Linking Triton data centers
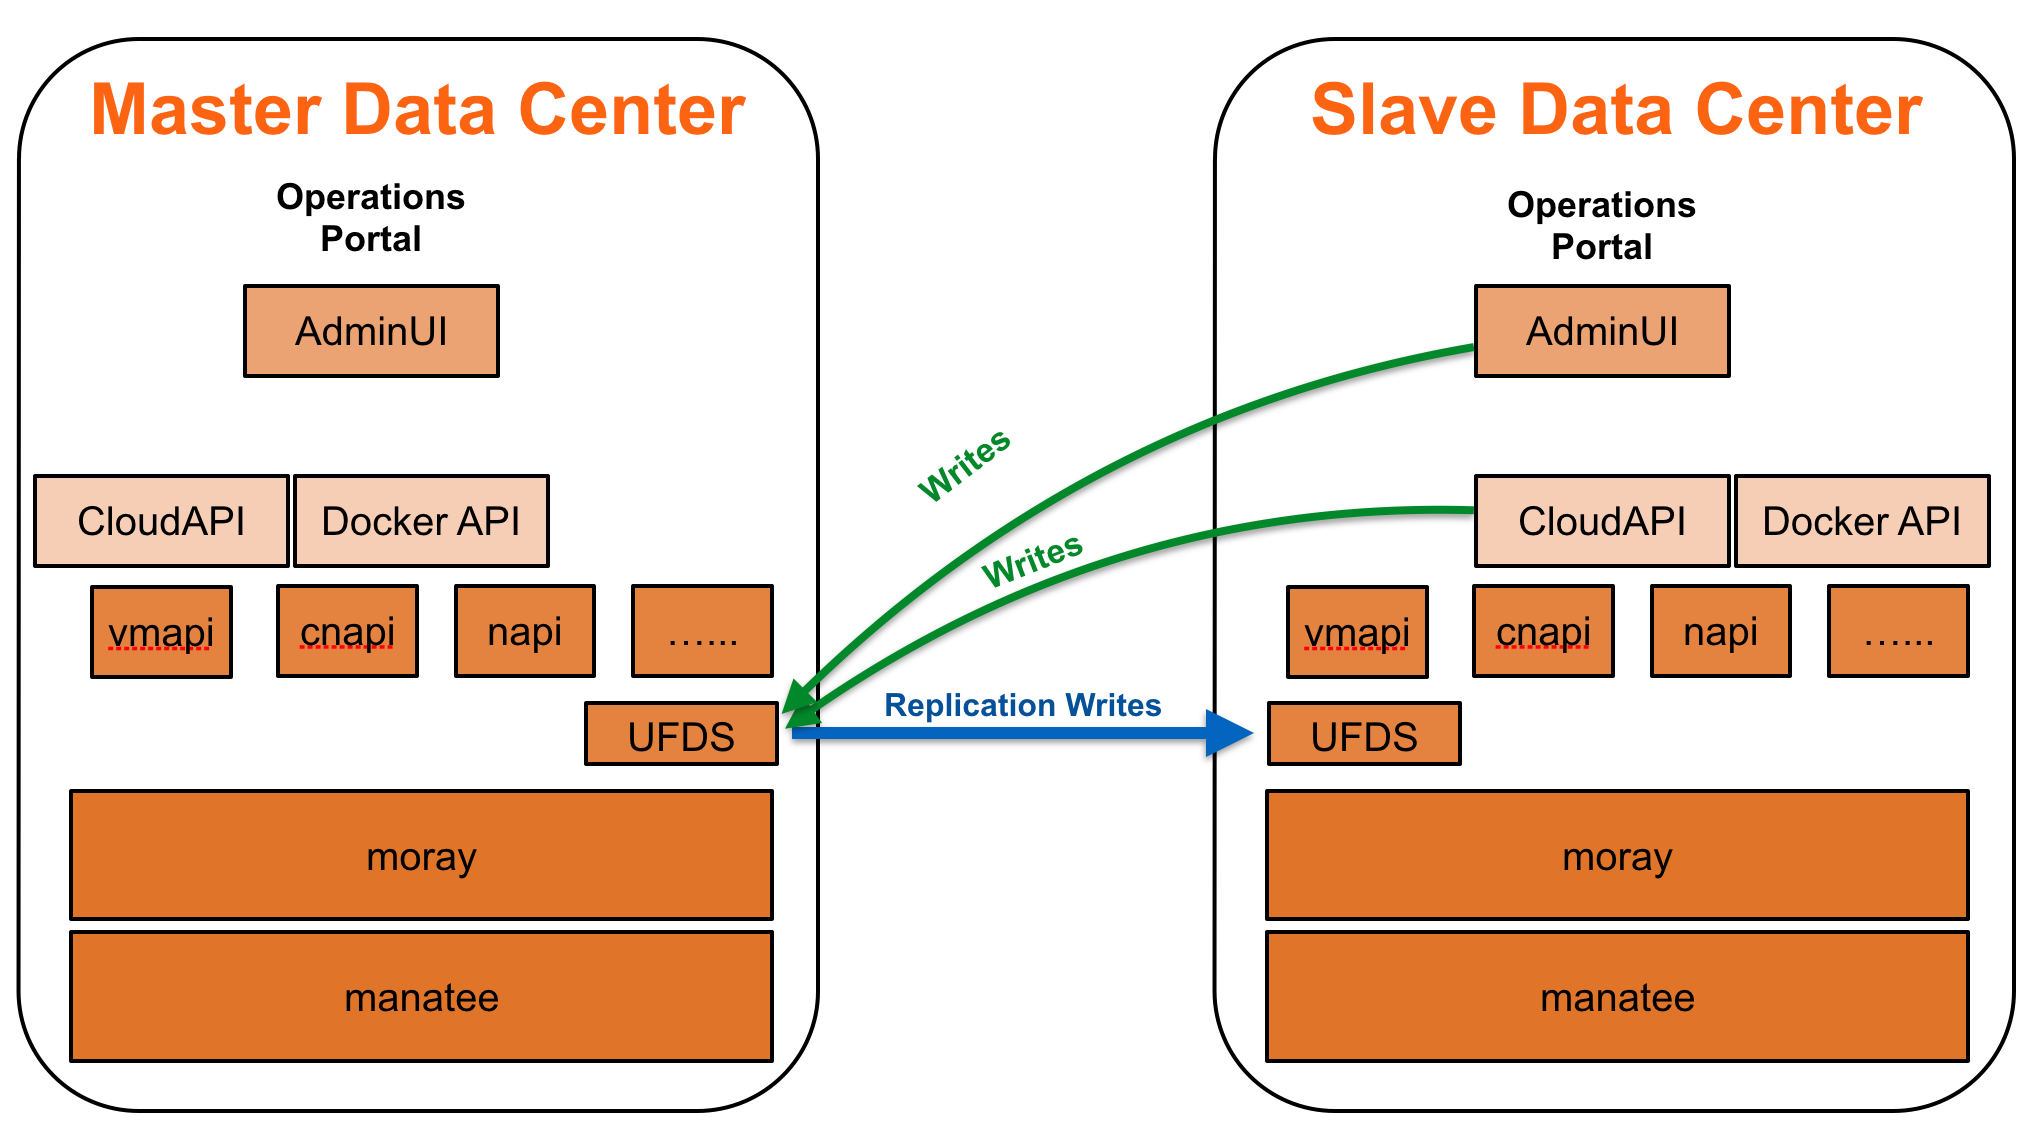
Triton authentication information, including Accounts, sub-users, roles and associated meta data can be shared between multiple Triton installations. This data is stored and managed via the UFDS interface. Replication can be established from one master (primary) UFDS to multiple slaves (replicas) ensuring that the following data is kept in sync.
This page reviews the steps necessary to to implement linked data centers.
Linked data center basics
Data centers are linked in a master/slave relationship, where one data center is designated as the master and is connected to one or many slave databases. Replication is uni-directional from master to slave data centers.
Preparation
Triton uses replication at the UFDS level to keep the customer data in sync. Accordingly the UFDS zones in both DC's must have a bi-directional route between them. This can be via the external VLAN or admin VLAN that are routable to each other. As such, it should be reviewed and secured appropriately via firewall rules, external firewalling, or other security measures.
This process will wipe all UFDS data in the DC that is to become the slave. Because of this, the slave must be a newly installed data center with no users (other than the admin user) setup.
Check Triton component versions
This process should be performed between two data centers running the same version of Triton. If you are attempting to join two data centers that are not on the same version of Triton, please contact MNX support prior to running this procedure.
Security concerns
It is recommended that you understand the security implications of joining your data centers prior to performing this procedure. The contents of the UFDS on the slave data center will be completely overwritten by the master data center. This includes users, roles, sub-users, password policies, etc. Additionally, you will want to ensure that you have secured the link between the master and slave UFDS core services.
Adding a VNIC to the UFDS core service
Prior to linking data centers, the UFDS zones on both the master and the slave(s) need to have a route between them. This can be tested by attempting to ping the Slave UFDS zone from the Master UFDS zone (or the converse). You will need to add a VNIC on one or both UFDS zones to enable communication.
Test ping
On the slave installation, log into the UFDS zone and validate that you can ping to the UFDS zone in the master data center.
headnode# sdc-login ufds
headnode-ufds# ping <IP of Master UFDS Zone>
Then repeat the test on the master installation, by logging into the UFDS zone and validating that you can ping the UFDS zone in the slave data center.
headnode# sdc-login ufds
headnode-ufds# ping <IP of Slave UFDS Zone>
Add slave data center SSH key
You will need to add the public SSH key for the ufds zone from the slave data center to the master data center admin user. This is because the sdc-healthcheck process uses this ssh key for its CloudAPI tests.
Note: This needs to be done after the linking of the master and slave data centers.
Grab the key you will need from the ufds slave (the following can be run from the slave data center's head node):
cat /zones/$(sdc-vmname cloudapi)/root/root/.ssh/sdc.id_rsa.pubThis value can then be added to the admin account on the master data center, either through the Operations Portal, or via the command line using the sdc-useradm command on the slave data center's head node as shown below after the data center's have been linked.
headnode# sdc-useradm add-key admin /zones/$(sdc-vmname cloudapi)/root/root/.ssh/sdc.id_rsa.pubSetup
This process converts the Slave Installation to become the UFDS slave of the master data center. This will wipe all UFDS data in the DC that is to become the slave. Because of this, the slave must be a newly installed data center with no users (other than the admin user) setup. If this is done in an installation with active users, it will leave orphaned objects (such as instances with invalid owners).
The sdc-ufds-m2s script
This script is run in the installation that is to become the slave data center to the master. The script is run from the head node global zone, and needs to be run by the root user (or a user with root-equivalent permissions).
When run, the script will first check to make sure that there is an external VLAN associated with the local UFDS zone, and will fail if this does not exist. Following this check, you will be prompted for the IP address of the master UFDS server. Once it has established a connection to the master UFDS server, the script will proceed to remove the local UFDS data and replace it with replicated data from the master installation.
Sample output is shown below.
headnode# sdc-ufds-m2s
    ---------------------------------------------------------------
Warning:
This command will delete all existing UFDS data and reconfigure
UFDS as a slave.

Ensure that the SAPI zone is up-to-date before proceeding.
    ---------------------------------------------------------------
Enter 'y' to continue: y
UFDS master IP address: 192.168.212.212
Deleting local UFDS data
ldap_delete: No such object (32)
        matched DN: o=smartdc
        additional info: region=TestRegion, o=smartdc
Setting up UFDS replicator
Waiting for SAPI to update the replicator configuration...
There are 109 changelog entries to be replicated
Waiting for the admin user to be replicated (0%)...
Re-loading local amon probe data
adding new entry "amonprobegroup=92514e2f-6548-6a9c-f0d5-c4f8473a637e, uuid=930896af-bf8c-48d4-885c-6573a94b1853, ou=users, o=smartdc"
      <----- SNIP ----->
adding new entry "amonprobegroup=020682f6-a621-6dbb-a470-a895a976e65e, uuid=930896af-bf8c-48d4-885c-6573a94b1853, ou=users, o=smartdc"

Downloading SAPI metadata to /var/tmp/metadata.json
Verifying local ufds at 127.0.0.1
Verifying remote ufds at 192.168.212.212
Datacenter information not found in ufds.  Need to load data...
Reconciling local data
ldap_add: Already exists (68)
        matched DN: o=smartdc
        additional info: ou=users, o=smartdc
      <----- SNIP ----->
ldap_add: Already exists (68)
        matched DN: o=smartdc
        additional info: cn=operators, ou=groups, o=smartdc
Reconciling (possible) remote data
ldap_add: Already exists (68)
        matched DN: o=smartdc
        additional info: region=TestRegion, o=smartdc
Done with reconciliation.
Updating config files
Done
How to check for the UFDS master
You can determine the UFDS master for an Triton installation by logging into the head node and running the following.
headnode# grep ufds_is_master /usbkey/config
ufds_is_master=true
If ufds_is_master shows as true then the installation you are in contains the master UFDS database. If it is set to false then your installation is a slave.