User management
Instructions on User Management within Triton via the Operations Portal interface, including the use of Users, Sub-Users, Roles, and Profiles to manage access. Covers the types of users, and how to find, modify, add, and disable users.
Instance access management
This page covers the administration of users within the context of Triton via the Operations Portal. For information on how to manage Triton users within the context of containers, please see Managing instance access.
Types of users
There are three types of users within Triton.
| Value | Description | Notes |
|---|---|---|
| Full Operator | Able to view and modify data in the Operations Portal | Warning! This permission allows unlimited read/write access to Triton via both the Operations Portal and through the APIs |
| Read-Only Operator | Able to view data in the Operations Portal | Warning! This permission allows unlimited read access to Triton via both the Operations Portal and through the APIs |
| None | User has no permissions within the Operations Portal | This should be standard for a normal user |
Additionally, Triton includes Sub-Users, which are subordinate users to a User account. These accounts cannot have operator permissions.
Users page in the Operations Portal
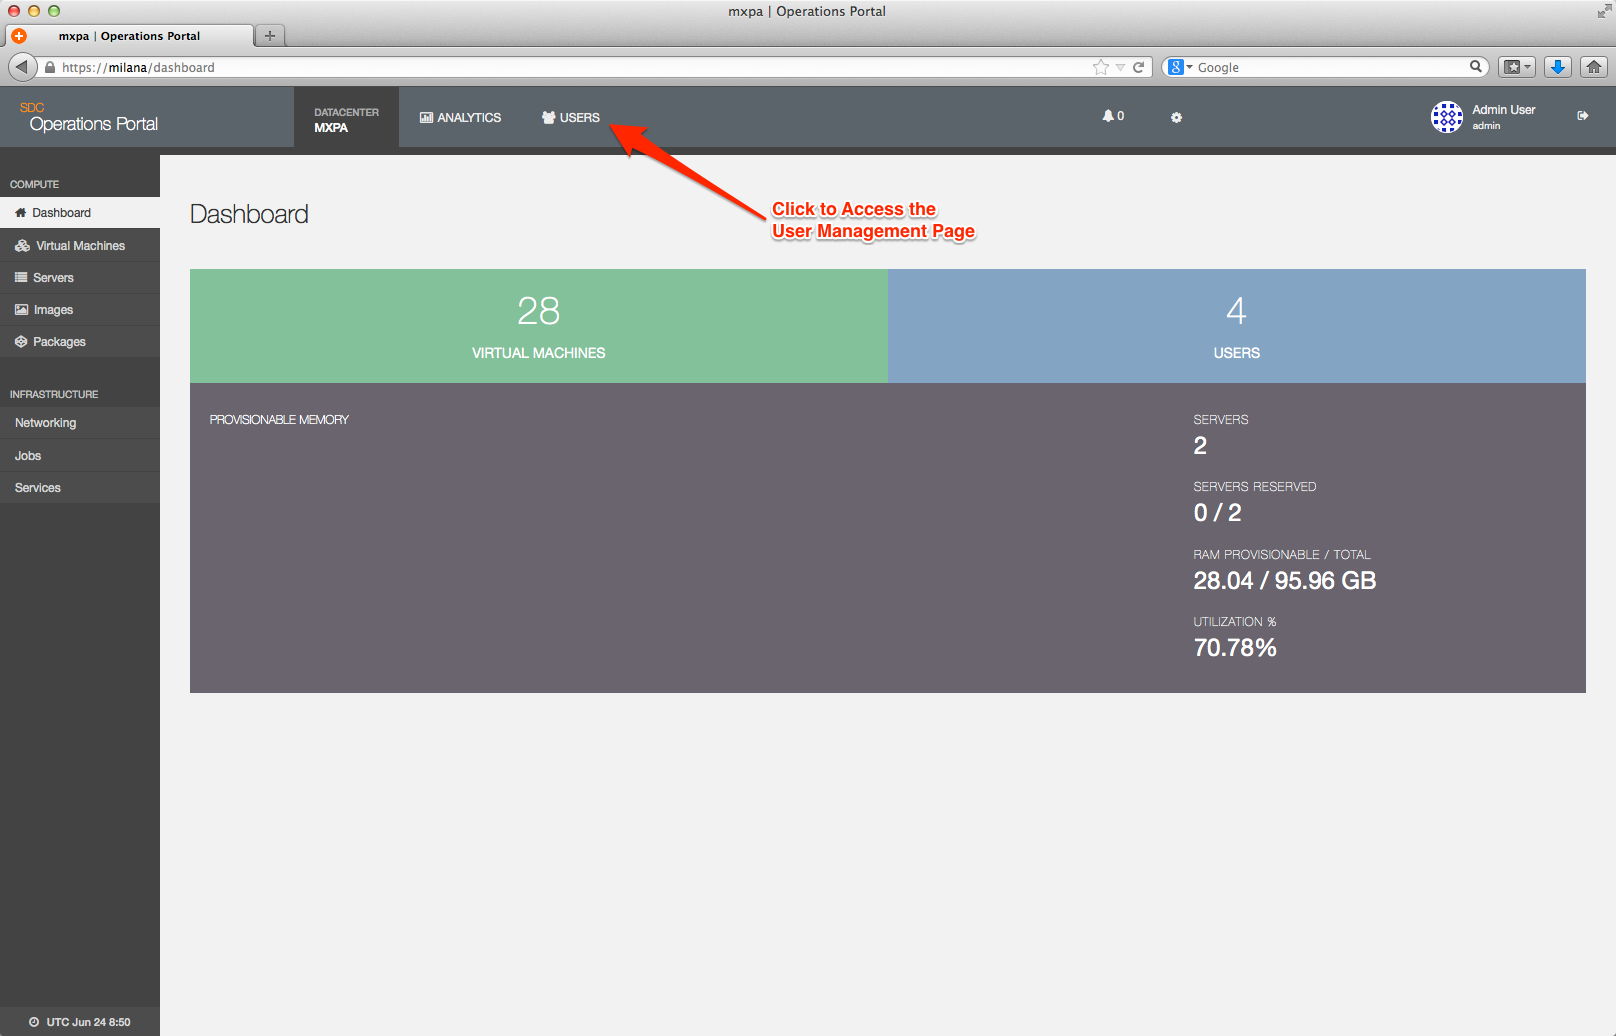
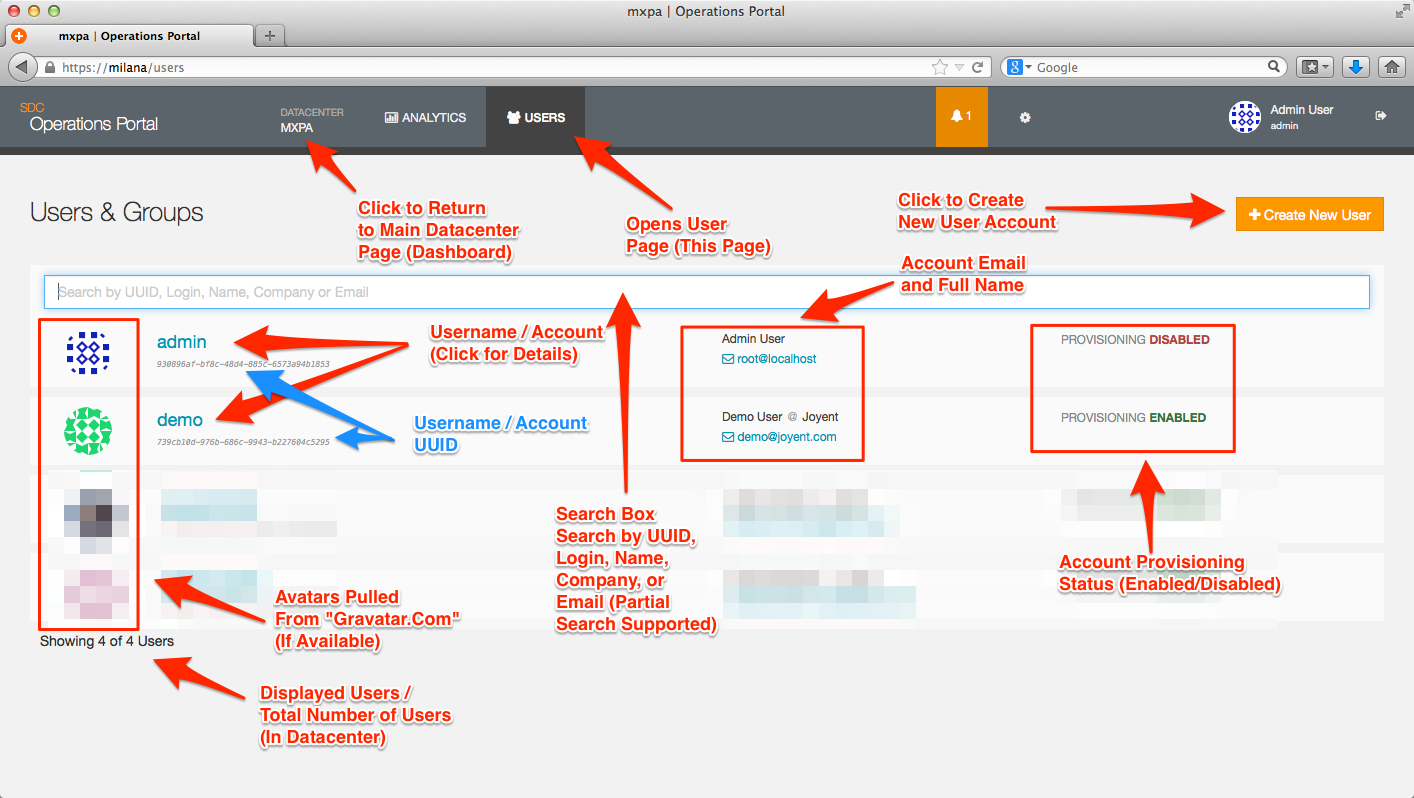
The User Overview page is the main interface for viewing, adding, and managing user information via the Operations Portal in Triton. This page is accessed by clicking on the Users text located on the top of the Operations Portal screen as shown below.
Searching for users
The User Overview page provides you with the ability to search for users by Login, UUID, Company Name, or Email Address. Partial search logic is supported. If Triton is able to match the user's email address against gravatar.com the user's chosen Gravatar will be displayed. If not, a generic avatar will be chosen from those provided by Triton.
Notes:
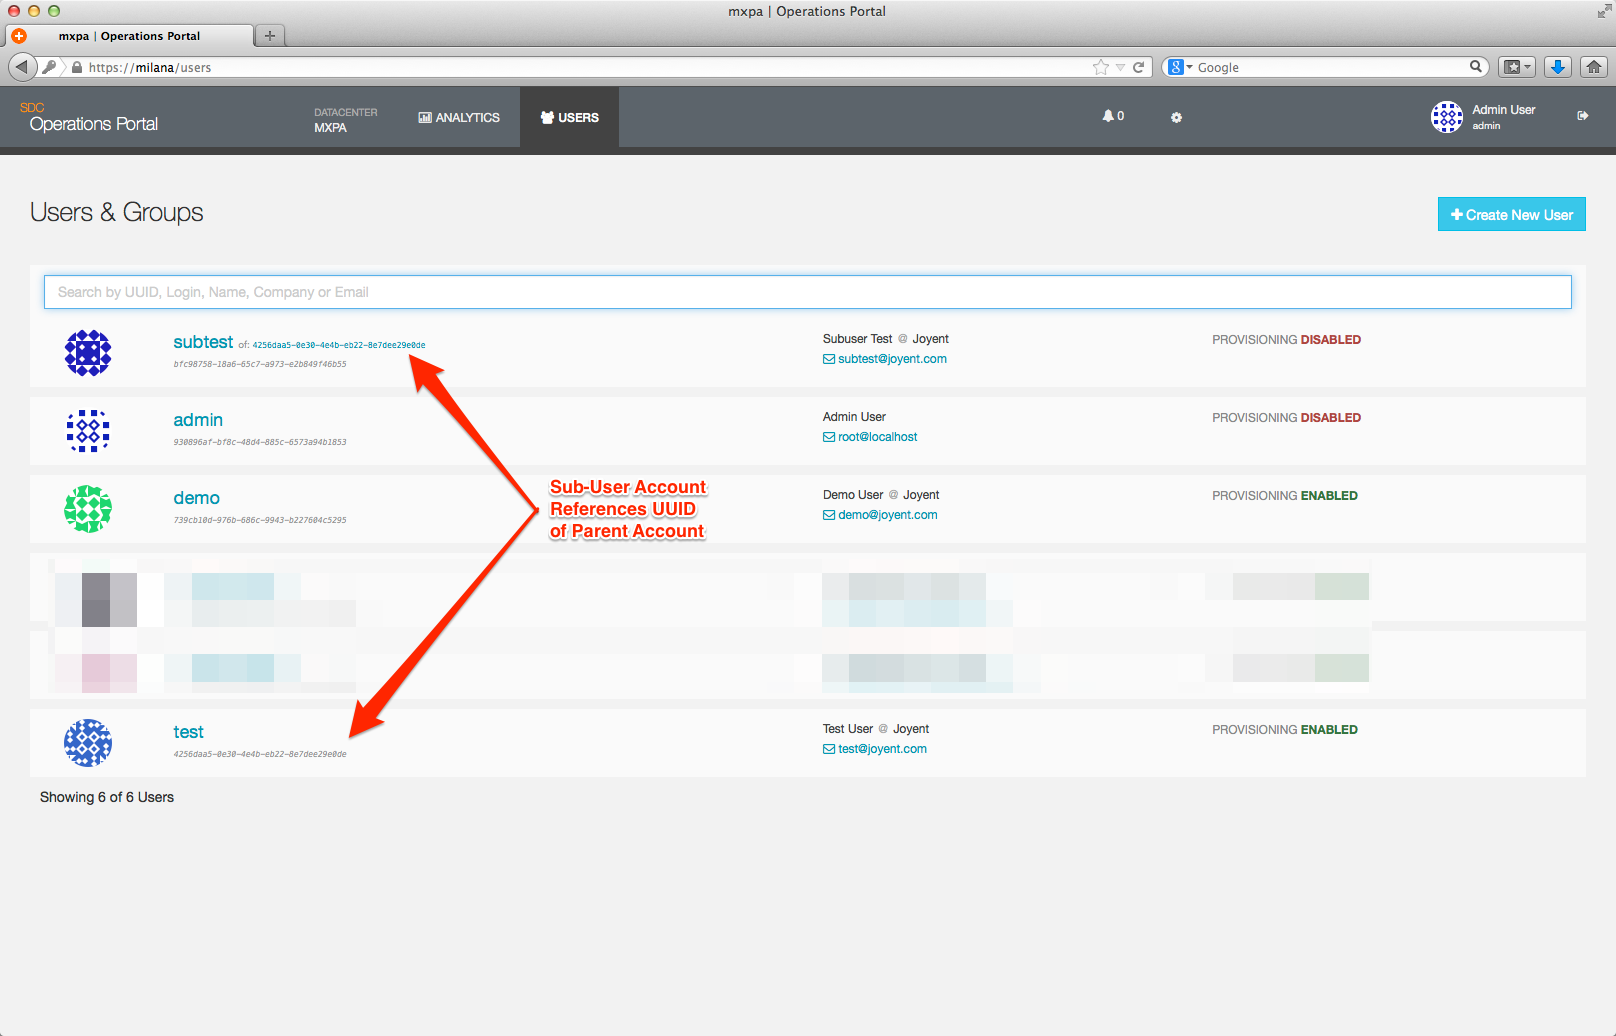
- Both User accounts and Sub-User accounts will be displayed in the User Overview page. Sub-User accounts will contain a link back to the User account to which they belong.
- Sub-User accounts cannot own Triton objects, such as networks, images, and instances. They can only access these objects on behalf of the User account to which they belong.
Viewing / modifying user details
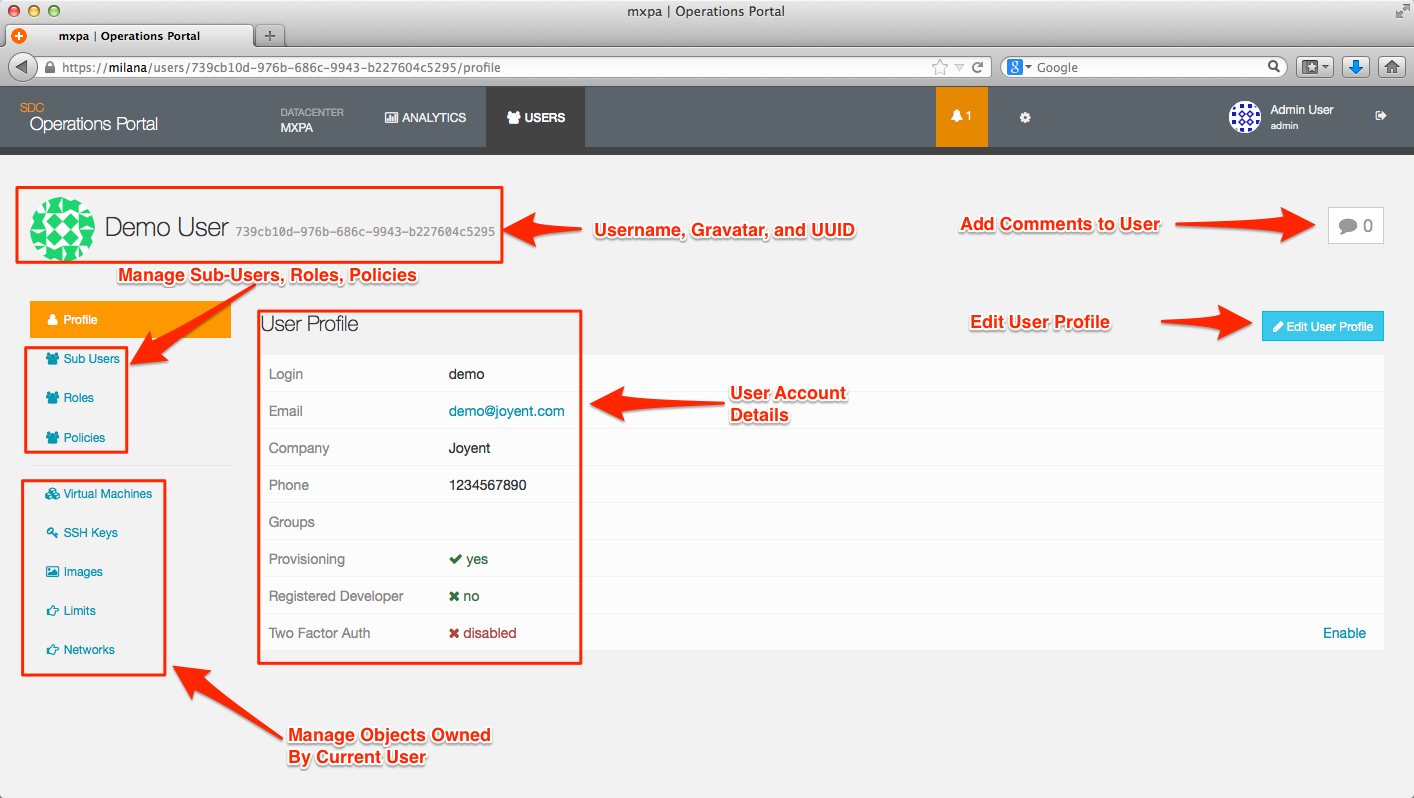
Clicking on the name of a User account will bring up a page with detailed information on the account and provides you the ability to:
- Modify account details, such as names and email addresses.
- Add, modify, or remove provisioning limits.
- Add or delete an SSH key from the account.
- View images owned by the account.
- View instances owned by the user.
- View networks owned by the user.
- Manage roles, policies, and sub-users owned by the account.
Clicking on the name of a Sub-User account will allow you to:
- Modify account details, such as names and email addresses.
- Add or delete an SSH key from the account.
User SSH keys
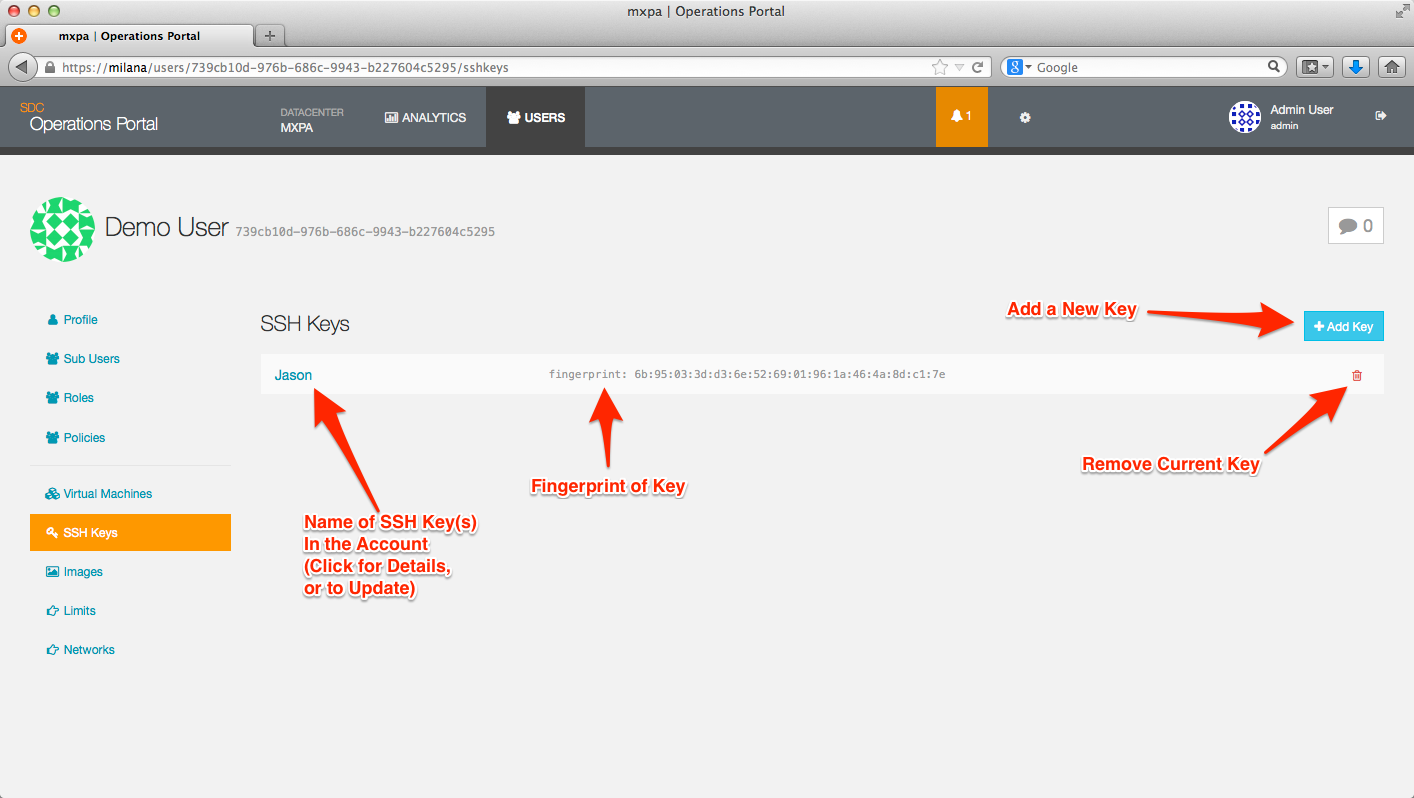
Each account (User or Sub-User should have one or more SSH keys added. Although it is possible to provision instances in accounts that do not have SSH keys, it will make it difficult to access those instances.
You can view the SSH keys that are currently associated with an account by clicking on the SSH Keys tag on the User Detail page.
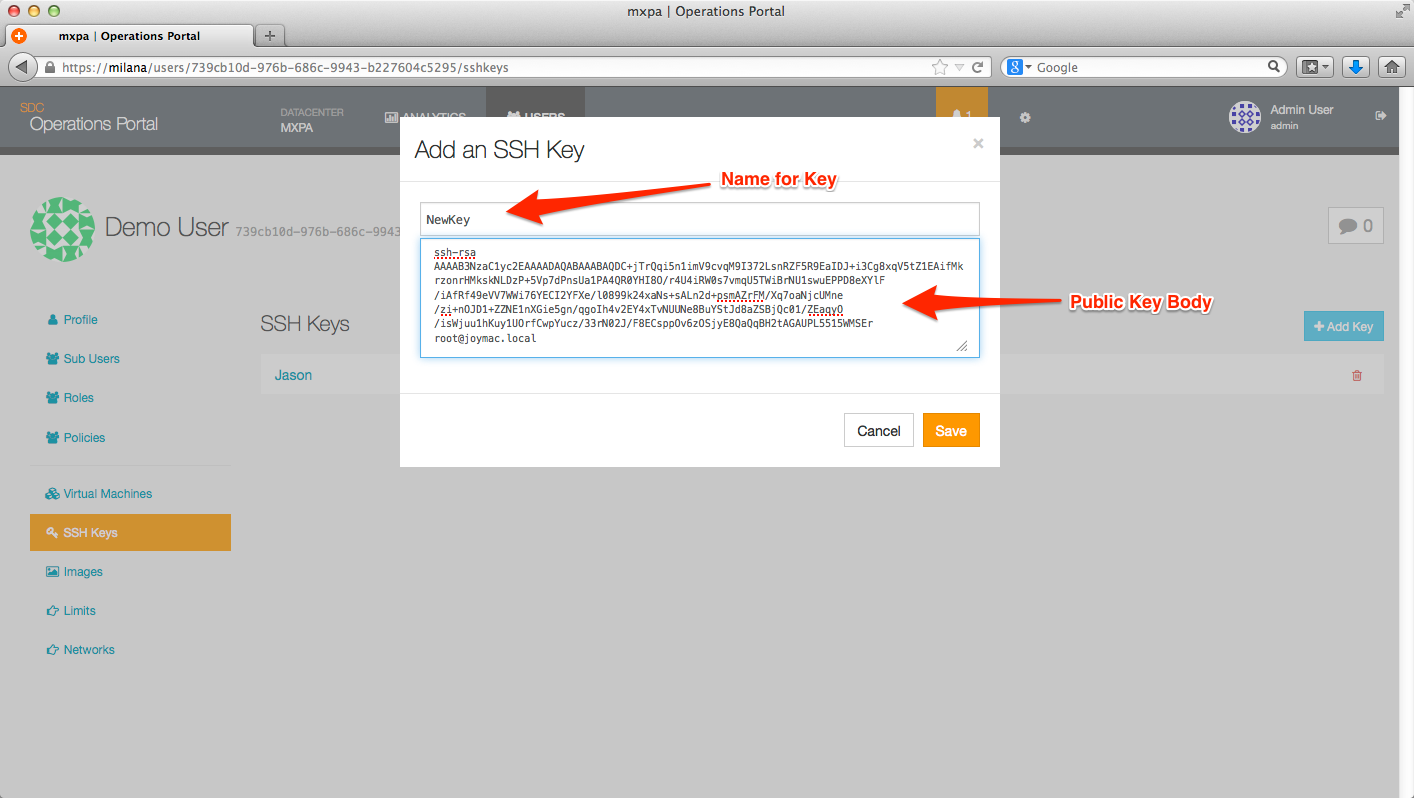
Adding an SSH key is accomplished by going to the User Detail page and clicking on the Add SSH Key button. The SSH Key Name is a user defined field that should contain a description of the key which is added in the SSH Public Key field.
Clicking on the Virtual Machines tag will show you all instances owned by the User account.
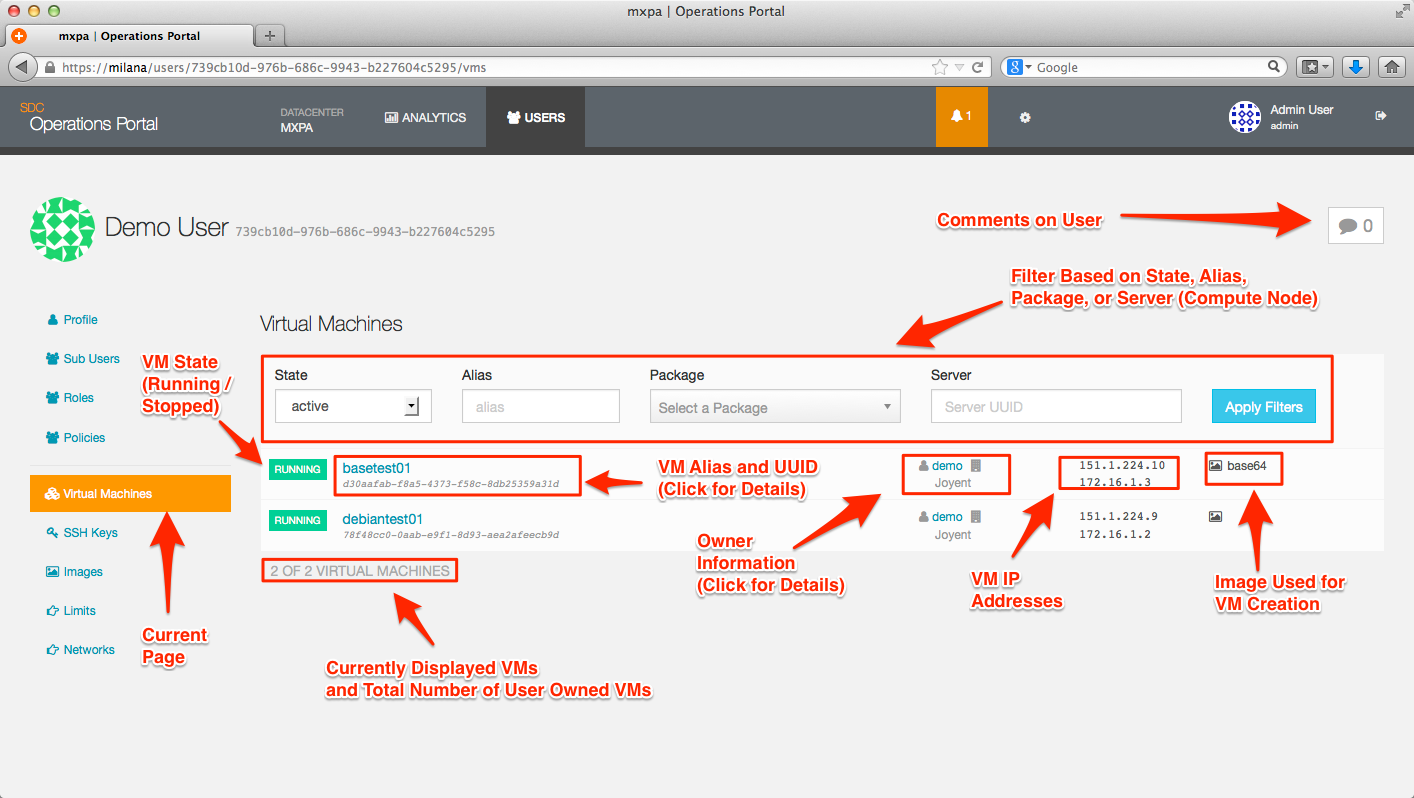
Note that most items displayed on this page (and all other pages in the Operations Portal) are represented by active links; for example, you can click on an instance on the user page and it will take you to the Virtual Machine Detail page. Also, please be aware that the currently active page will be highlighted.
Adding a user
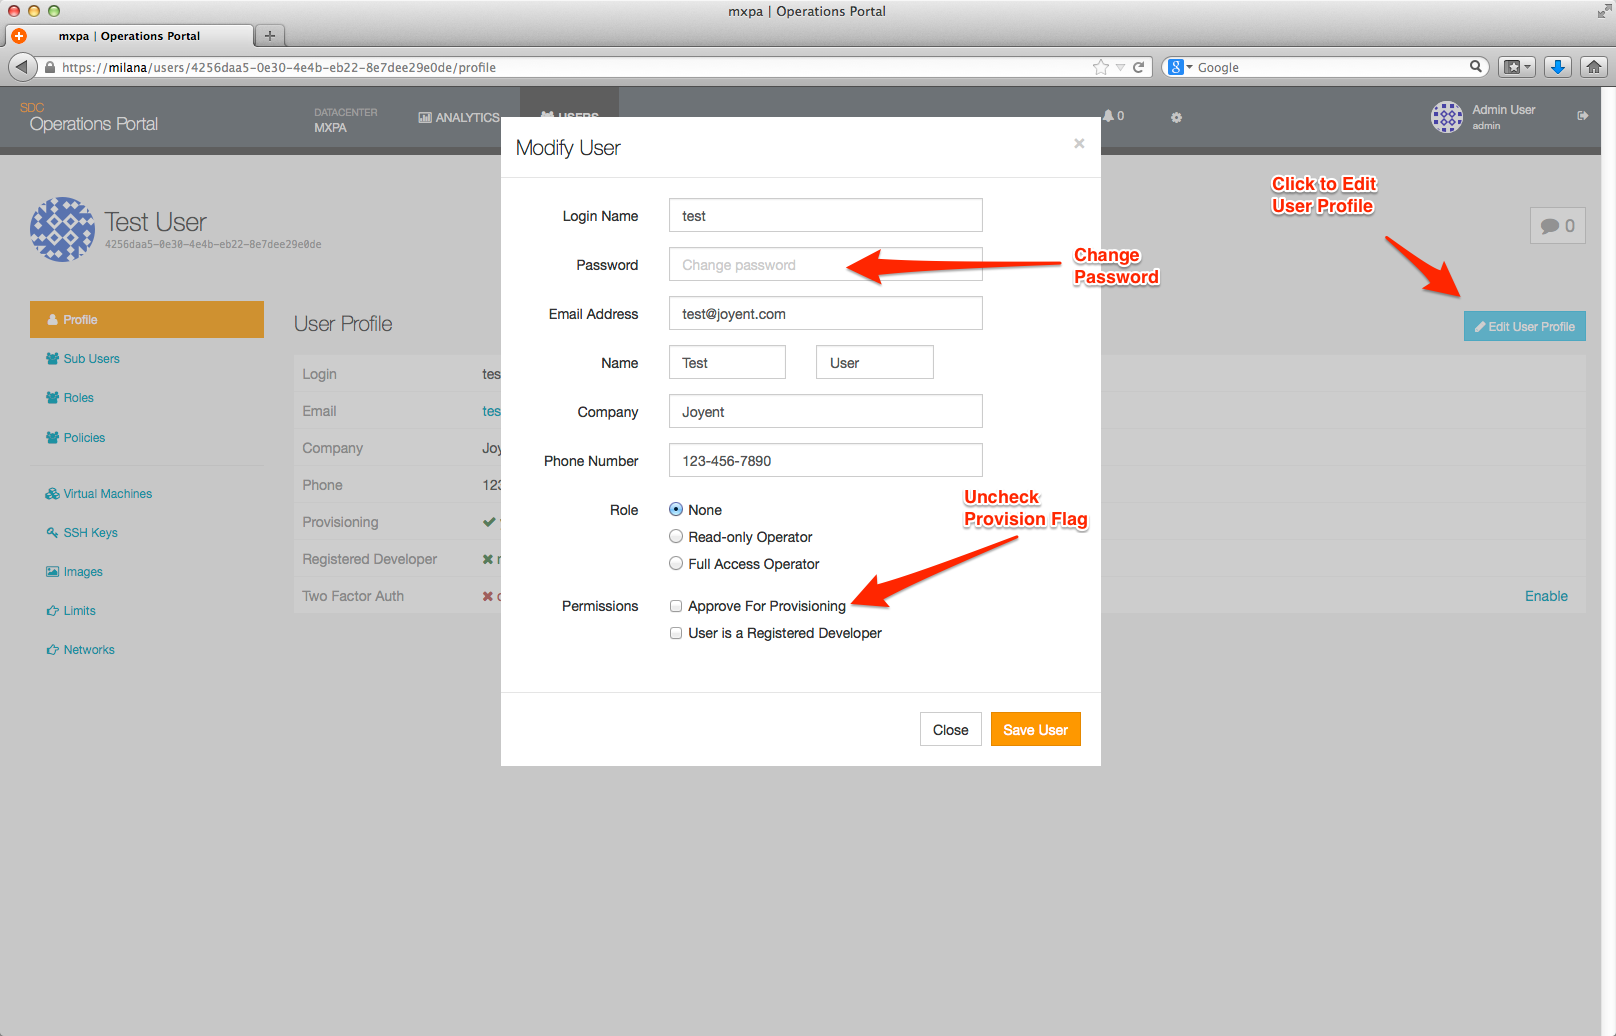
From the User Overview page you can click on the + Create New User button to bring up the following dialog box; this is the same process that is used to create both normal users (ie, non-privledged users) and administrative users or operators. The level of access provided to an account is controlled by the checkboxes on this page.
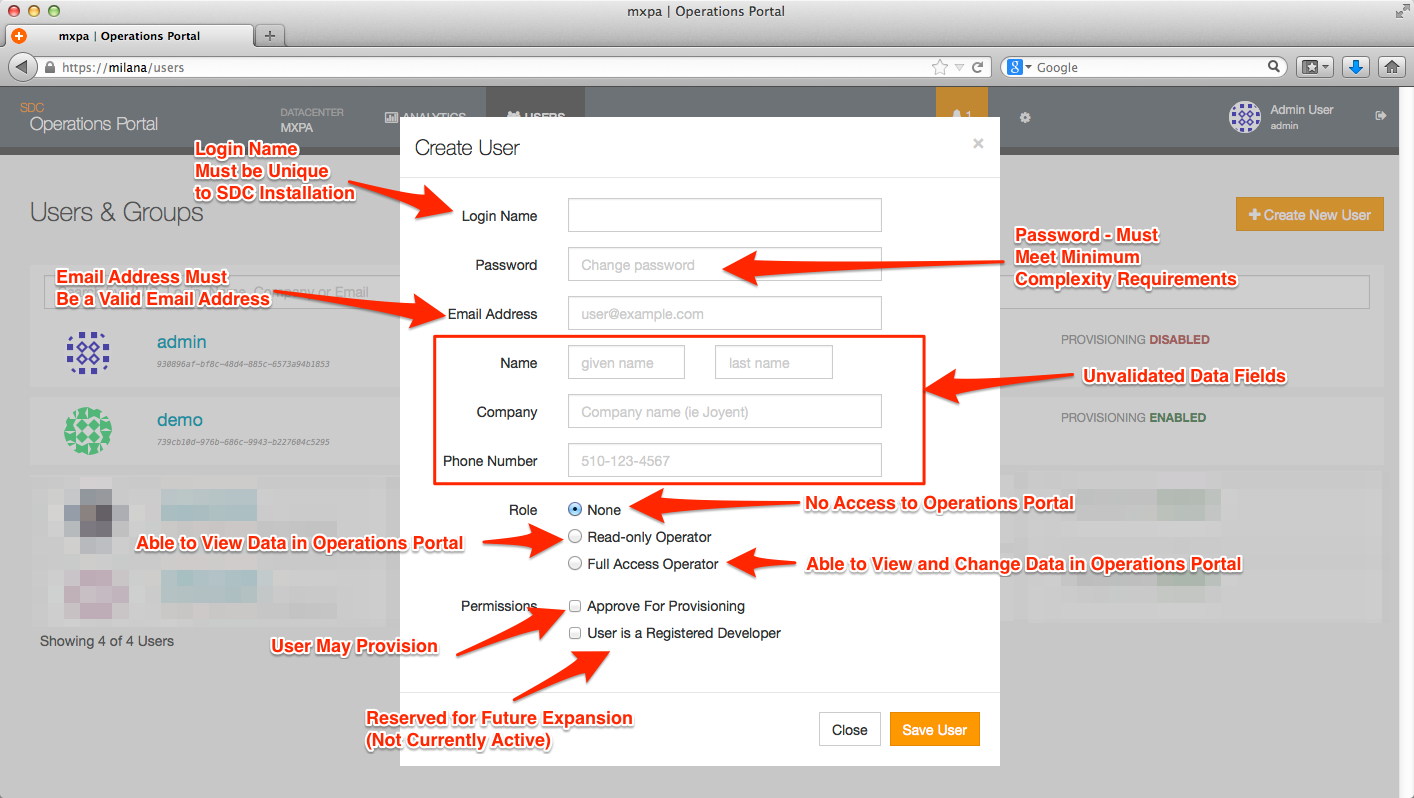
The data entered into the fields of the Operations Portal are stored in UFDS, the data store used by Triton. The key fields for users are divided into two sets:
- General user information
| Value | Description | Notes |
|---|---|---|
| Login Name | Name used to log into Triton; identifies a user | Must be unique |
| Password | Used to authenticate to Triton | Minimum complexity enforced |
| Email Address | Email address for user | Must be valid address. Must be unique* |
| Given Name | Customer given name | Not validated by Triton |
| Last Name | Customer last or family name | Not validated by Triton |
| Company | Customer's company name | Not validated by Triton |
| Phone Number | Customer's phone number | Not validated by Triton |
* Users who require multiple accounts may utilize a "+something" email modification in Triton to allow for multiple username accounts. They will continue to receive emails to their correct email address in the case of a forgotten password for that account. For example, john.doe@acme.com may create additional user accounts and utilize john.doe+dev@acme.com, john.doe+test@acme.com, john.doe+app1@acme.com without losing the ability to initiate password recovery for their primary, active email address.
- Role and permission information
| Value | Description | Notes |
|---|---|---|
| Full Operator | Able to view and modify data in the Operations Portal | Warning! This permission allows unlimited read/write access to Triton via both the Operations Portal and through the APIs |
| Read-Only Operator | Able to view data in the Operations Portal | Warning! This permission allows unlimited read access to Triton via both the Operations Portal and through the APIs |
| None | User has no permissions within the Operations Portal | This should be standard for a normal user |
| Approve for Provisioning | User is able to provision instances This should be standard for normal users | |
| Registered Developer | Currently inactive; reserved for future use | Should be left unchecked |
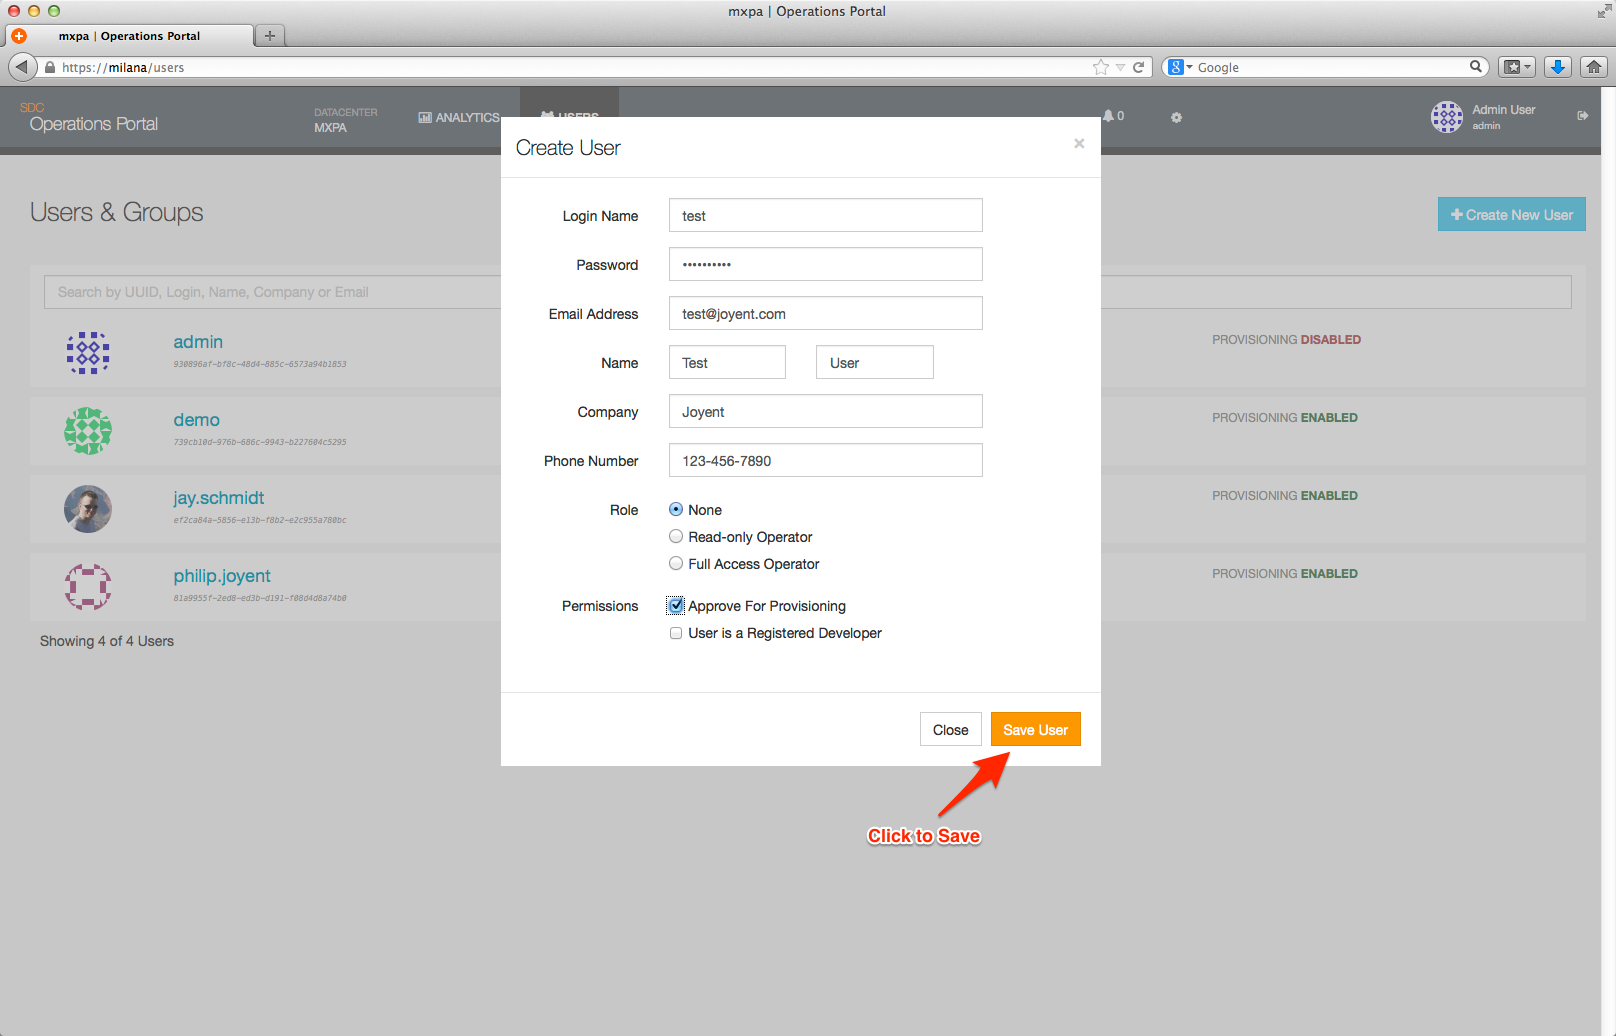
The Save User button can be used to save the data you have entered for the new user. In the event there are validation errors, the system will inform you via an onscreen message. If this happens, please correct the error and re-save the data.
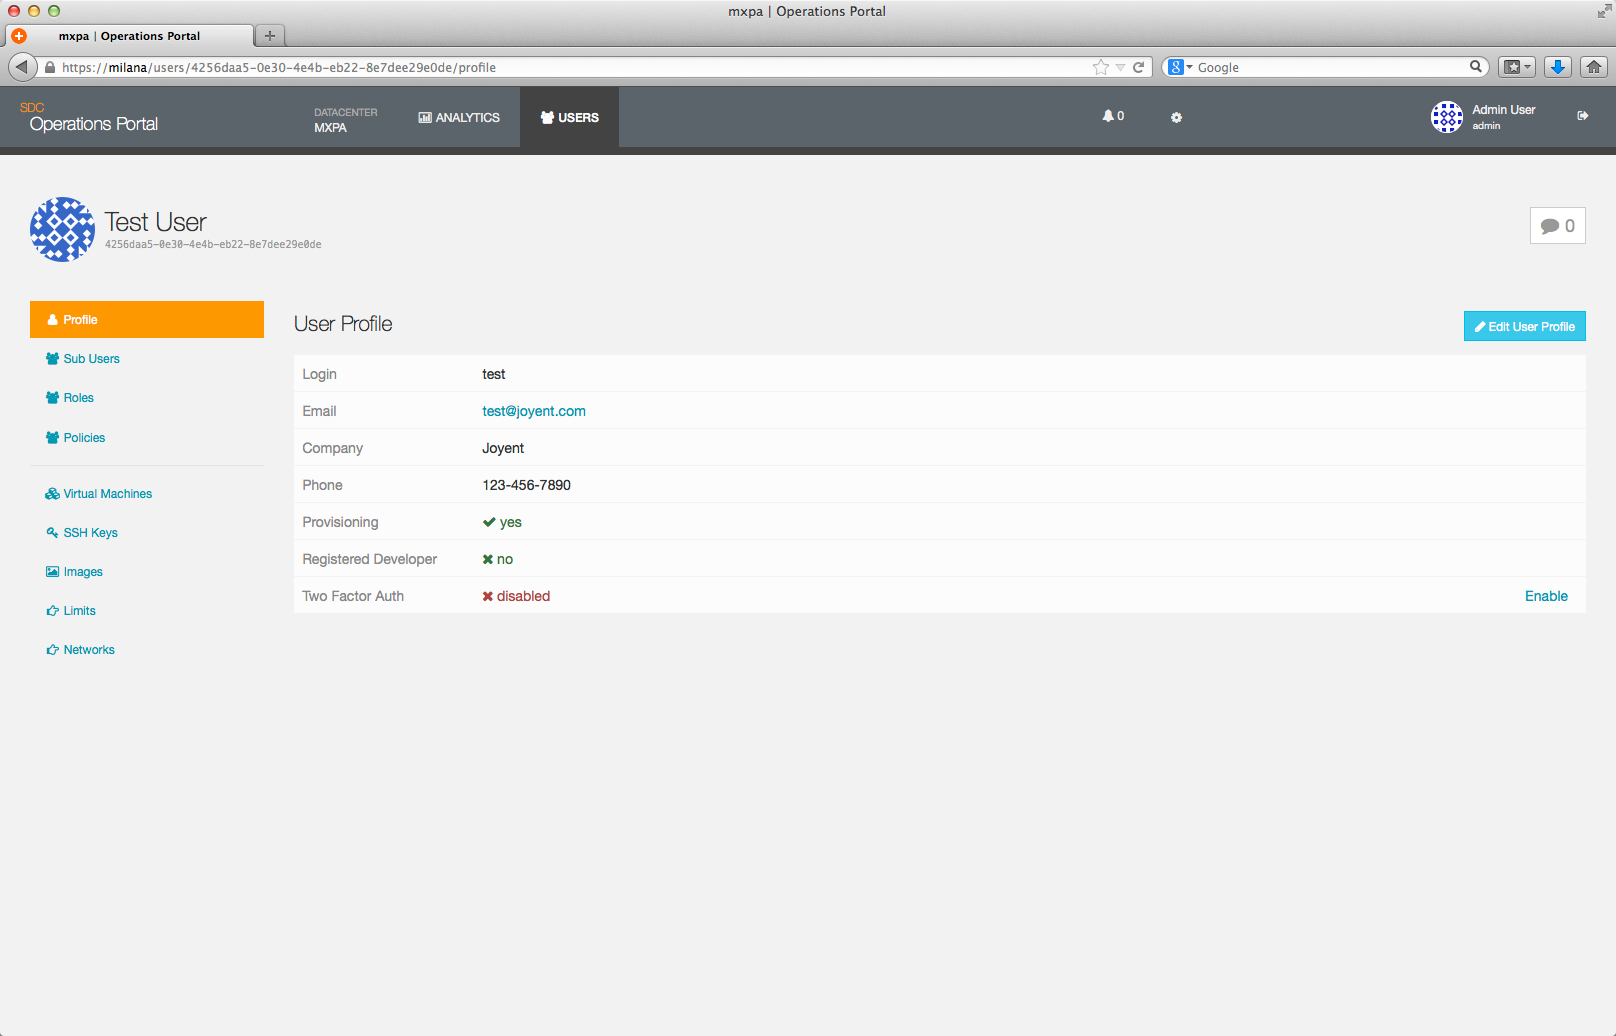
Once the user has been saved, you will be back at the User Detail page for the new user.
Disabling a user
User and Sub-User account records cannot be deleted. These records are retained as part of the usage metrics Triton generates to support any billing or accounting processes customers may choose to use with Triton. When a User or Sub-User account is no longer required it should be disabled as follows."
- Disable provisioning by unchecking the Provisioning Allowed checkbox. Note: This only applies to User accounts.
- Scramble the password.
- Change the login name to
.disabled. - Change the email address to
.disabled. - this step is necessary for configurations where your installation has a system in place that emails users credentials when they click a Forgot Password/Forgot Username function. - If a Sub-User account, remove the account from any roles they are members of.
Account lockout
Triton implements account-lockout policies. After pwdmaxfailure failed login attempts, an user account will be locked for pwdlockoutduration. The default configuration is for the account to lock for 30 minutes after 6 failed login attempts. The account can be unlocked in one of two ways - either by communicating with the LDAP server directly or by using the Operations Portal.
Setting lockout parameters
These parameters are set in the pwdpolicy ldap object, which can be viewed by running the following command:
# sdc-ldap search objectclass=pwdpolicy
dn: cn=pwdpolicy, o=smartdc
objectclass: pwdpolicy
pwdattribute: userpassword
pwdcheckquality: function checkPassword(pwd, cb) {if (!/[a-zA-Z]+/.test(pwd) || !/[0-9]+/.test(pwd)) {return cb('insufficientPasswordQuality');} else {return cb(null);}}
pwdinhistory: 4
pwdlockoutduration: 1800
pwdmaxage: 253404889200000
pwdmaxfailure: 6
pwdminlength: 7
To adjust these values, you need to create an ldif file with your changed values and import them back into UFDS.
For example, to change the value for pwdmaxfailure from 6 to 9 you would create a file called failurecount.ldif with the following contents:
dn: cn=pwdpolicy, o=smartdc
changetype: modify
replace: pwdmaxfailure
pwdmaxfailure: 9
Then you would run the command:
# sdc-ldap modify -f pwdmaxfailure.ldif
modifying entry "cn=pwdpolicy, o=smartdc"
Then you can verify your change to the policy:
# sdc-ldap search objectclass=pwdpolicy
dn: cn=pwdpolicy, o=smartdc
objectclass: pwdpolicy
pwdattribute: userpassword
pwdcheckquality: function checkPassword(pwd, cb) {if (!/[a-zA-Z]+/.test(pwd) || !/[0-9]+/.test(pwd)) {return cb('insufficientPasswordQuality');} else {return cb(null);}}
pwdinhistory: 4
pwdlockoutduration: 1800
pwdmaxage: 253404889200000
pwdmaxfailure: 9
pwdminlength: 7
Important notes:
- Both
pwdlockoutdurationandpwdmaxagevalues are in milliseconds. - The value specified for
pwdlockoutdurationis the number of milliseconds a lockout will persist. - The value specified for
pwdmaxageis the time a given password is valid without locking the account. By default, this is intentionally set to a very high value to prevent it from taking effect.
Unlocking an account from the Operations Portal
It is also possible to unlock a user account from the Operations Portal. To do this, you will need to log into the Operations Portal as a user with full operator permissions, and then navigate to the detail page for the user.
Once there, you will see output similar to below:
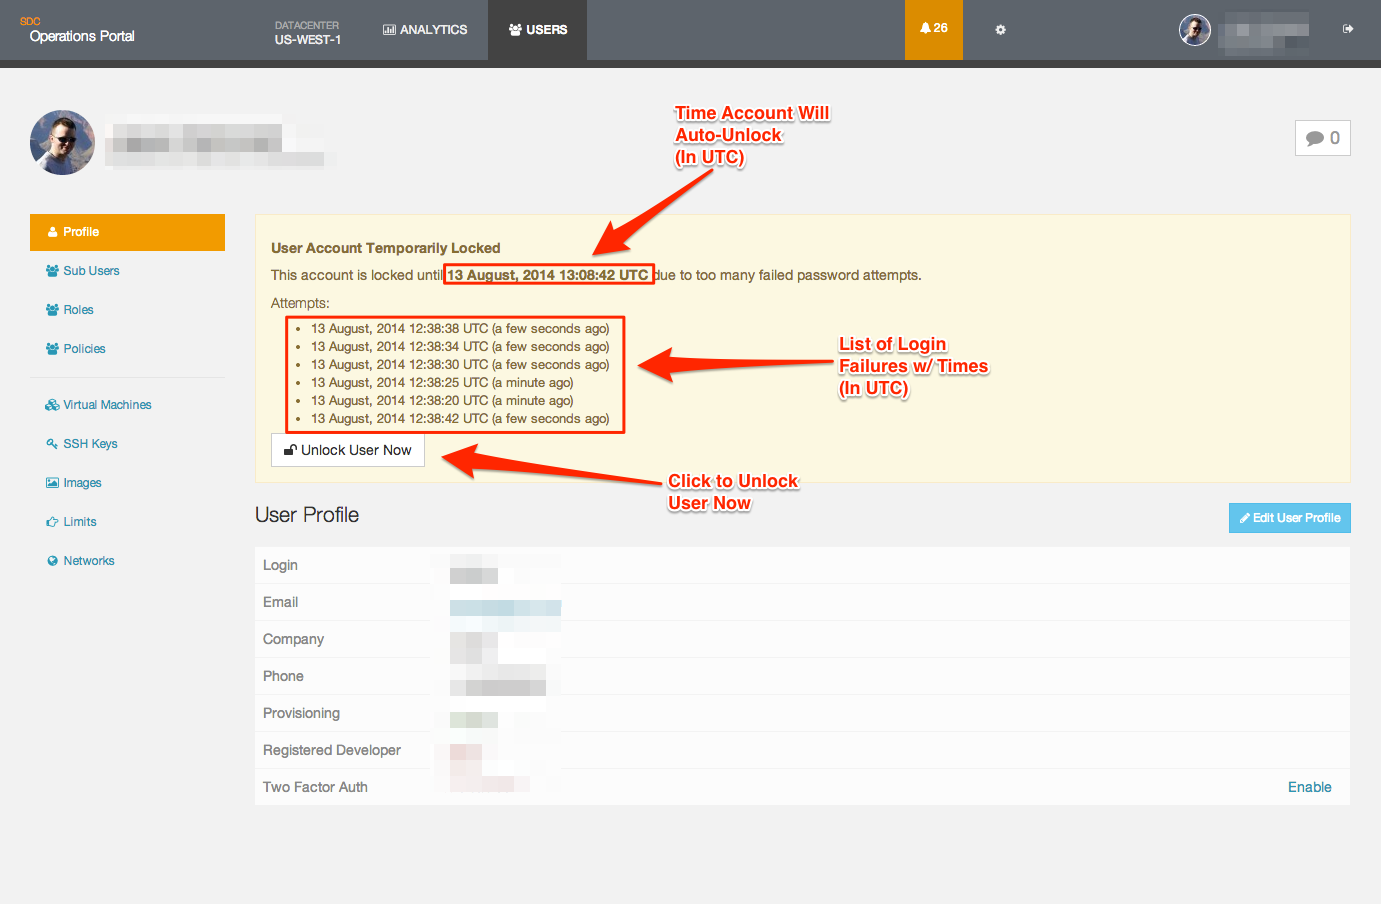
To unlock the user account, you just need to click on the Unlock User Now button, which will clear the pwdaccountlockedtime attribute. Alternatively, you can wait until the time specified on this page after which the account will become unlocked automatically.
Role based access control
Triton provides for Role based management of infrastructure. The Account Owner (User account) can create Sub-User accounts, who are assigned to Roles that will allow them to perform infrastructure administration tasks on behalf of the Account Owner. Through the definition of Policies allocated to Roles, Sub-Users can be enabled to perform such tasks as provision instances, manage firewall rules, etc.
While the behavior of the main account remains the same, including the SSH keys associated with it, it's now possible to have multiple accounts (Sub-Users) subordinate to the main account. Each of these Sub-Users should have a different set of SSH keys. Both the Sub-Users and their associated SSH keys have the same format as the main account object (and the keys associated with it).
Note: Role Based Access Controle (RBAC) requires CloudAPI 7.2.0 or higher.
Sub-users
To create a Sub-User, navigate to the User Detail page of the User who will be the parent of the Sub-User in the Operations Portal.
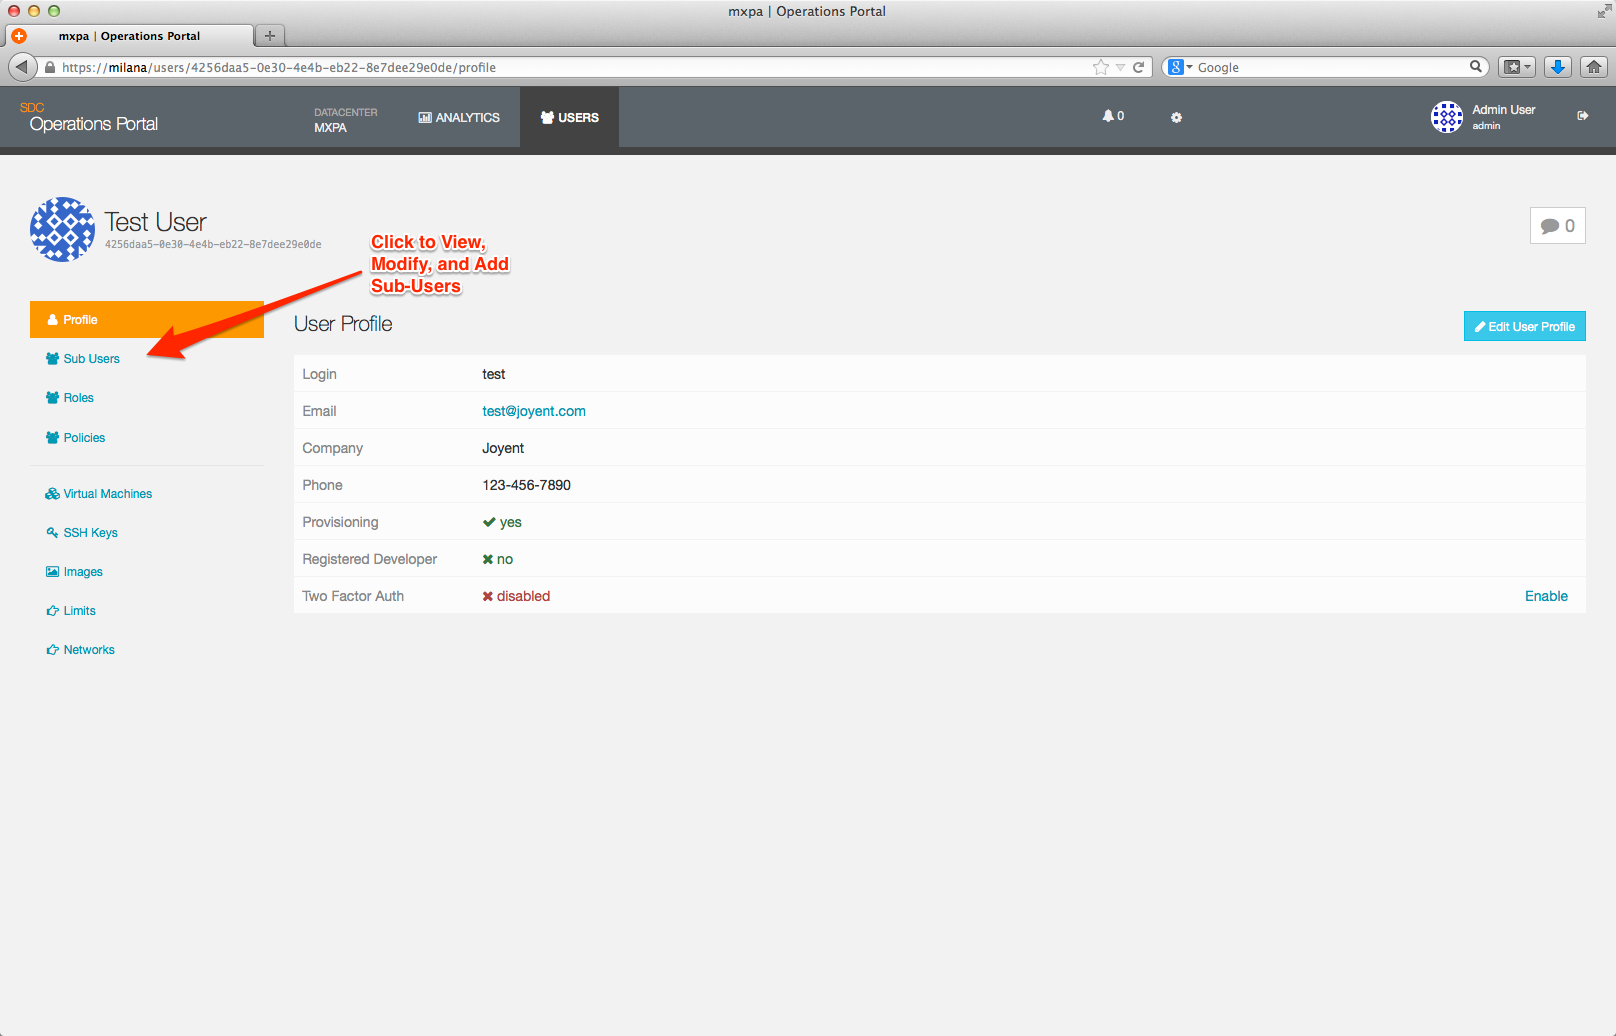
This will reveal the Sub-User Overview page, which lists out all current Sub-User accounts associated with this User account, and allows you to add, modify, or delete Sub-User accounts.
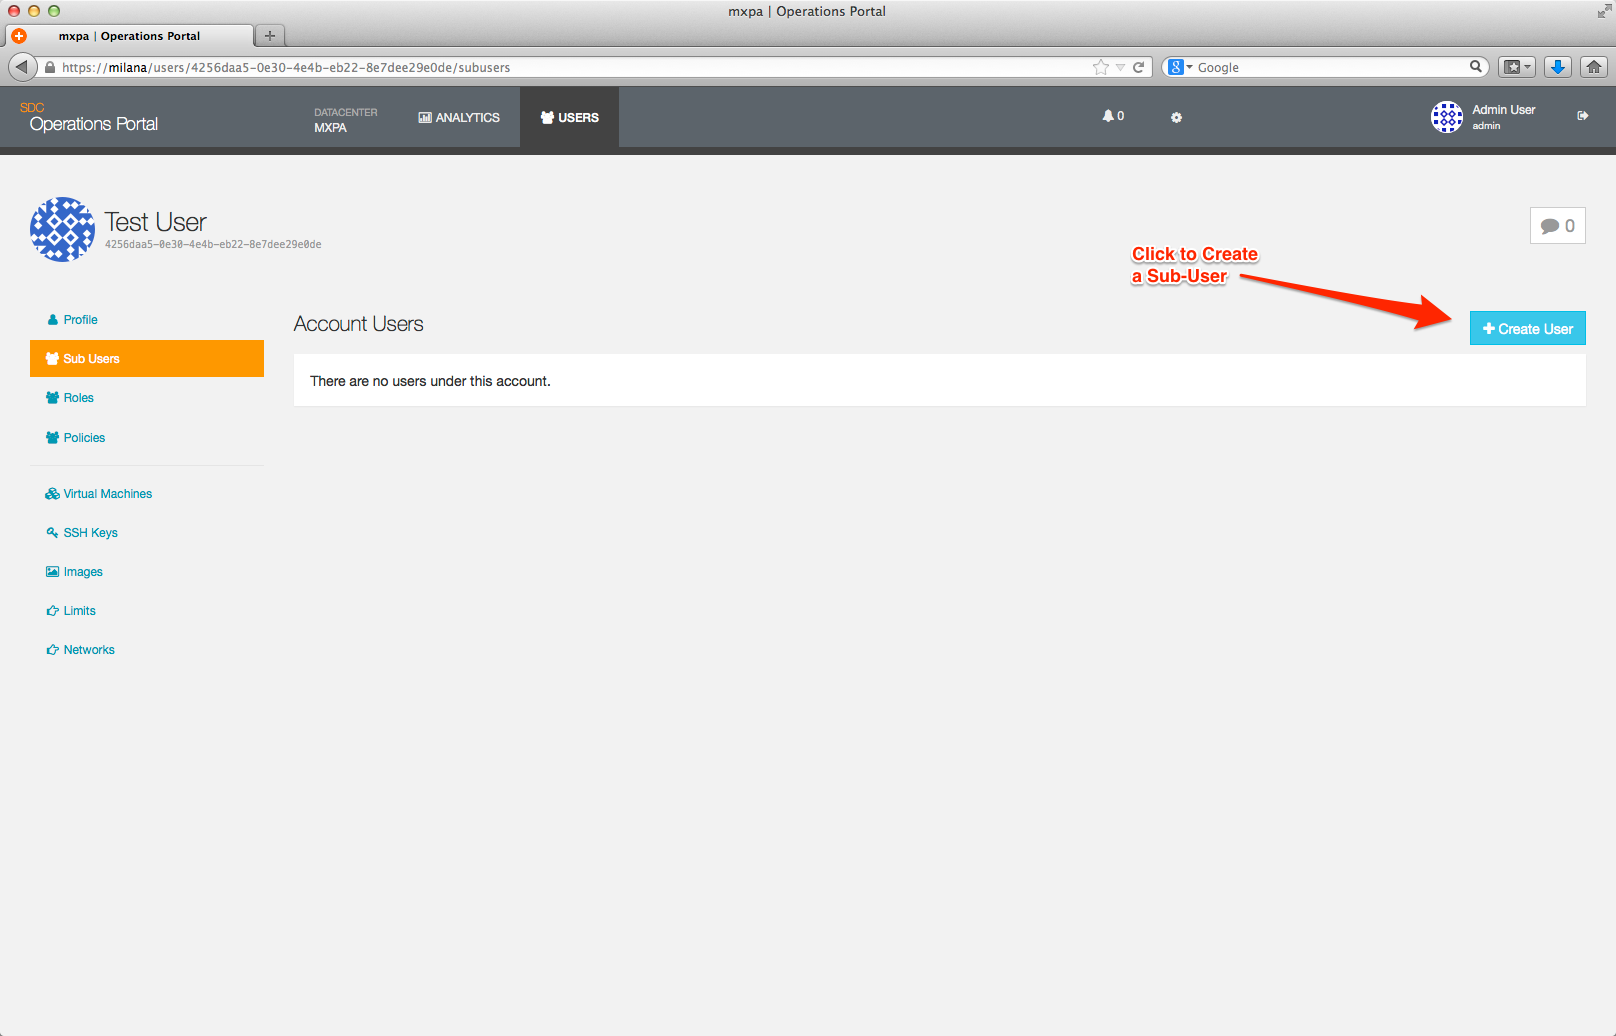
To add a Sub-User account, click on the +Create User button. The following image summarizes the values for each data field on the screen.
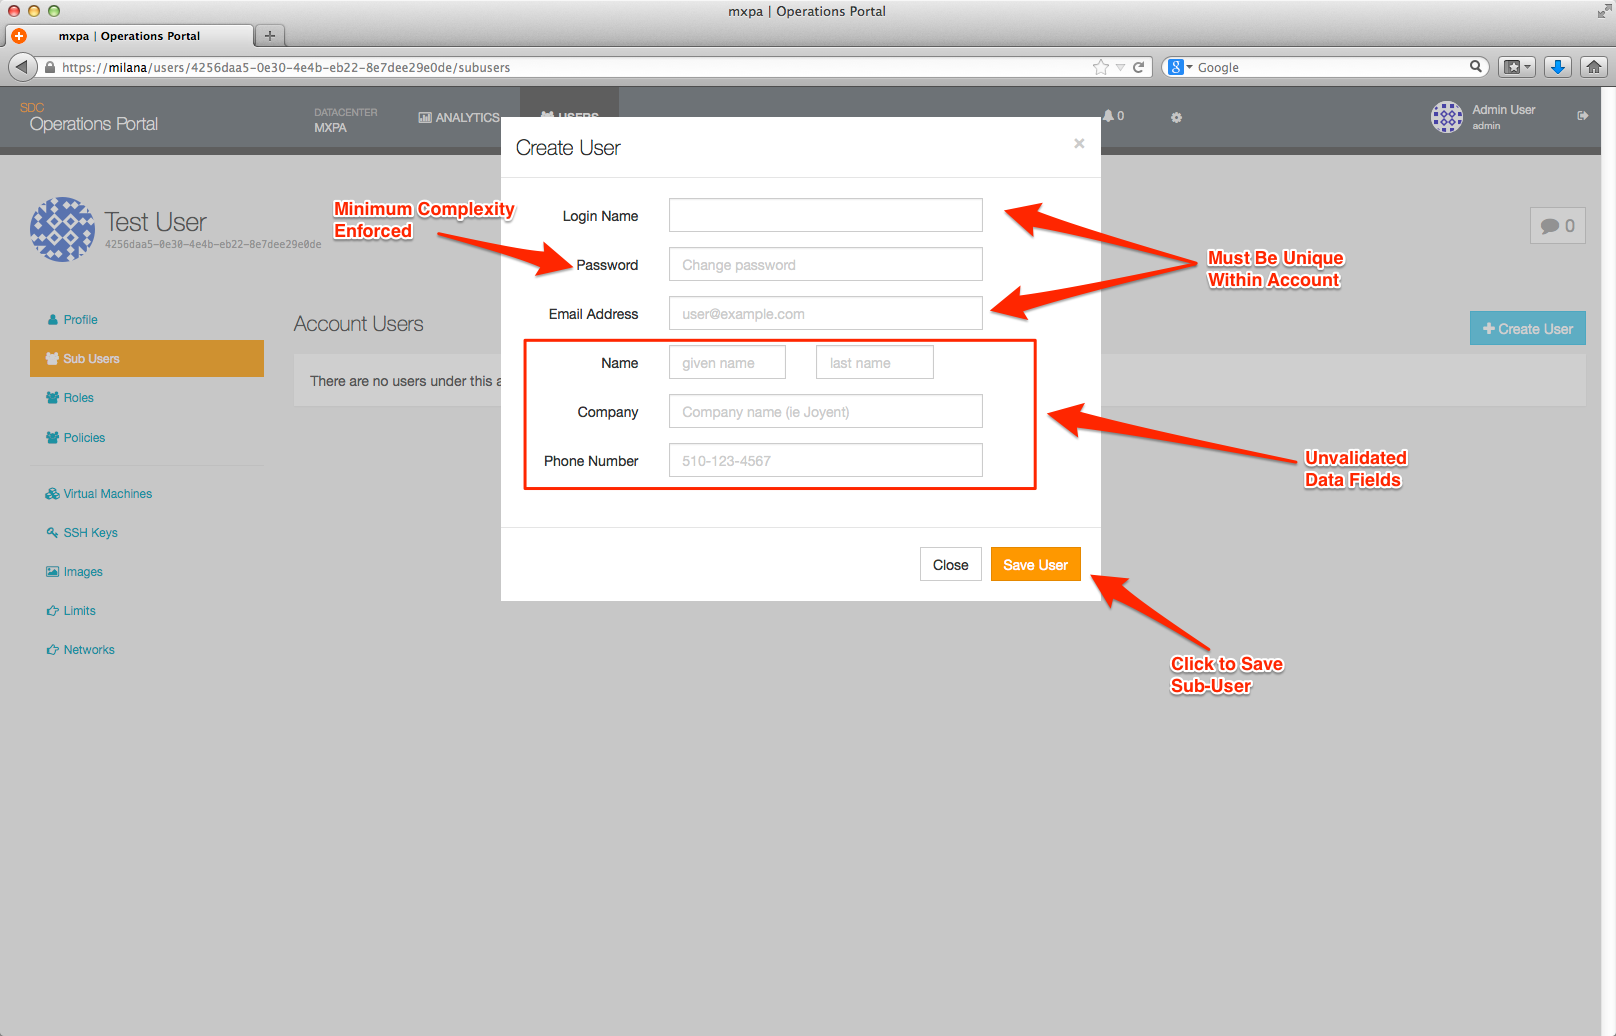
Note: The login for an User account's Sub-User accounts must be different only between the Sub-User accounts subordinate to that account, not globally. For example, you can have an User account with login mark, another User account with login exampleOne with a Sub-User account with login mark, another User account with login exampleTwo with a Sub-User account with login mark, and so forth.
One you have added the details for a Sub-User and clicked Save User a new row will be displayed on the User Overview page.
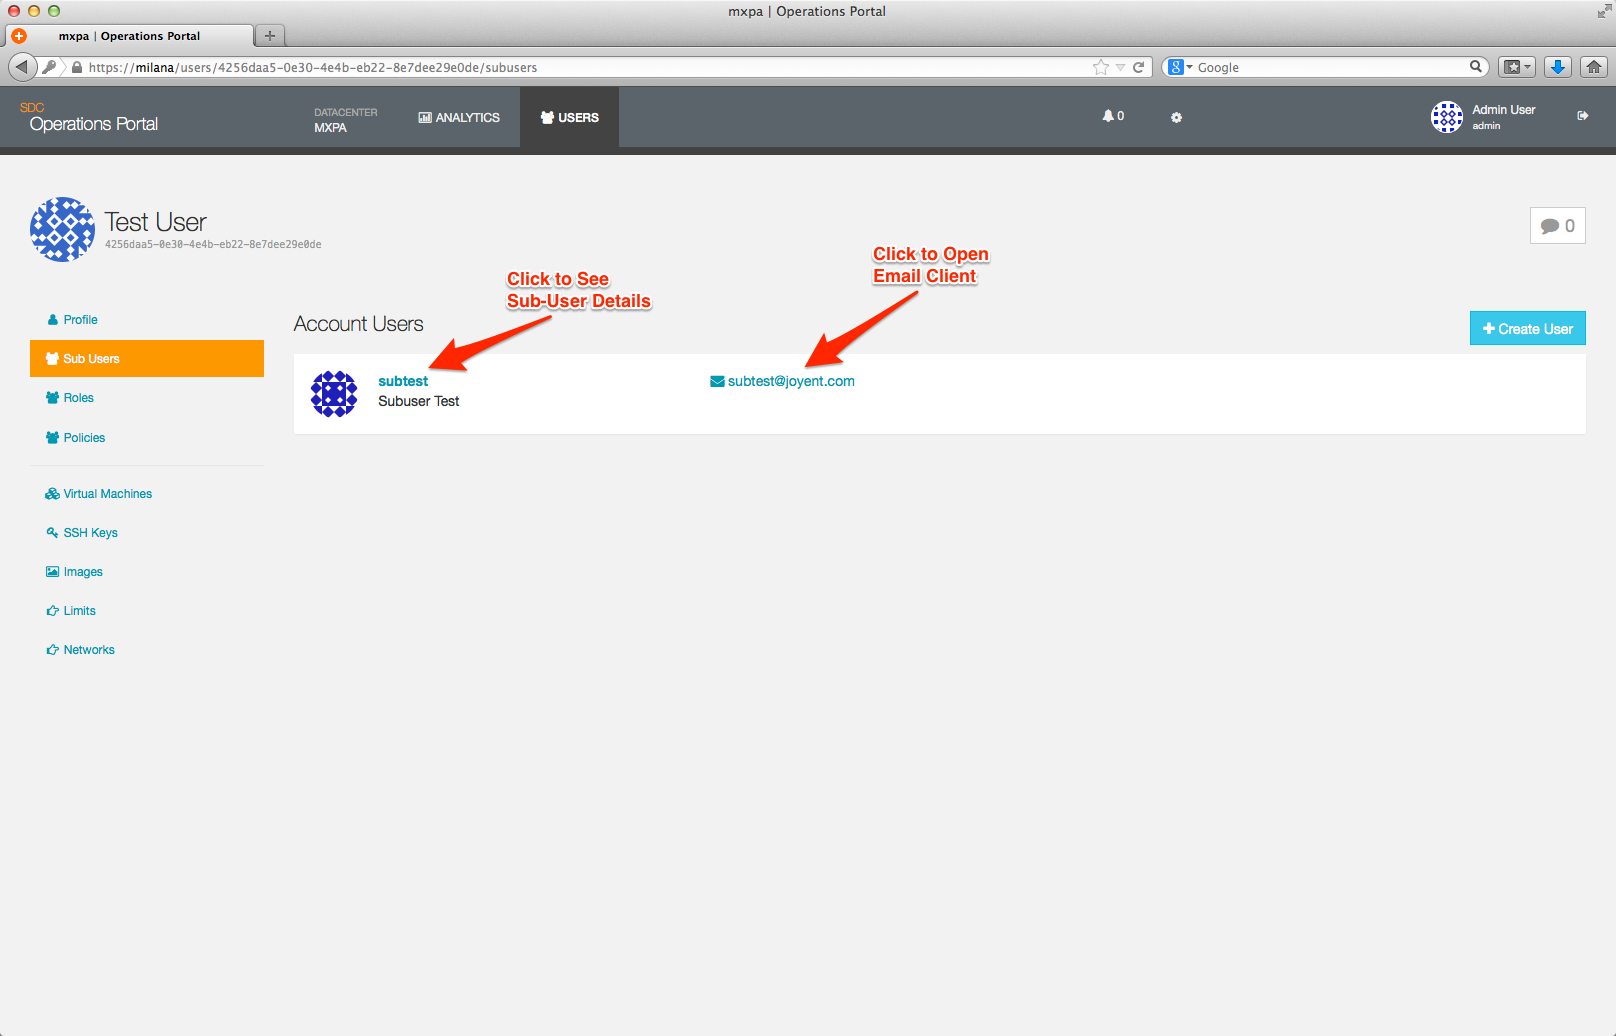
Clicking on the login name of a Sub-User account will take you to the detail page for that Sub-User account, which allows you to modify or delete the account.
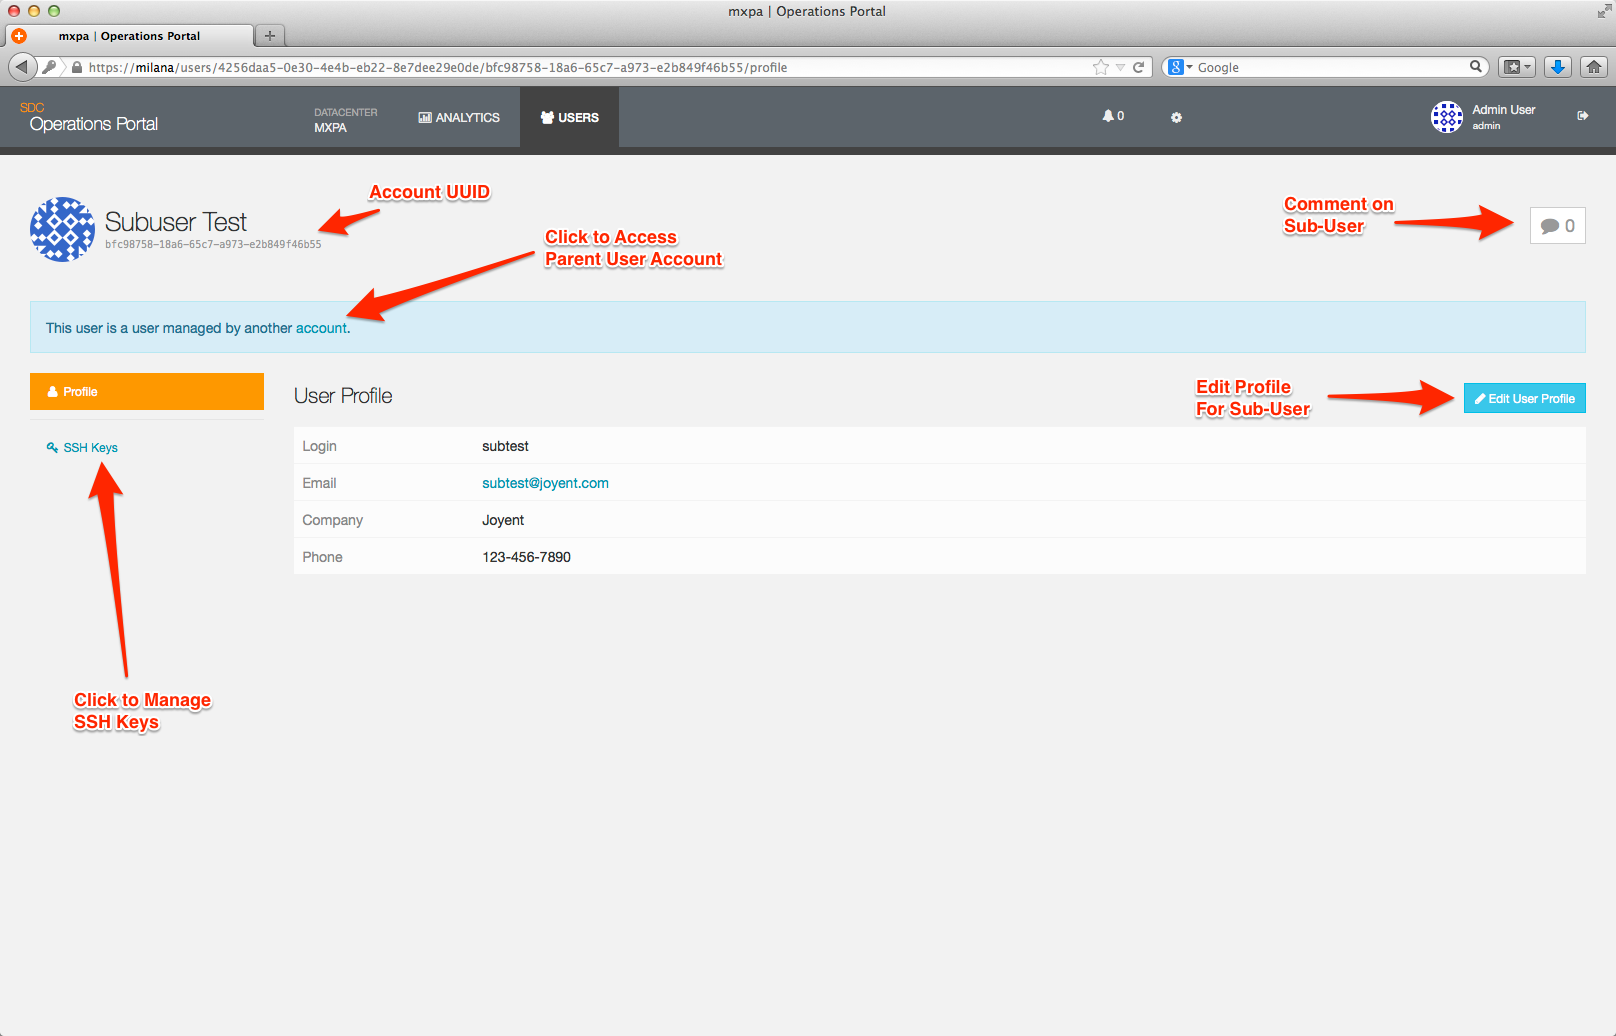
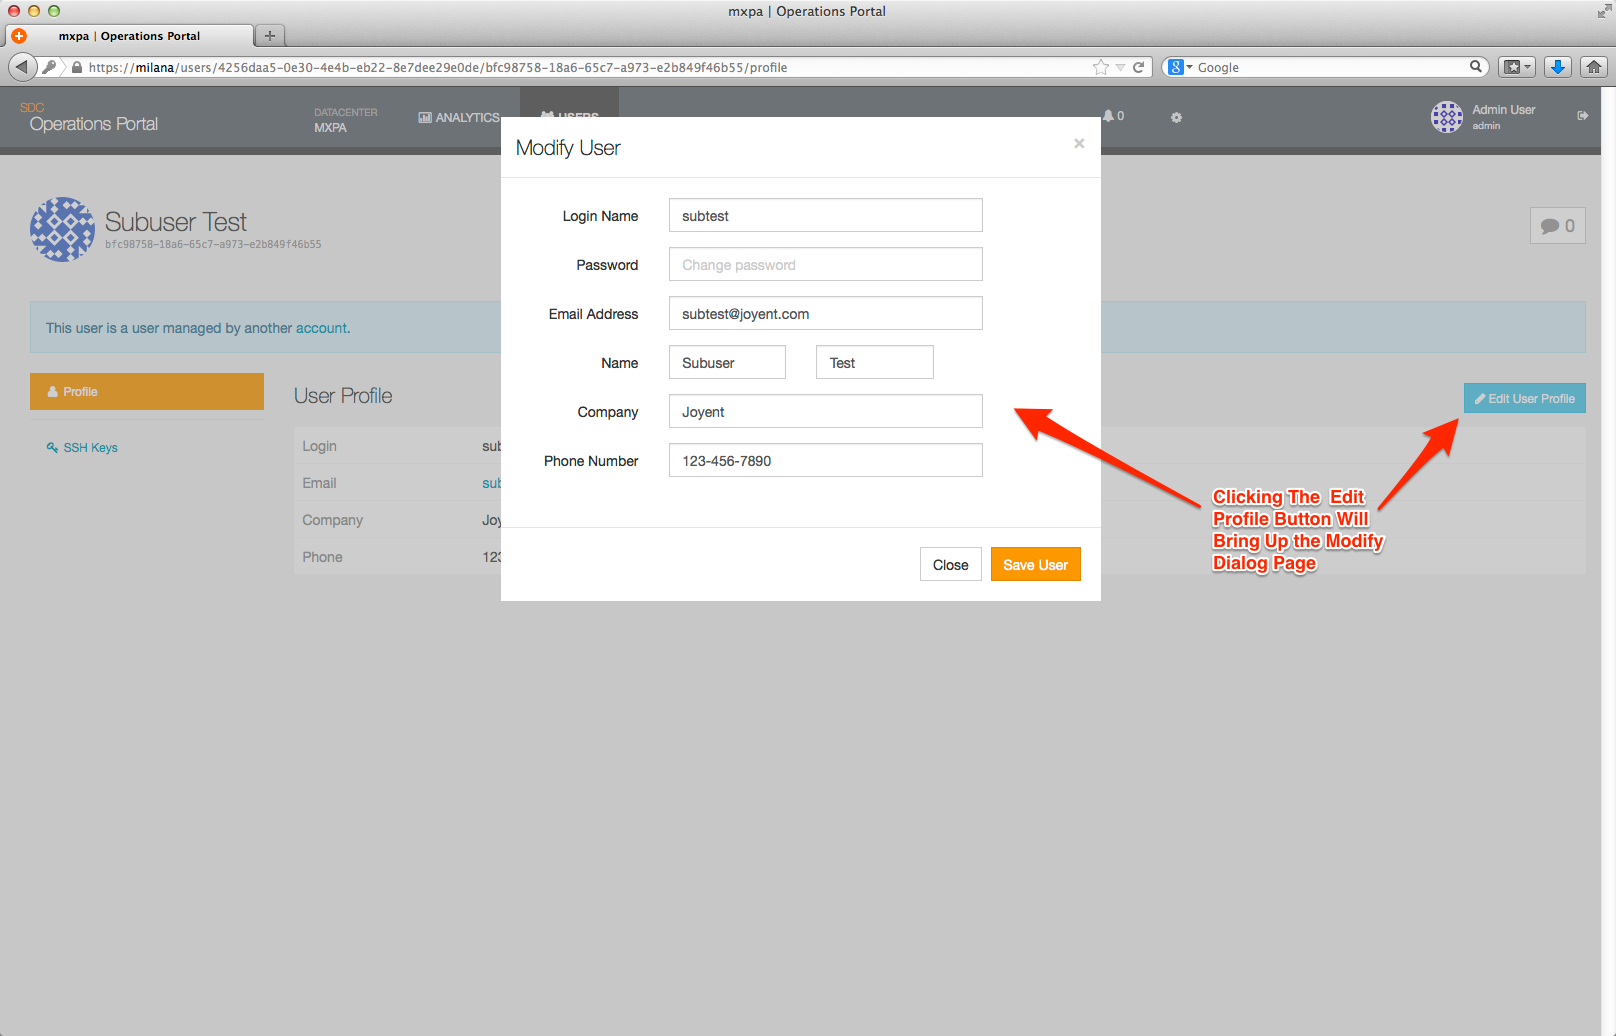
From this page you can edit the profile for the Sub-User account.
Sub-User accounts will appear on the User Overview page, but will contain a reference to their parent (User) account as shown below:
Policies
Policies are used to define allowed or disallowed actions. Once created, a Policy can then be be assigned to a Role, which can then be granted to a Sub-User account. Policies are assigned at the User account level and cannot be applied to a User account, only a Sub-User account.
Policies' rules are used for the access control of a User account's Sub-User accounts' access. These rules use Aperture as the policy language, and are described in detail in the next section.
Our recommendation is to limit each policy's set of rules to a very scoped collection, and then add one or more of these policies to each group. This lends itself to easily reusing existing policies for one or more roles, allowing fine-grained definition of each role's abilities.
The standard format for a policy rule is:
CAN <actions> <resources> WHEN <conditions>Important: You must include a resource specifier at the end of each rule. Use * to allow the action on all resources. Without the asterisk, the rule would not match any resources and authorization would fail.
For example, the following are valid rule definitions:
| Rule | Role Assigned to Policy Can |
|---|---|
CAN listmachines and getmachines * |
List all instances, view details on a instance |
CAN stopmachine, startmachine, and rebootmachine * |
Start, stop, and reboot instances |
CAN createmachine * |
Create instances |
By default, the access policy will DENY any attempt made by any account user to access a given resource, unless:
- That resource is tagged with a role.
- That role is active.
- That role has a policy.
- That policy contains a rule which explicitly GRANTS access to that resource.
For example, an account with an active role ReadMachines, which includes a policy rule like CAN listmachines and getmachines * will not get access to view snapshots, or view machine tags unless these resources are tagged with the ReadMachines role as well.
Additionally, given that the <actions> included in the policy rule are just listmachines and getmachine, the account will be able to retrieve a machine's details provided by the GetMachine action, but will not be able to perform any other machine actions (like StopMachine). However, if the role has a rule including that <action> (like StopMachine), or the account has an additional role which includes that rule, then the user can invoke that action too.
You manage polices via the Policy page which can be accessed from the User Overview page.
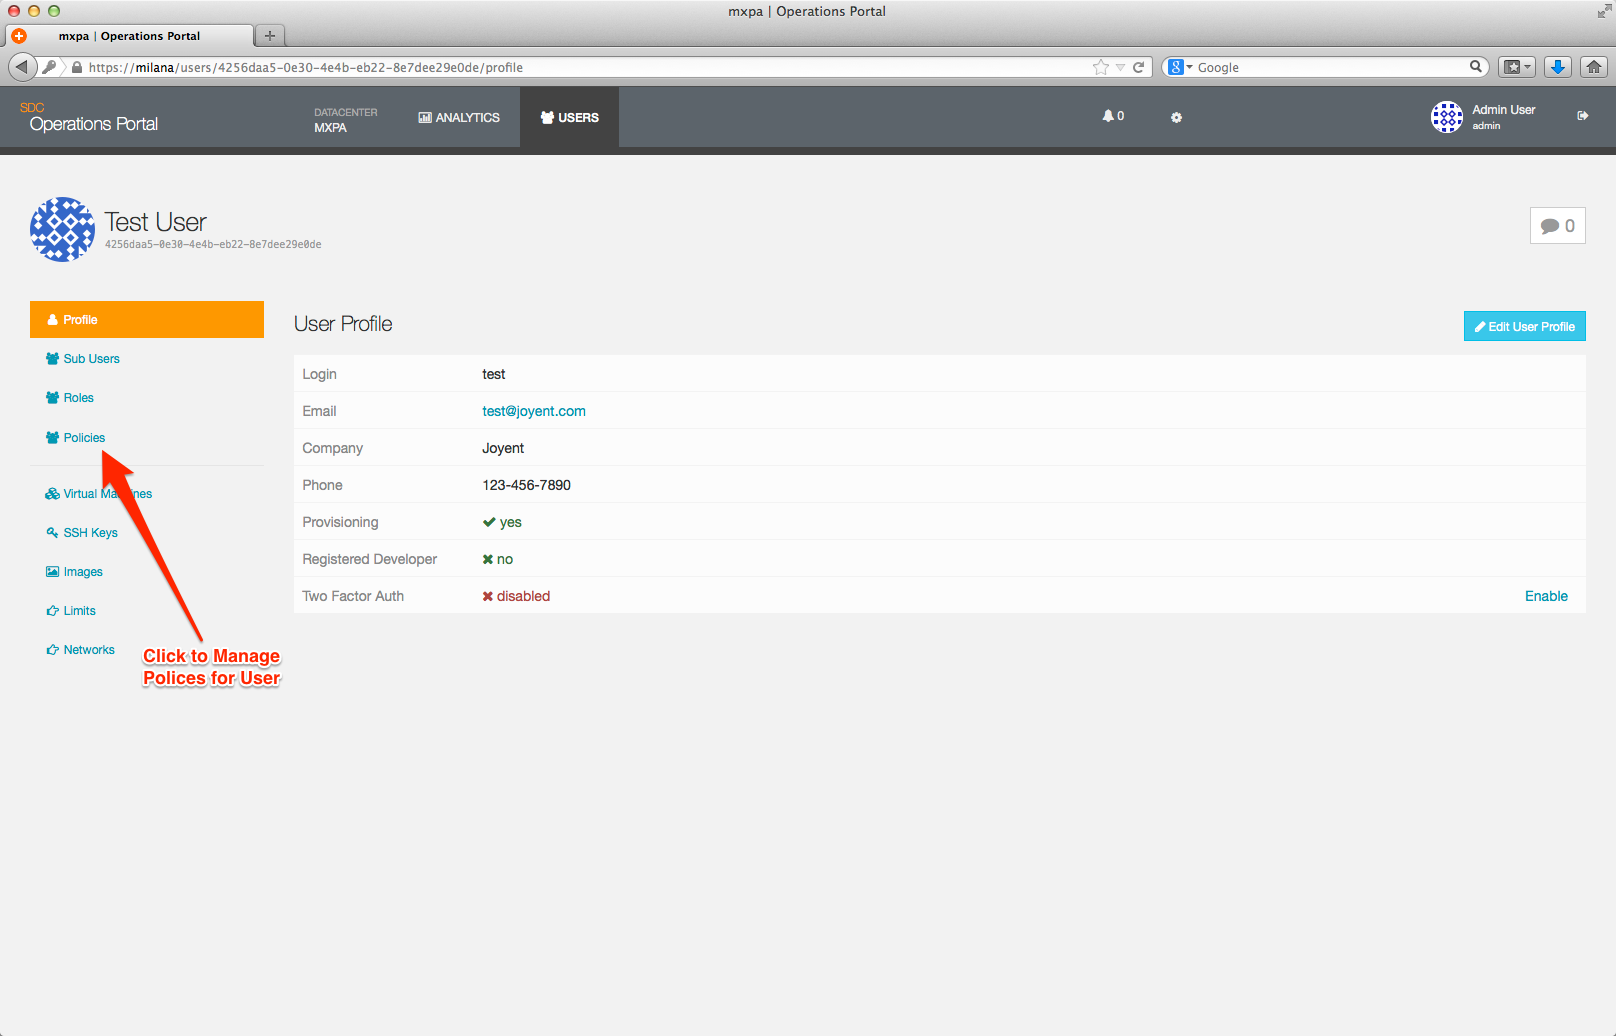
From the Policy page, you have the option to view, modify, add, and delete policies.
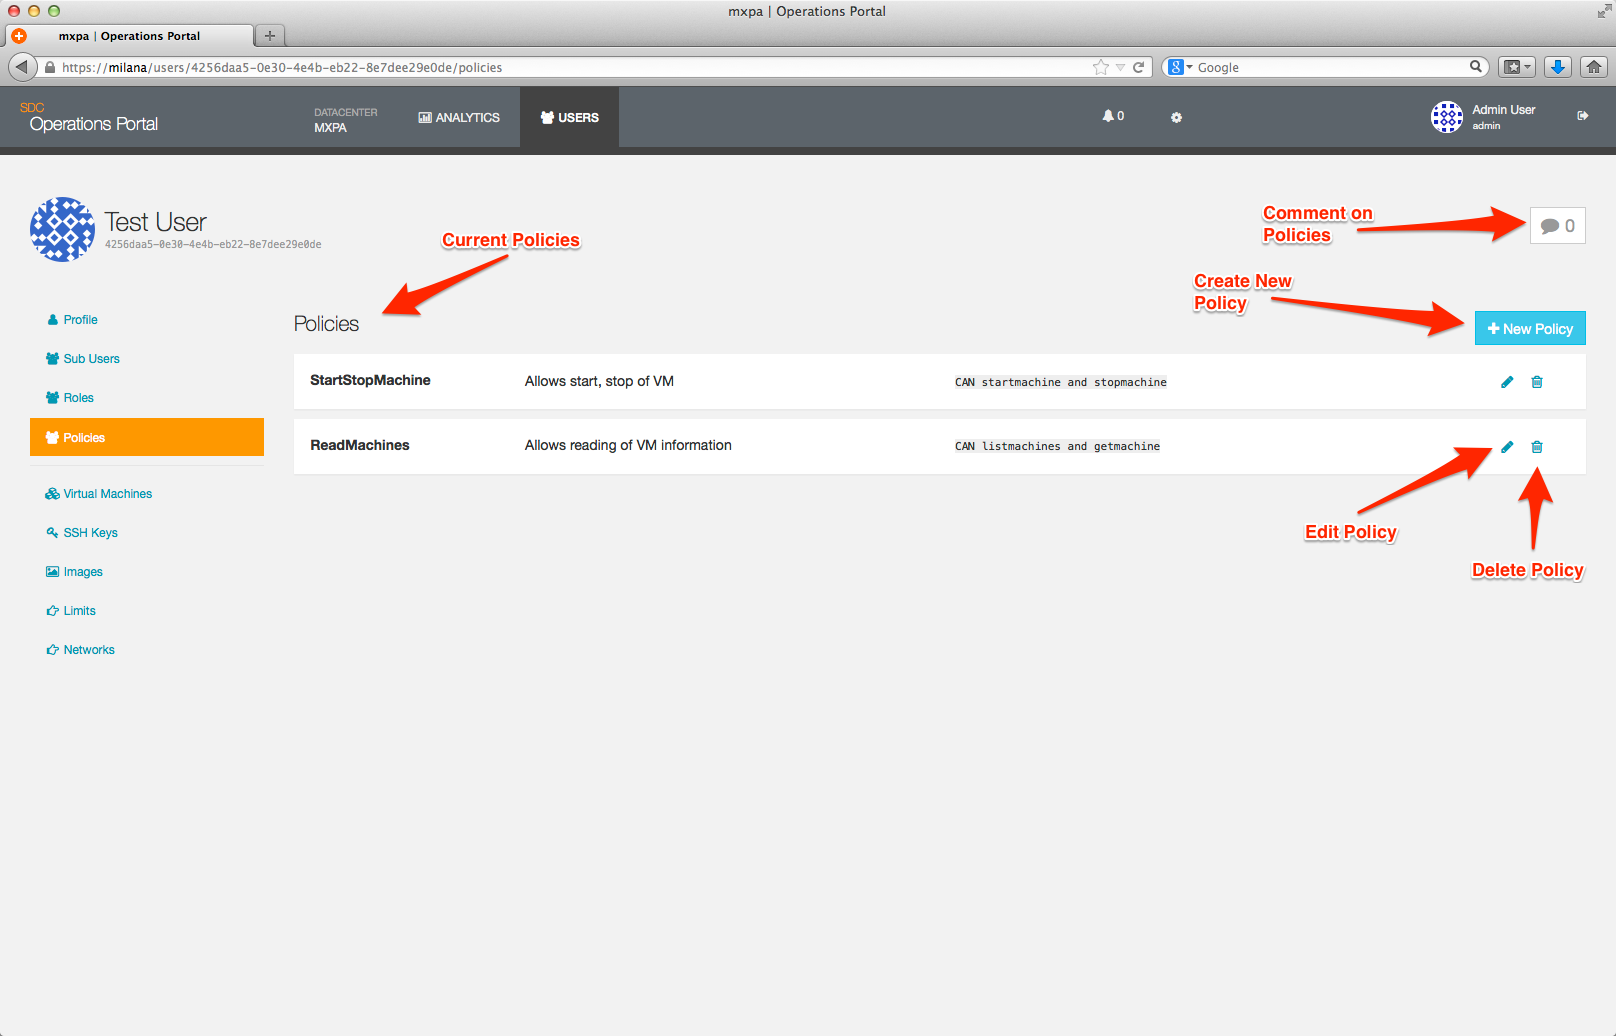
To create a new policy, you click on the +New Policy button which will bring up a dialog box.
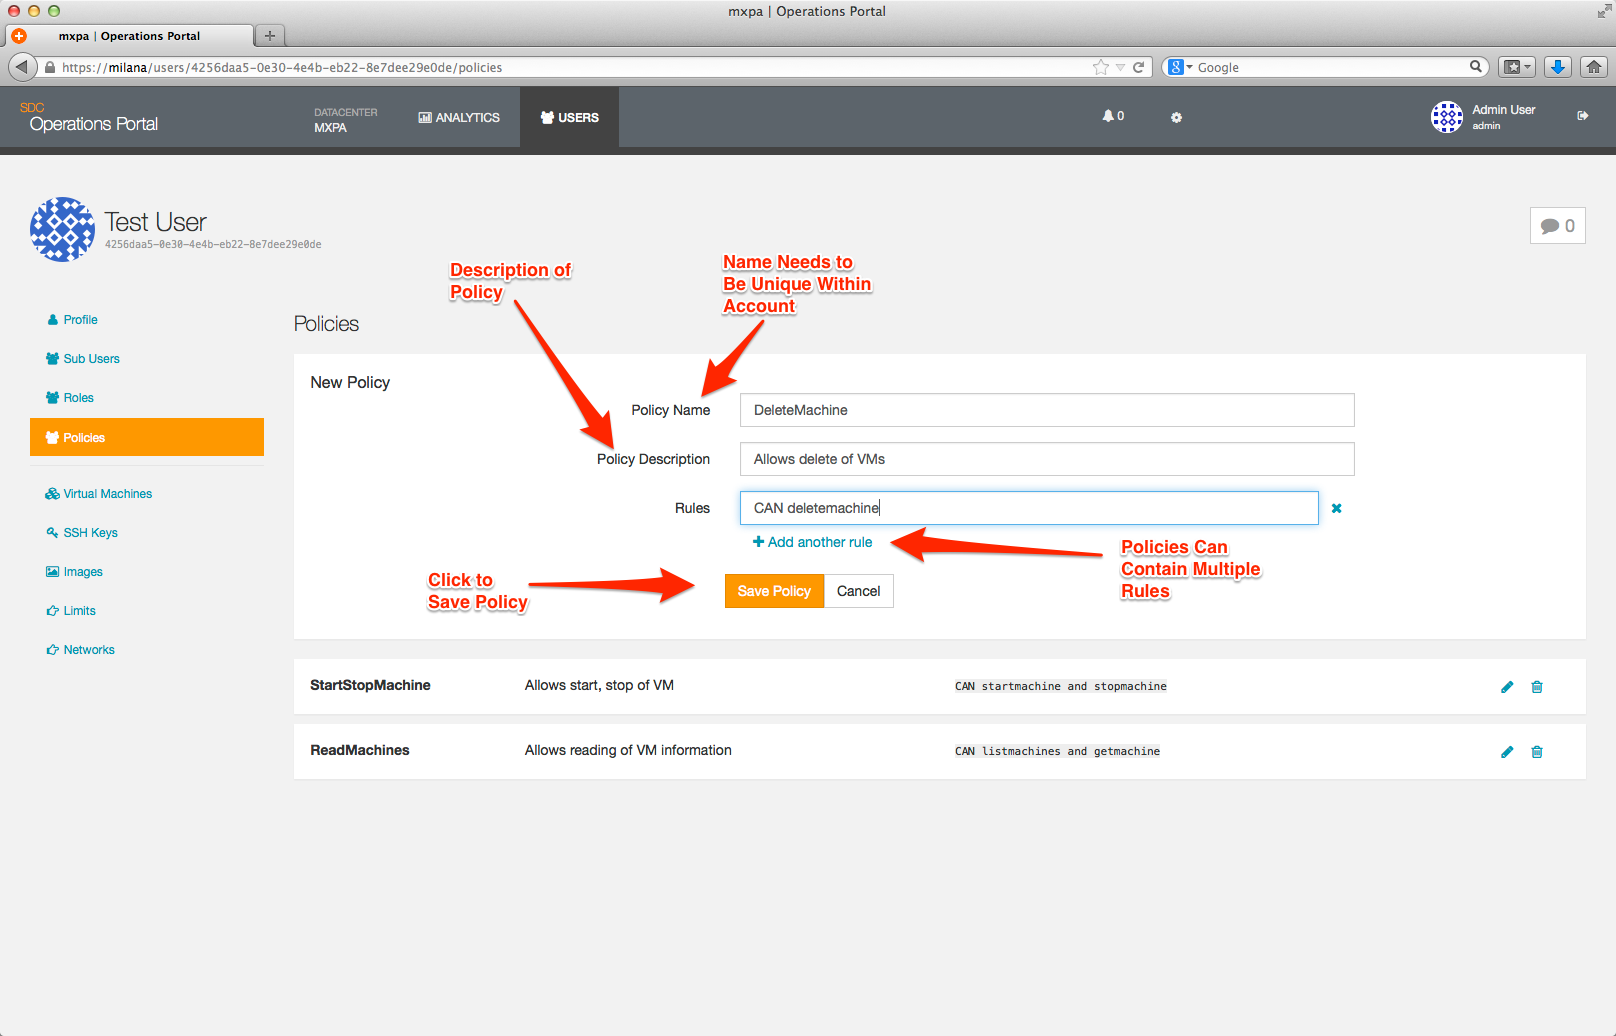
Saving your policy will take you back to the main Policy page where you will be able to see your new policy listed.
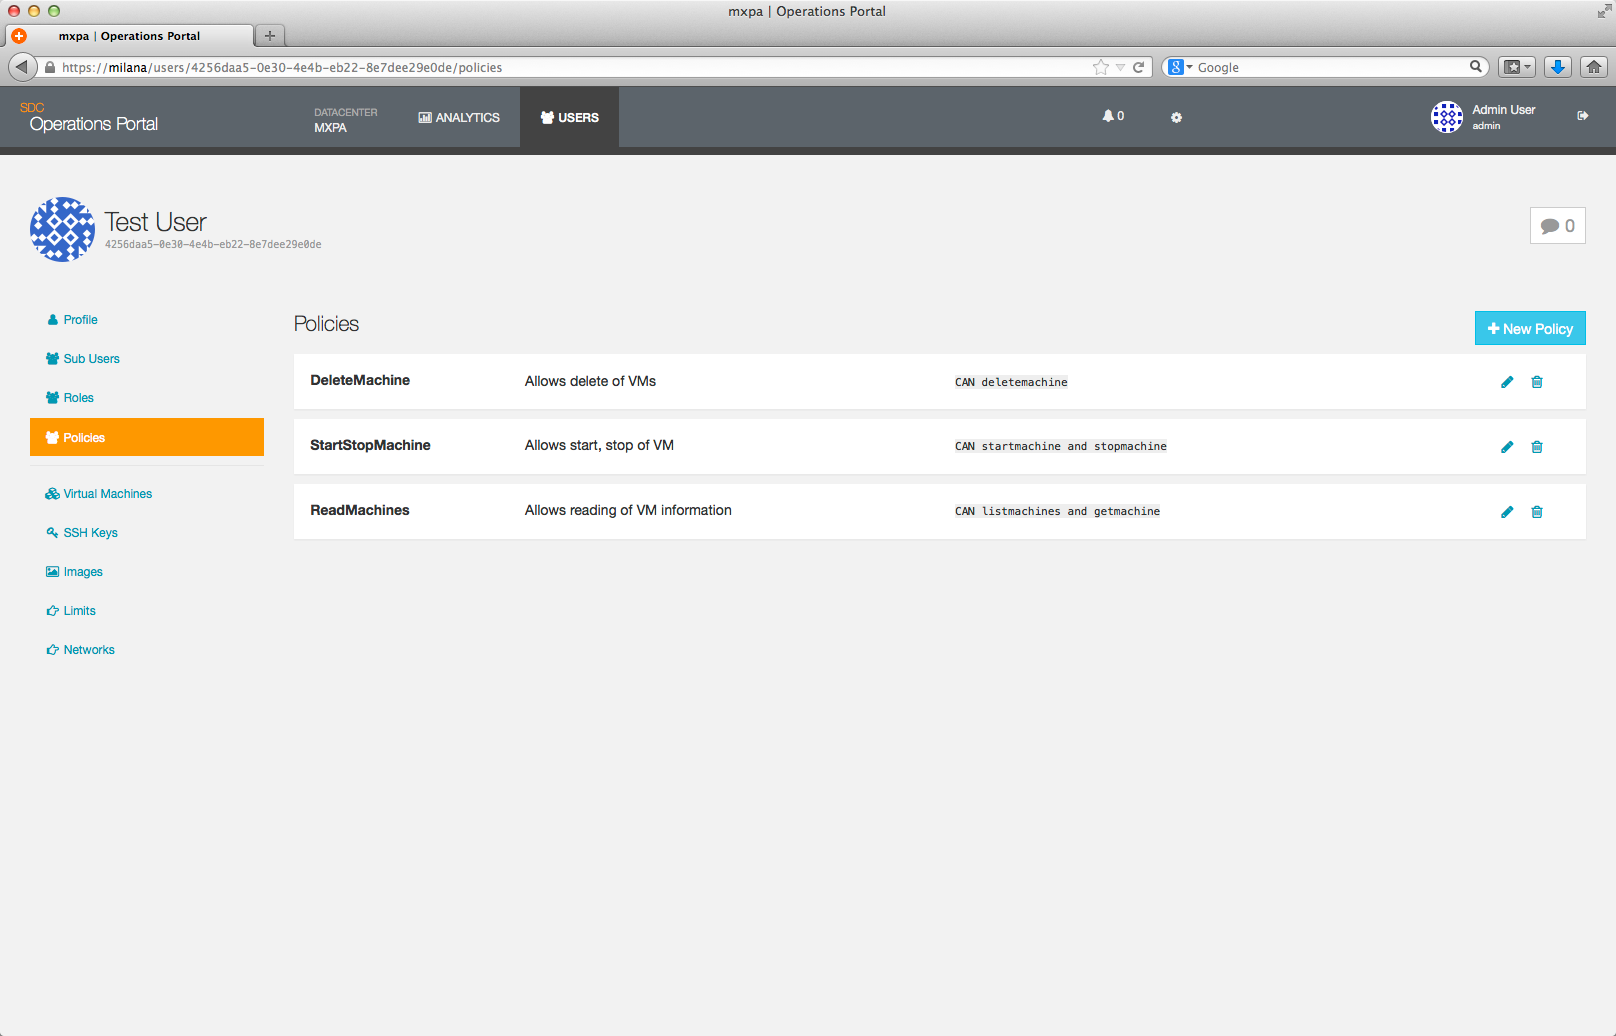
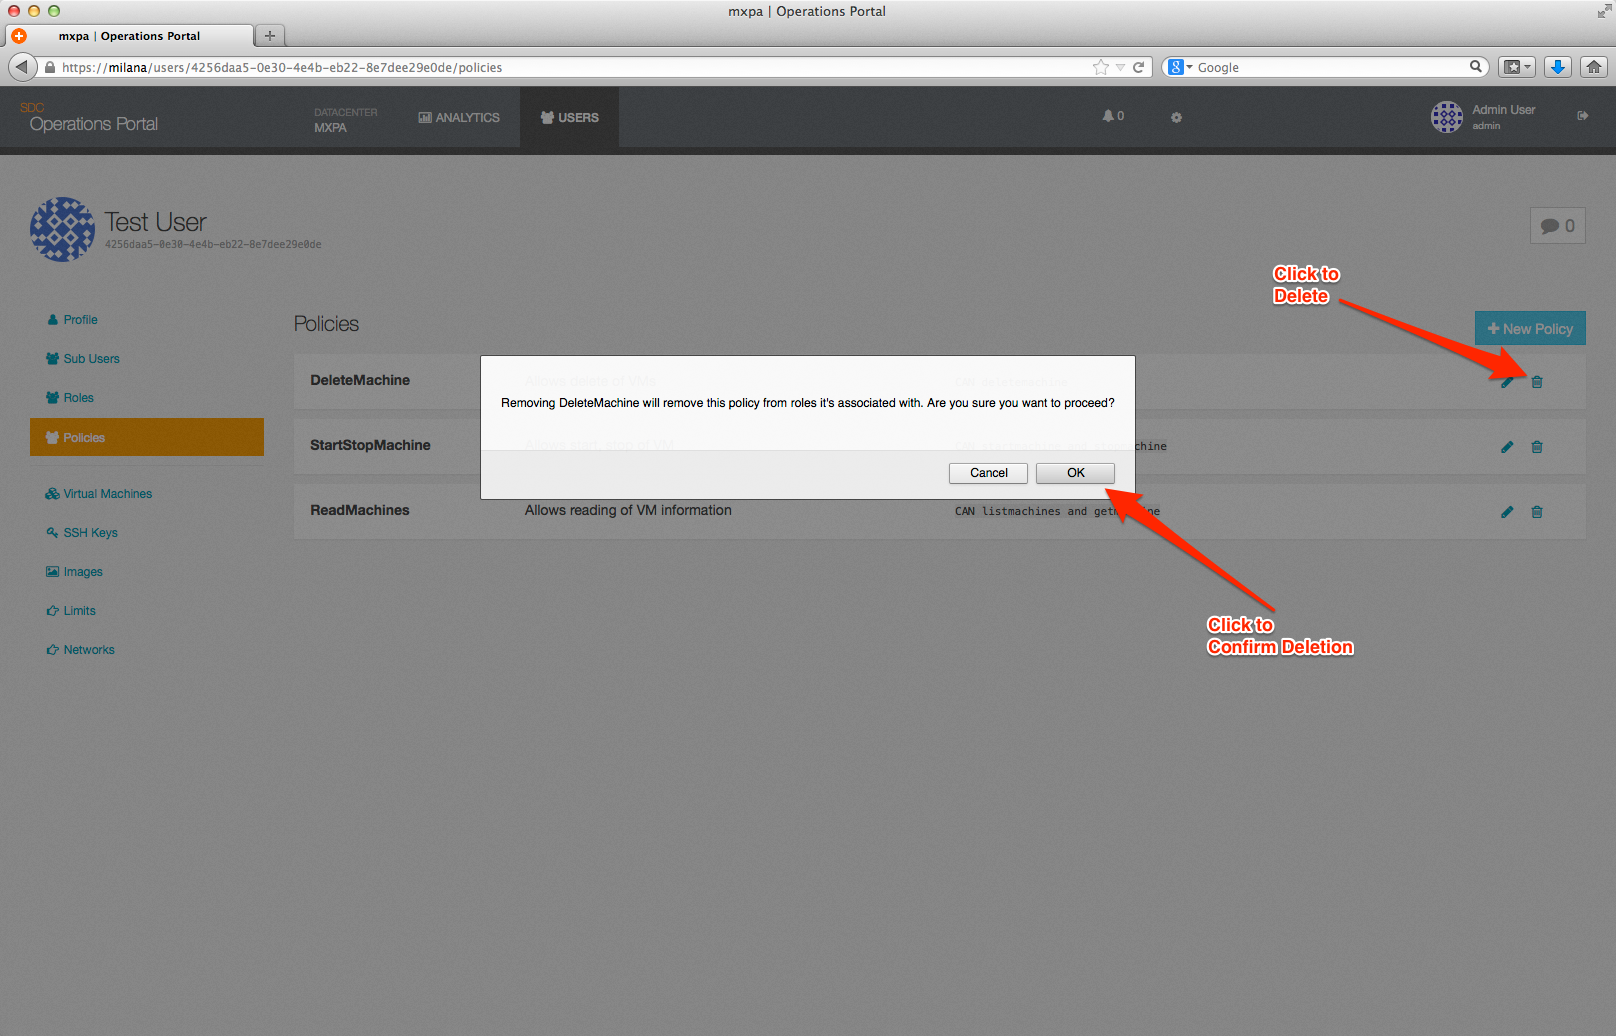
To delete a policy, click on the trash can icon to the right of the policy description. A confirmation dialog will then be shown; answering Ok will delete the policy and return you to the Policy page.
Note: Deleting a Policy will delete it from all Roles that currently are associated with it.
To modify a policy, click on the pencil icon to the right of the policy description. This will open the editing window.
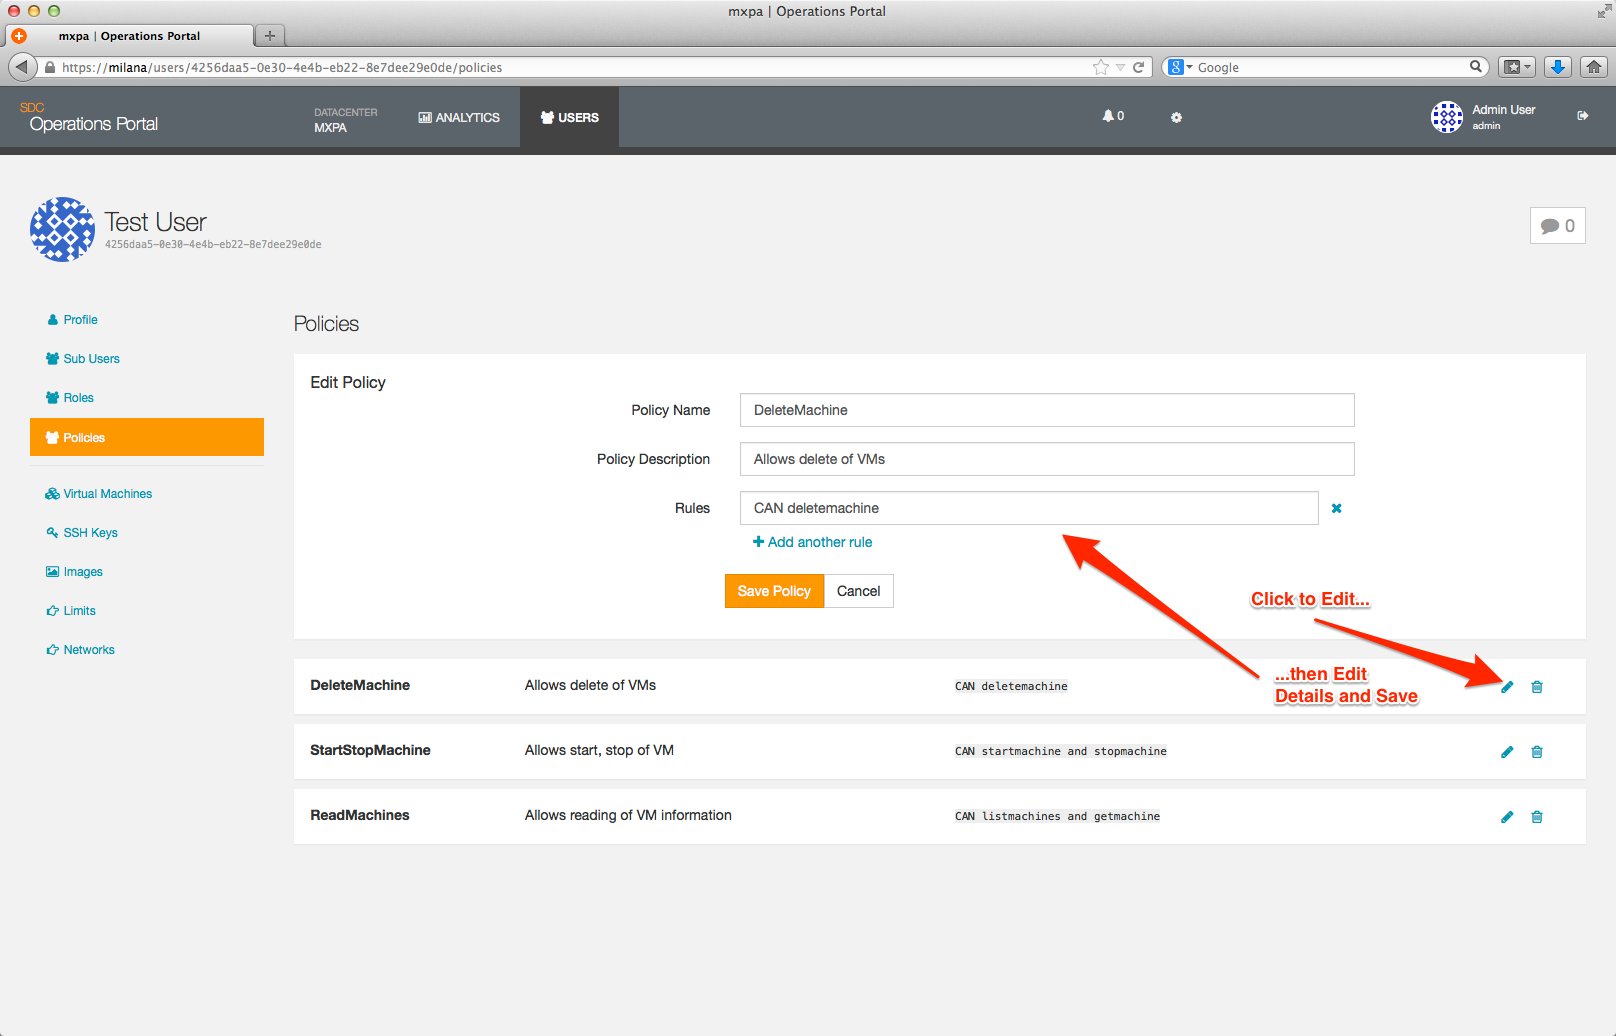
After you save your changes you will be returned to the main Policy page.

Roles
Roles are used to organize Sub-User accounts. Policies can be associated with Roles, which permits the the account owner (User account) to control the level of access provided to each Sub-User account.
You manage roles via the Roles page which can be accessed from the User Overview page.
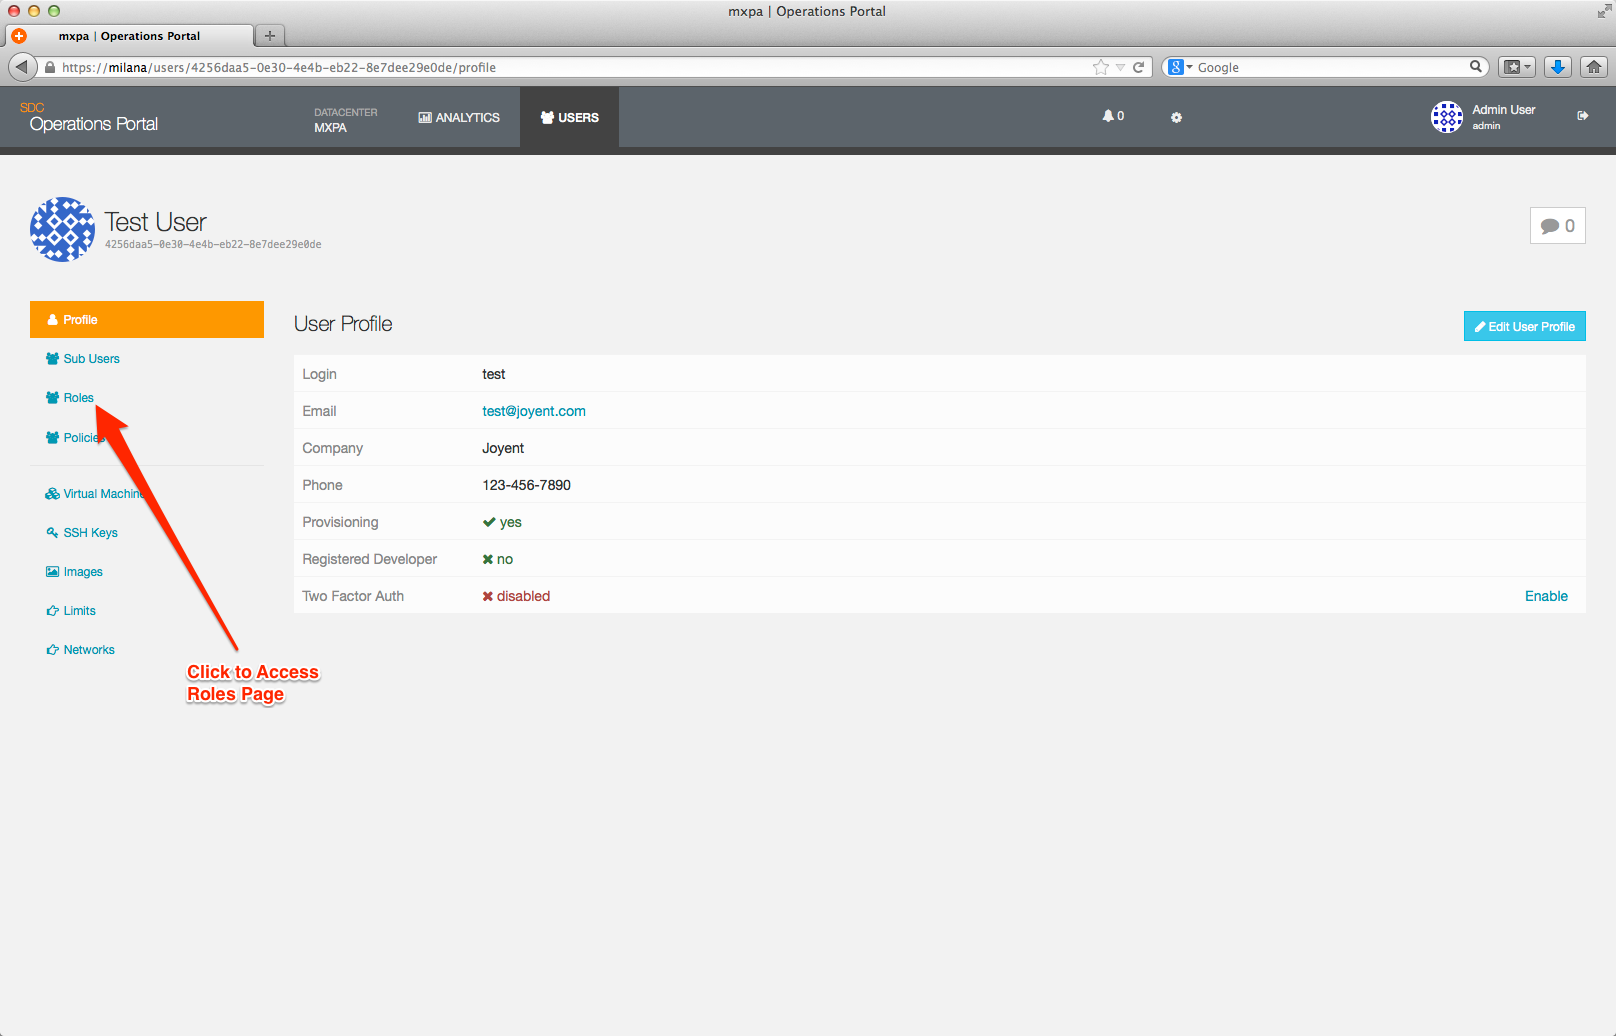
From the Roles page, you have the option to view, modify, add, and delete roles.
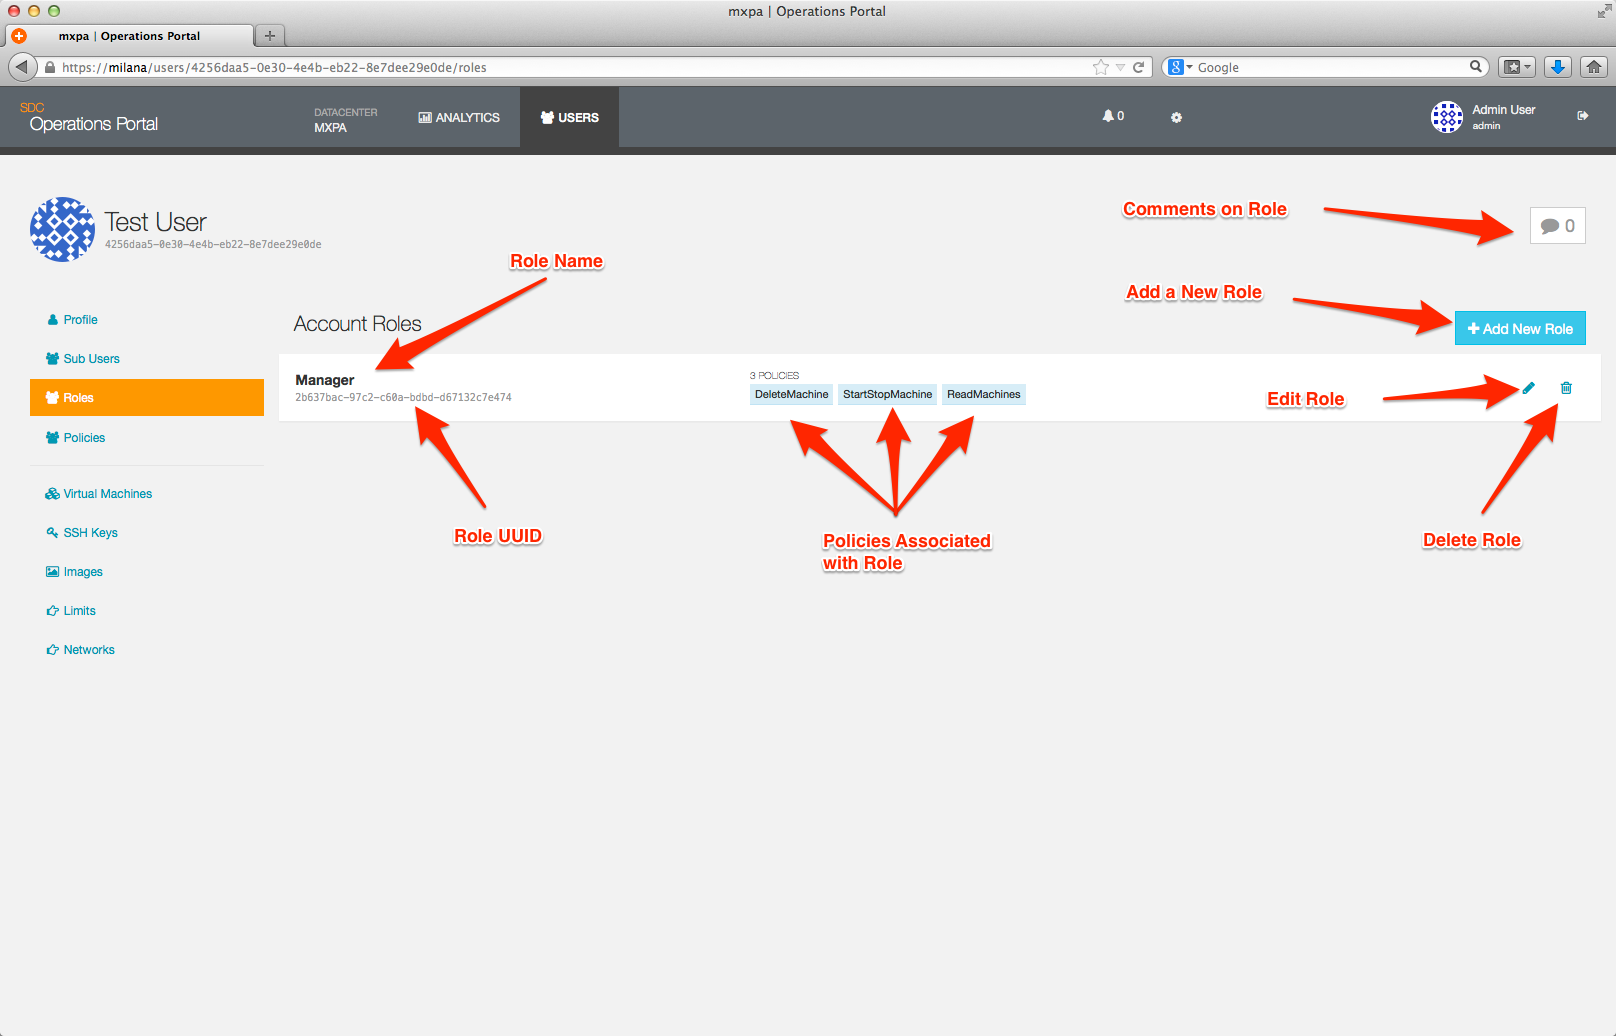
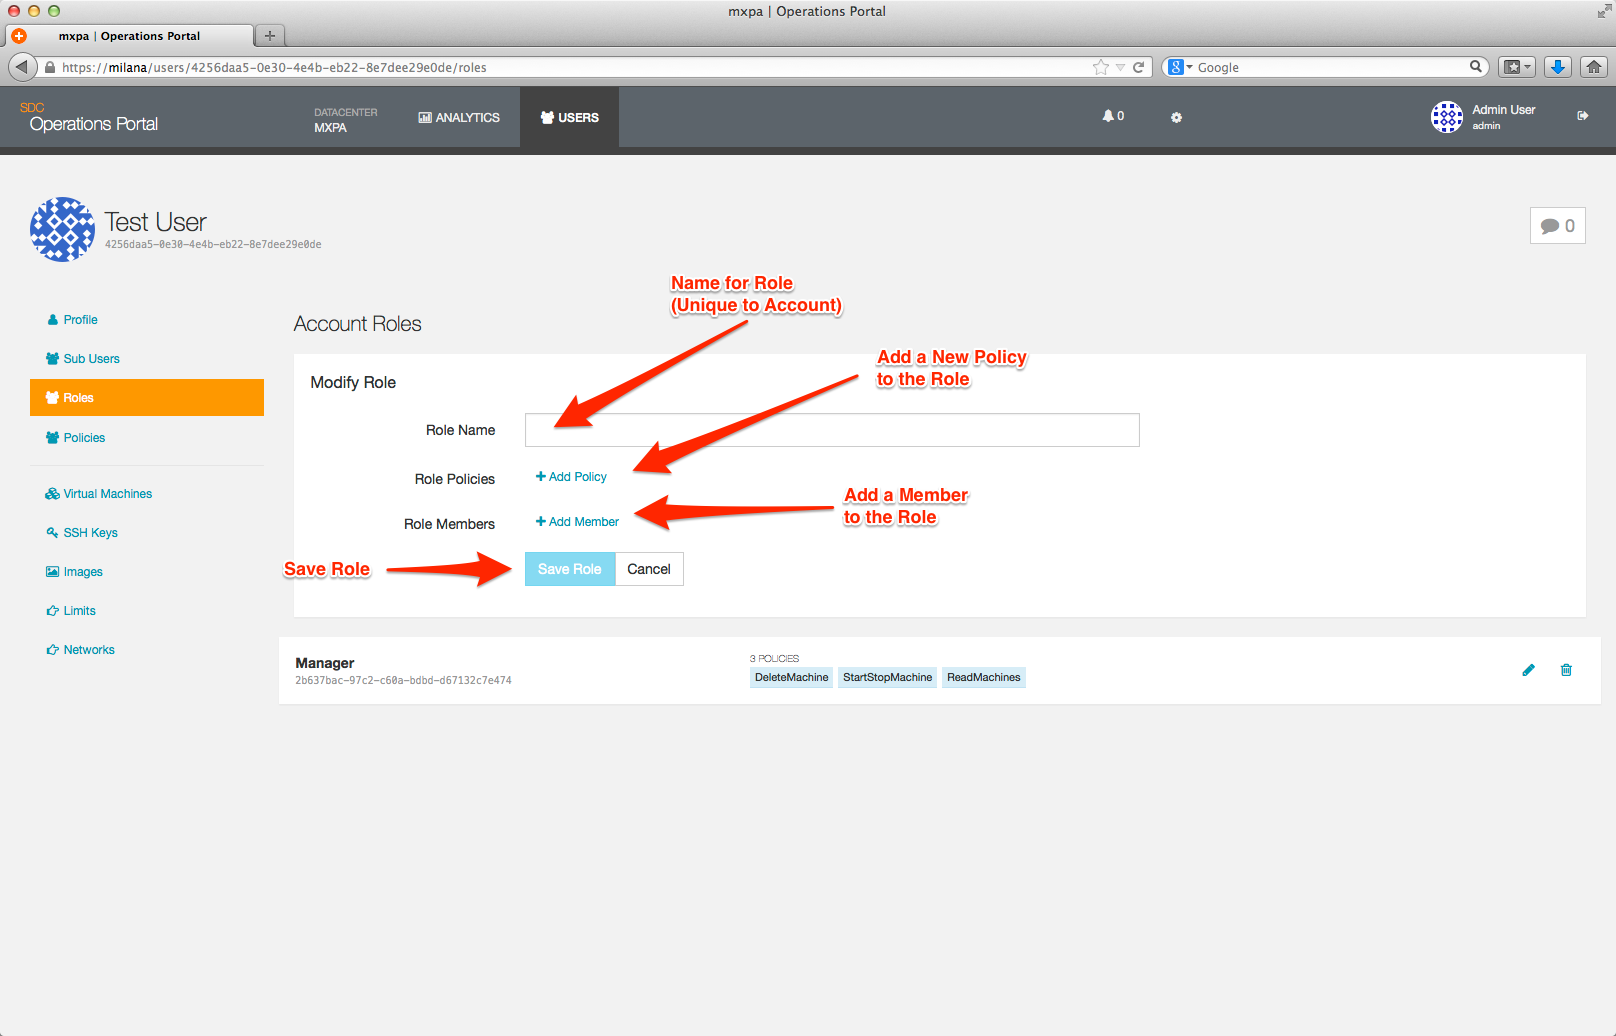
To add a new role, click on the +New Role button which will bring up a new page which allows you to define the role.
A role is defined by:
- A unique name (within the User Account)
- One or more Policies
- One or more Sub-User accounts
The Policy and Member selection boxes will expand and allow you to either select from a drop-down list or type in the name of the policy or member you wish to add.
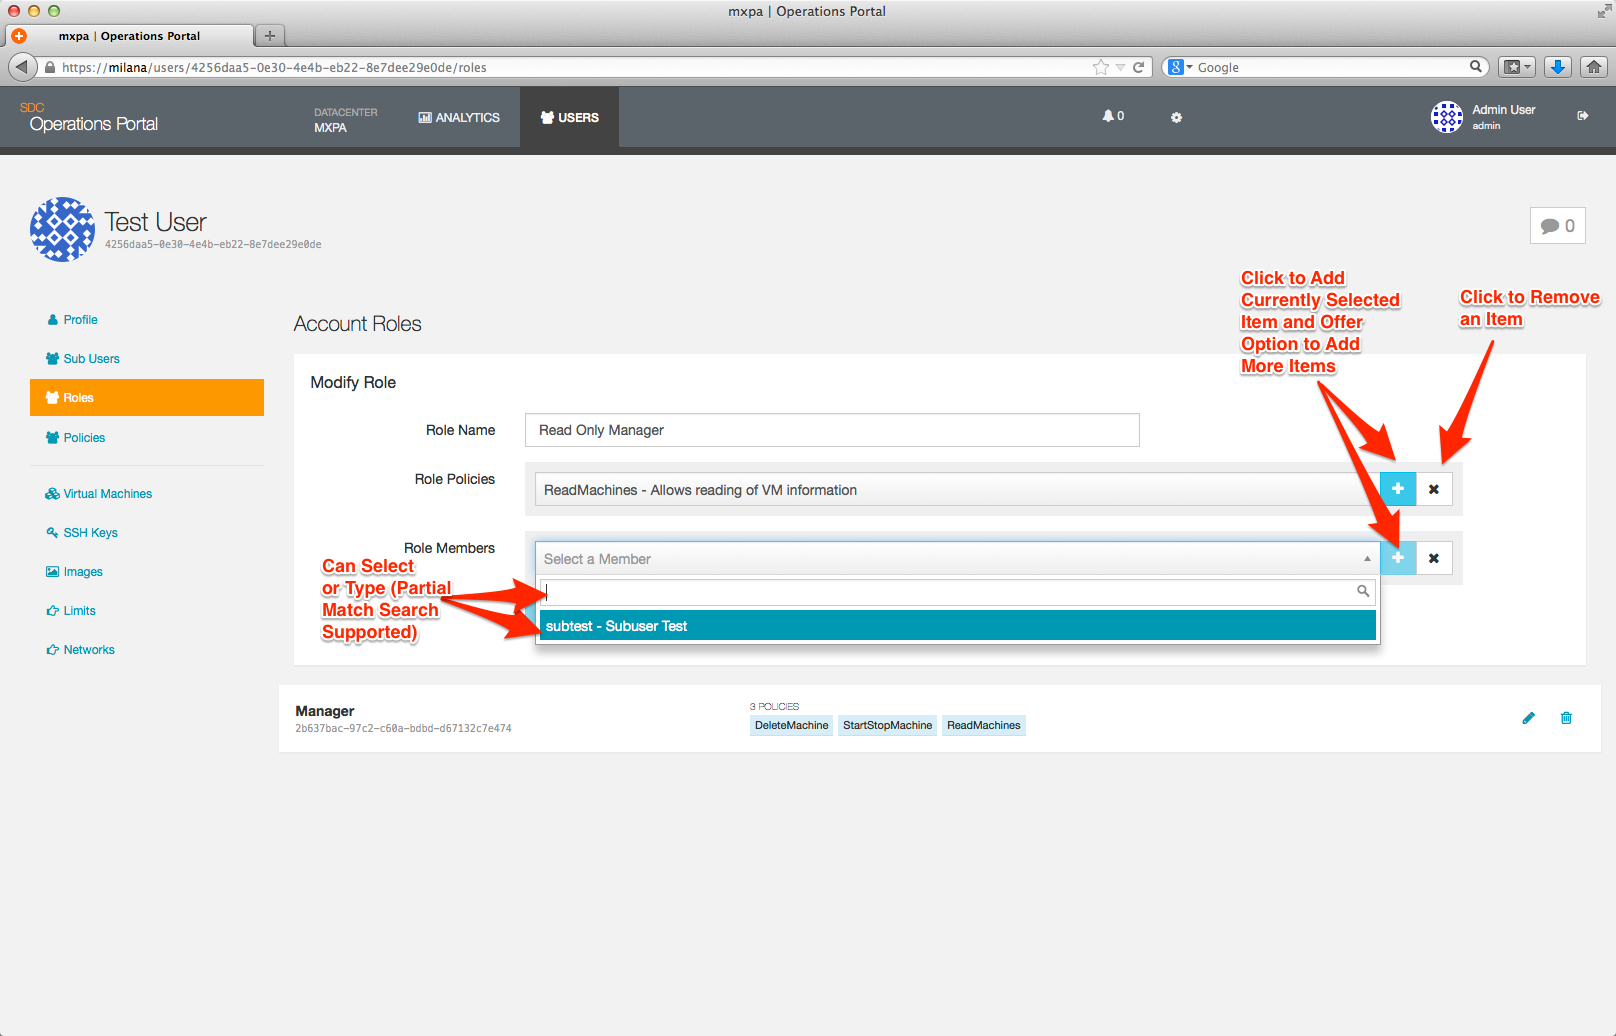
Note: You must click the blue + button after selecting a policy or a member; this adds it to the role definition. If you do not do this, you will be unable to save your role.
Once you save your changes, you will be returned to the Role Overview page.
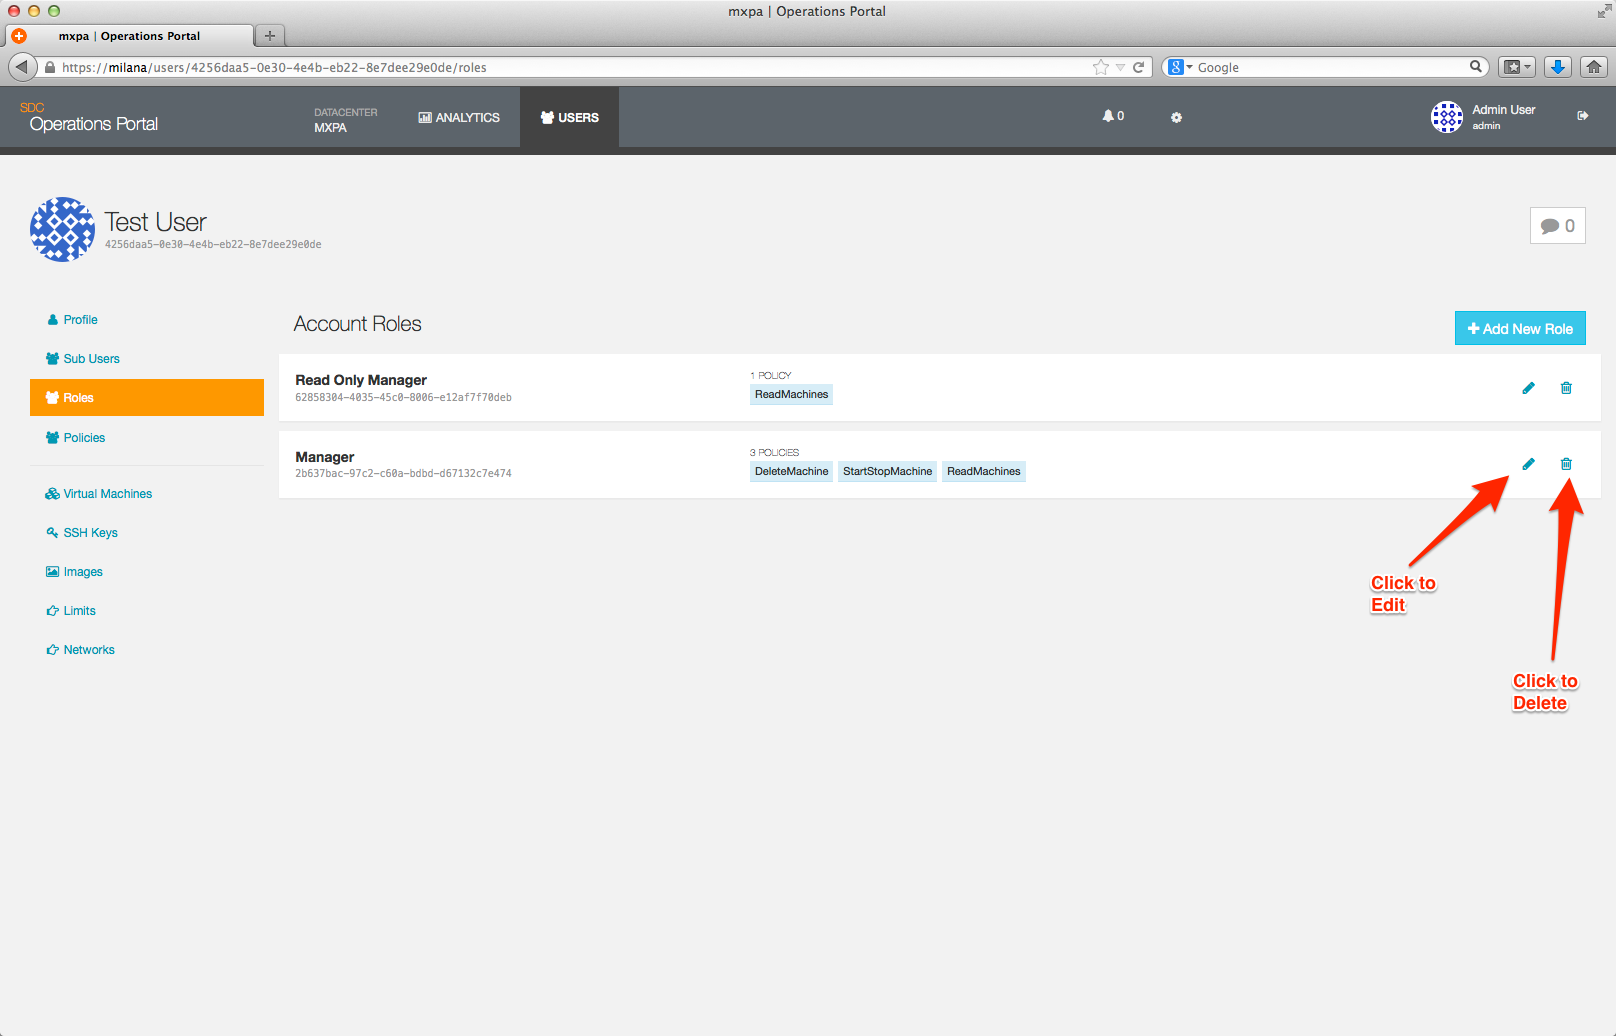
To modify a role, click on the pencil icon to the right of the role definition. This will cause the role editor to reappear. Make any changes you need and then save the role. This will then return you to the Role Overview page.
To delete a role, click on the trash can icon to the right of the role definition. After answering the confirmation dialog, you will be returned to the Role Overview page.
Setting limits
Limits are used to control user access to data center resources. Limits apply to a User account, as only User accounts can own instances. Sub-User accounts can only own/create objects on behalf of their associated User account.
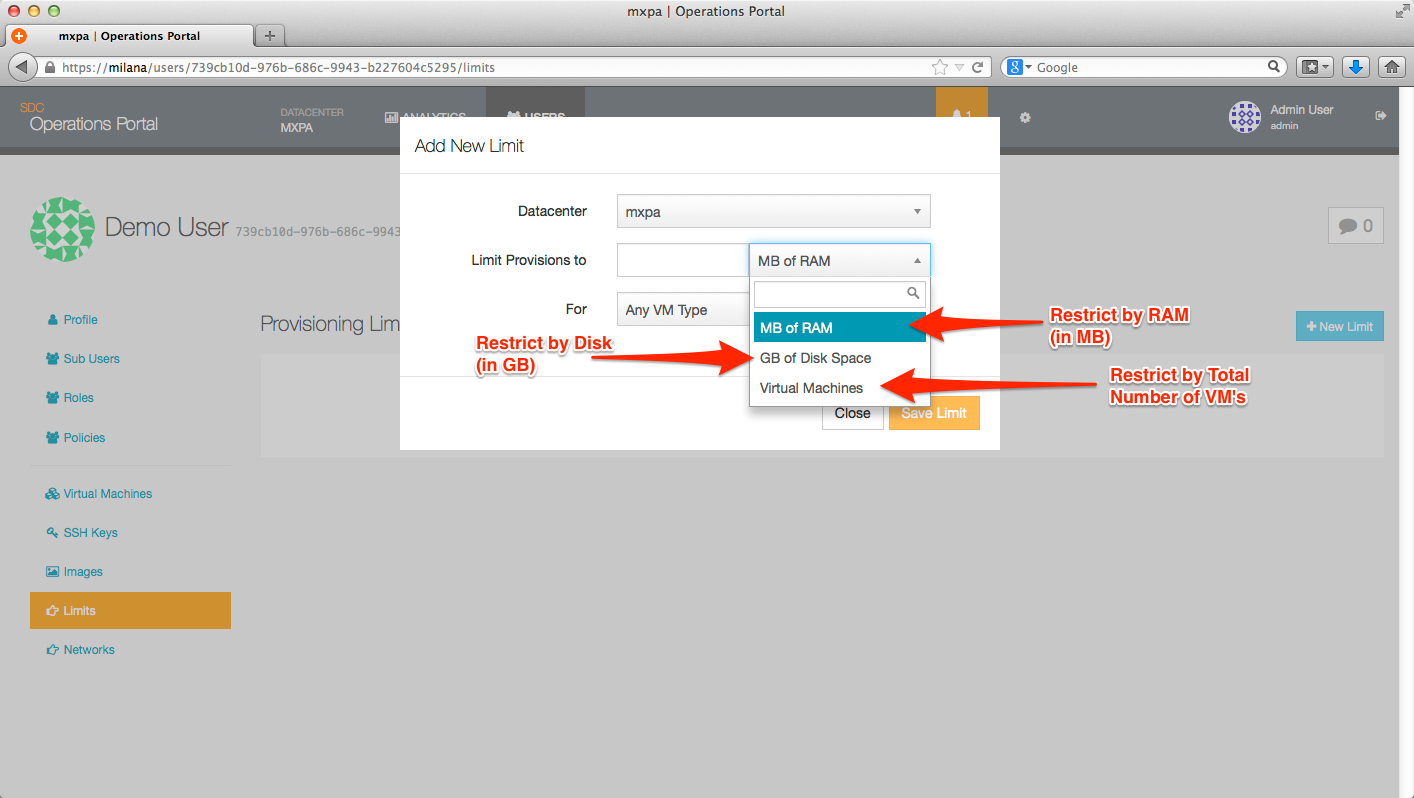
In Triton, it is possible to define limits by three main categories:
- Amount of RAM
- Amount of disk space
- Number of instances
These can further be modified by:
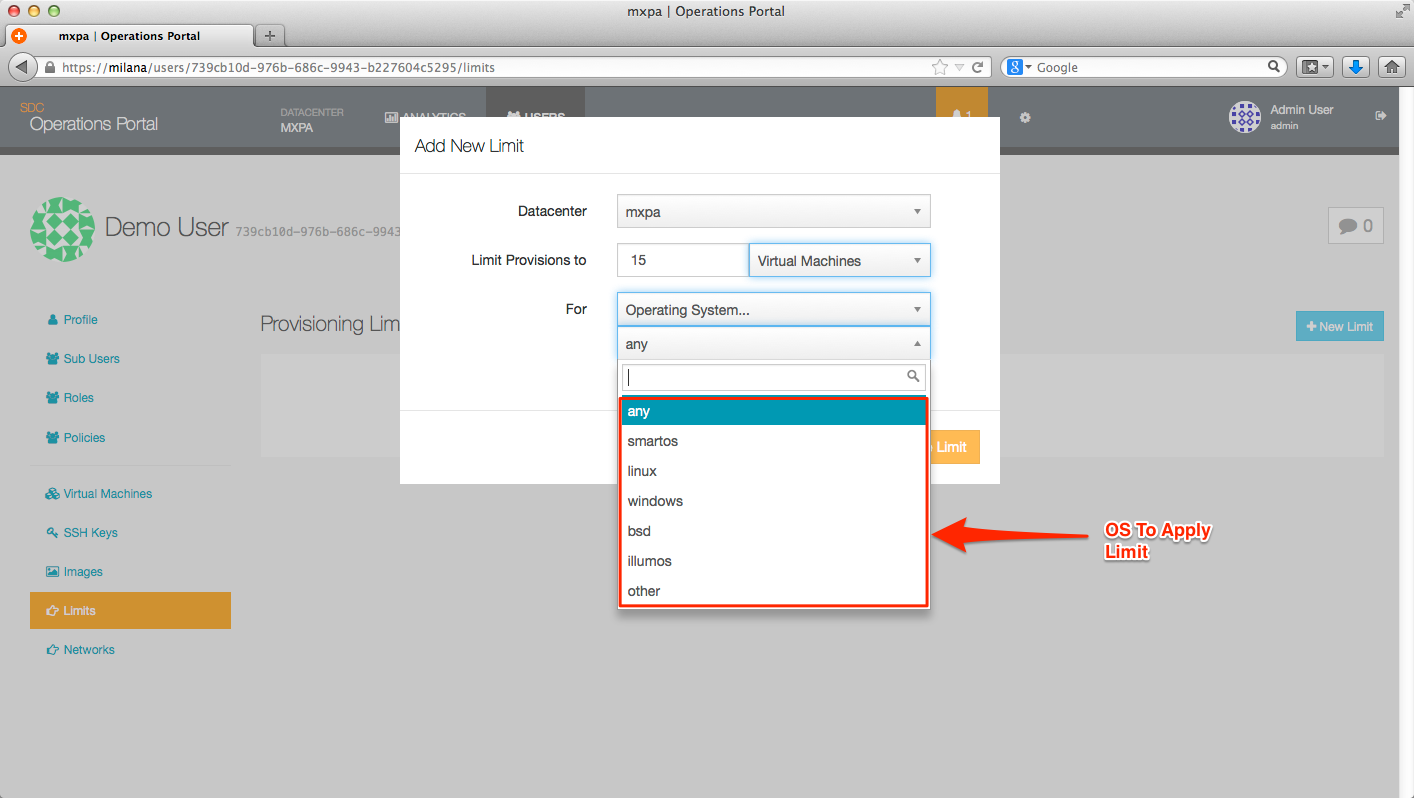
- Operating system (ie, Linux, SmartOS, Windows, etc.)
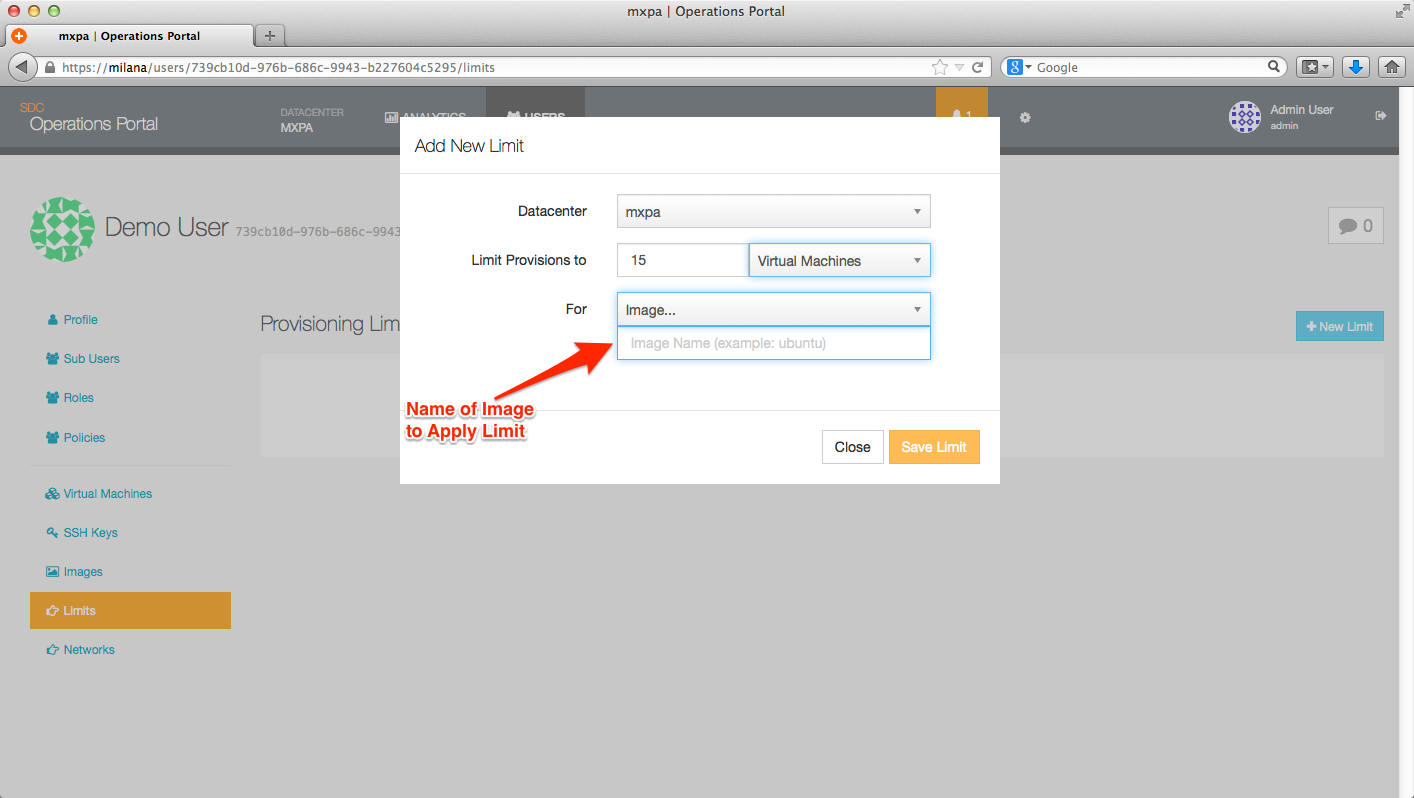
- Image file (centos-2.1, ubuntu-12LTS, base64, etc.)
This is set on a per-datacenter basis. So it is possible to give a user unlimited provisions in one data center, while restricting them to only a maximum of 5 in another data center. Likewise, you could allow a user to provision an unlimited amount of infrastructure containers running SmartOS while only allowing one Windows instance.
A positive integer represents the amount of instances to limit. The following values can also be used.
| Value | Description |
|---|---|
| 0 | Unlimited instances |
| -1 | Provisioning blocked |
When limits are in place, the user will receive an error when attempting to provision instances that would put them over these limits.
Example:
A user has a limit of 2GB of RAM for an Triton installation. This user has four instances currently:
- One 1GB hardware virtual machine
- Three 256MB containers running SmartOS
If the user attempts to provision:
-
1 512MB container or hardware virtual machine, the provision will fail.
- 1 256MB container or hardware virtual machine, the provision will succeed.*
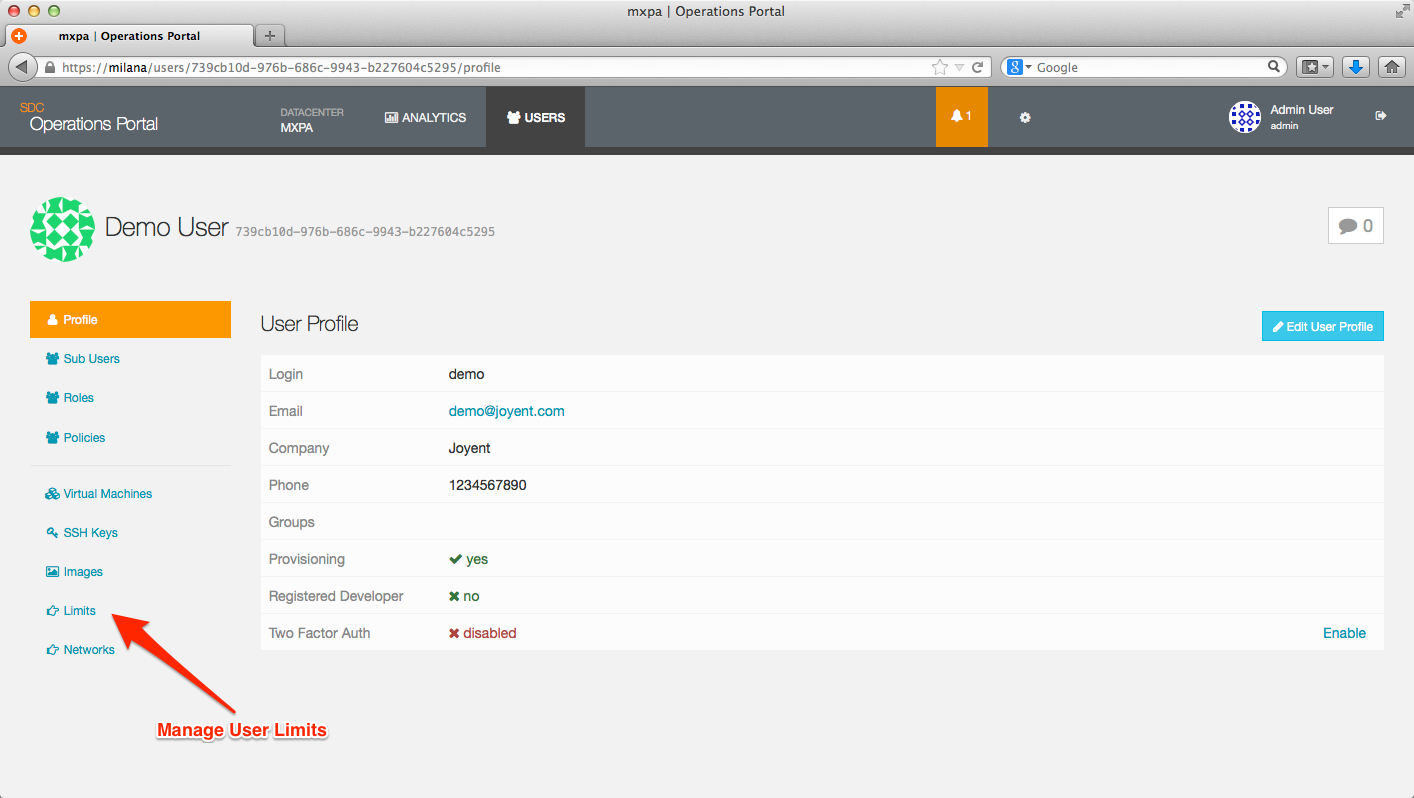
To access the Limits page, you need to click on the Limits tag on the User Detail page.
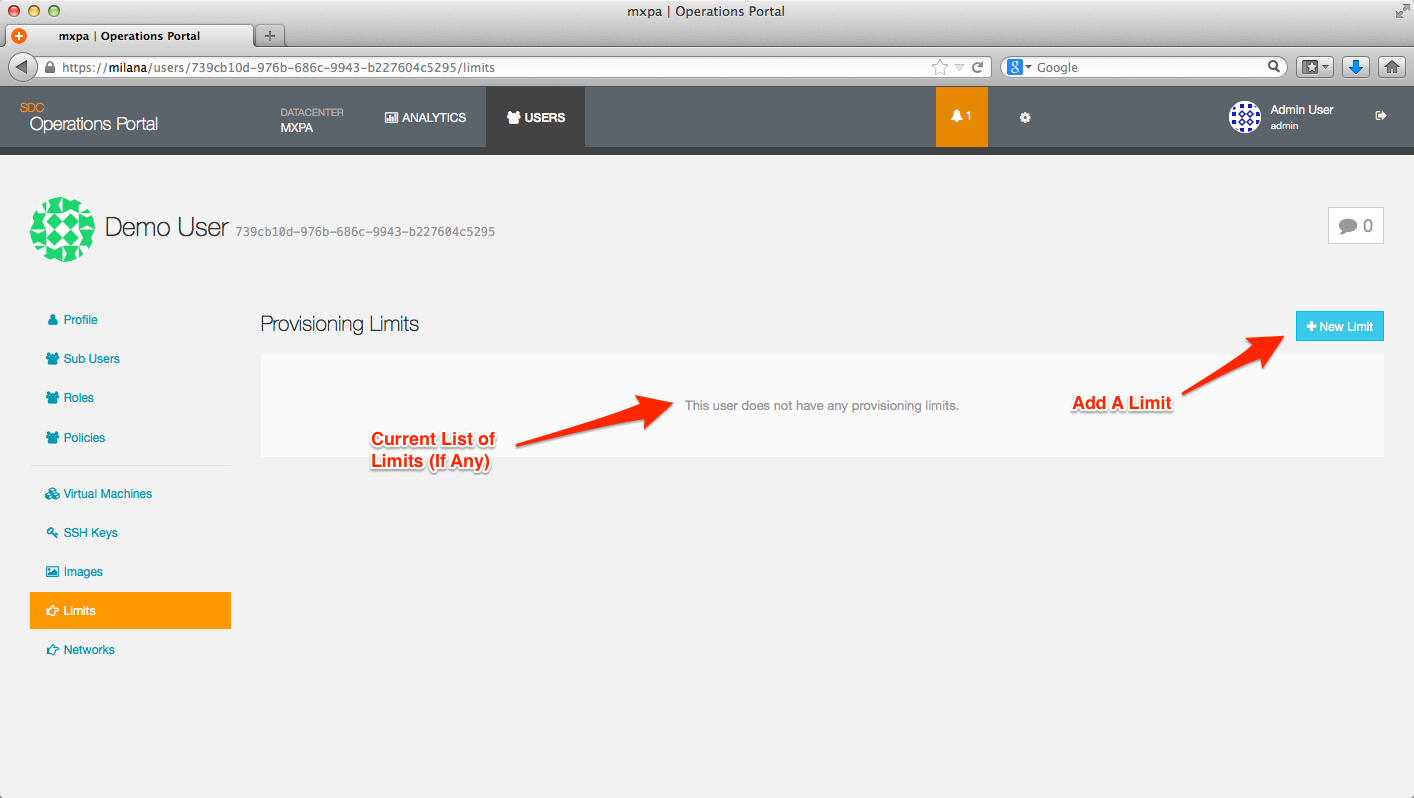
This will put you on the Limits page, which will show you the current limits set for the User account as well as allow you to create new limits.
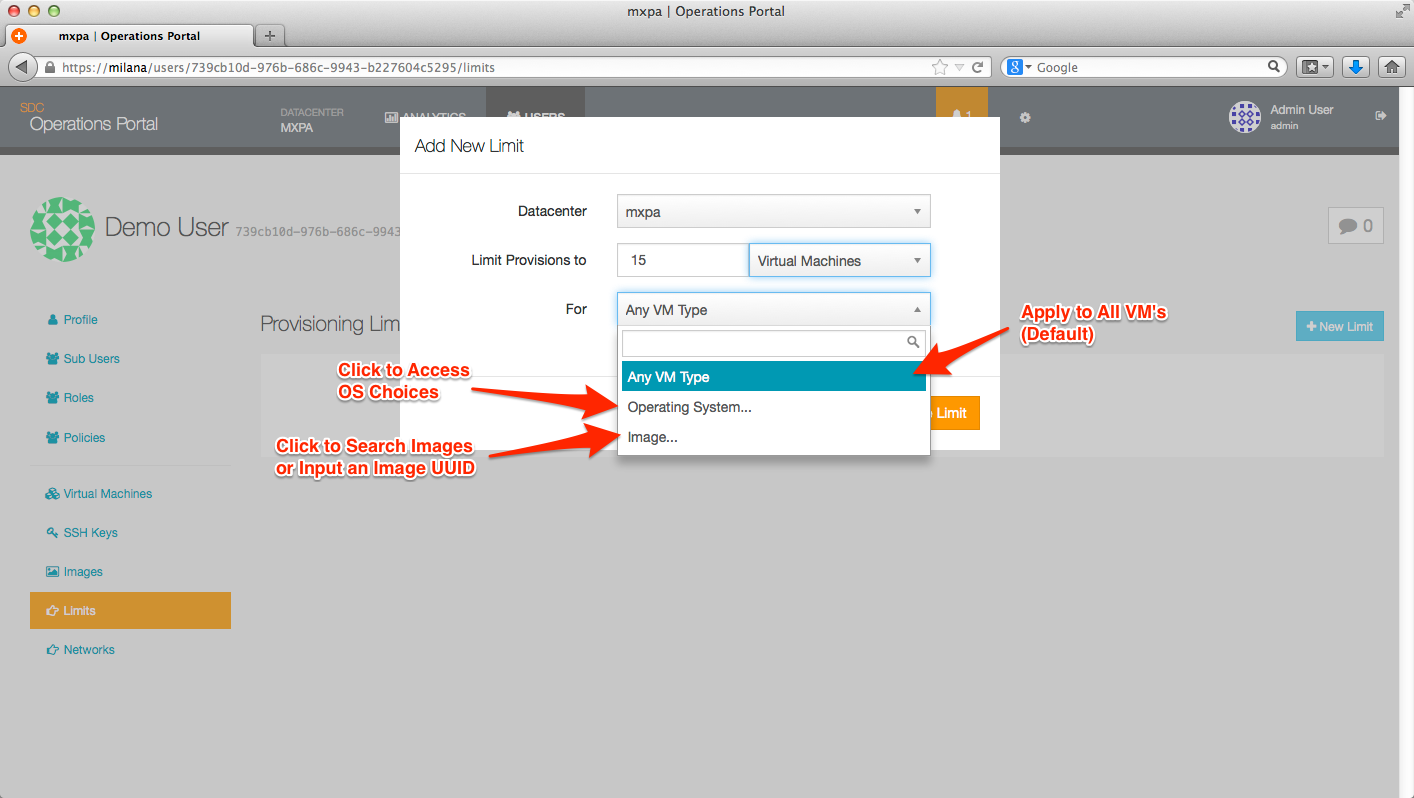
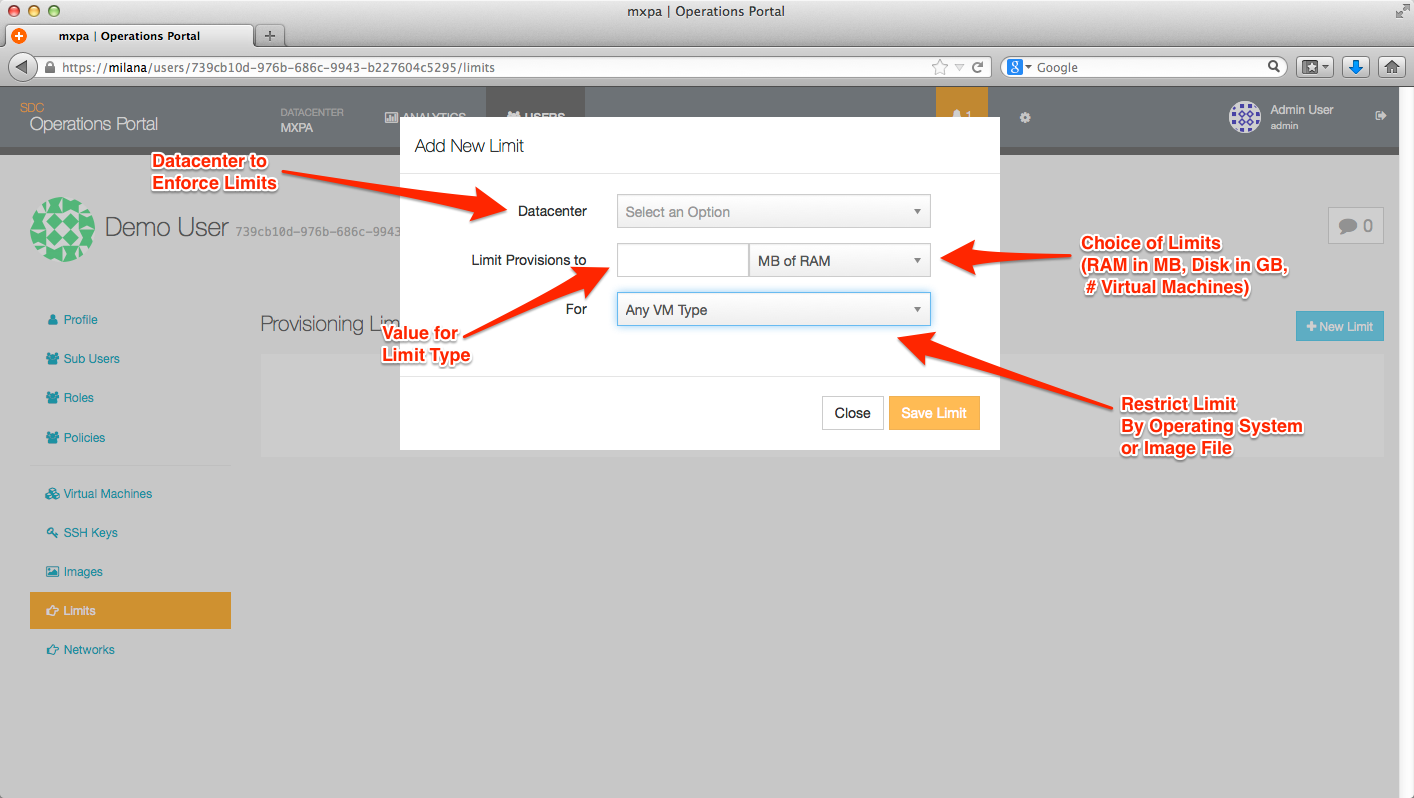
The Limits page is where you define your limits, based on:
- Datacenter
- Limit (RAM, Disk, Overall #)
- Type of instance (By OS or Image File)
Current limit choices:
Current OS / image file choices
