Custom instance addresses
In certain instances it may be necessary to allocate a particular MAC address or IP address to a given instance. This procedure shows you how to accomplish this.
Important Note: This section does not apply to addresses on a fabric network (VXLAN) - this only applies to L2/L3 networks that have been created in NAPI. For more information on the VXLAN implementation in Triton, please see Triton networking and fabric guide and Triton networking and fabric operations guide.
Prerequisites
This will require access to the head node of your installation, as root or as a root-equivalent user. You will also need to have already provisioned the instance that you wish to connect to the custom VNIC (either MAC address, IP address, or both).
Additionally, you will need to know the following information:
| Placeholder | Replace With | Notes |
|---|---|---|
| MAC-ADDRESS | Custom MAC Address | Must be unique within Triton; Only required if specifying a custom MAC address |
| NIC-KEY | Key to NAPI NICs | MAC Address with colons removed |
| OWNER-UUID | The UUID of the owner of the instance | |
| VM-UUID | The UUID of the instance the VNIC is to be connected to | |
| NETWORK-UUID | The UUID of the network the VNIC is part of | |
| IP-ADDRESS | Your custom IP Address | Must be in the range of the network specified above |
| NIC-TAG | NIC Tag of Network for your specified IP address | Only required if specifying an IP address |
| VLAN-ID | VLAN ID of the Network for your specified IP address | Only required if specifying an IP address |
Notes:
-
If you delete a custom VNIC from the instance, you will need to recreate it in NAPI.
-
NAPI is keyed on MAC address with the colons stripped out.
-
You cannot have two NICs with the same MAC in Triton (other than in fabric or VXLAN networks, where it is segreated by user).
- You cannot have two NICs with the same IP address in Triton (other than in fabric or VXLAN networks, where it is segreated by user).
Assigning a MAC address
This procedure will create a VNIC with a custom MAC address and allow you to assign it to an instance.
Create the VNIC
Run the following command, replacing the placeholders with your information
headnode# sdc-napi /nics -X POST -d '{ "mac": "MAC-ADDRESS", "primary": false, "owner_uuid": "OWNER-UUID", "belongs_to_uuid": "VM-UUID", "network_uuid": "NETWORK-UUID", "belongs_to_type": "zone" }'You should see output that looks like this:
headnode# sdc-napi /nics -X POST -d '{ "mac": "22:50:56:34:60:4c", "primary": false, "owner_uuid": "76ce0bcd-d418-ce8c-bbee-90dd4d4ea48e", "belongs_to_uuid": "420ee790-9d60-6dbe-a3c4-fc6f86e10f14", "network_uuid": "d534f307-da9b-4df5-86d6-0c3fc6905e46", "belongs_to_type": "zone" }'
HTTP/1.1 200 OK
Content-Type: application/json
Content-Length: 438
Date: Fri, 22 Aug 2014 20:00:37 GMT
Server: SmartDC Network API
x-request-id: fbd5a240-2a36-11e4-b8da-11f0f3531862
x-response-time: 289
x-server-name: 526b0403-eb9f-4e93-a3ac-7bcb95ab41d8
Connection: keep-alive

{
  "belongs_to_type": "zone",
  "belongs_to_uuid": "420ee790-9d60-6dbe-a3c4-fc6f86e10f14",
  "mac": "22:50:56:34:60:4c",
  "owner_uuid": "76ce0bcd-d418-ce8c-bbee-90dd4d4ea48e",
  "primary": false,
  "state": "running",
  "ip": "192.168.212.138",
  "netmask": "255.255.255.0",
  "gateway": "192.168.212.1",
  "vlan_id": 0,
  "nic_tag": "external",
  "resolvers": [
    "192.168.212.19",
    "192.168.212.119",
    "8.8.8.8",
    "8.8.4.4"
  ],
  "routes": {},
  "network_uuid": "d534f307-da9b-4df5-86d6-0c3fc6905e46"
}
At this point we have created the VNIC; this VNIC can be viewed in NAPI by using the MAC address with the colons stripped as a key. For example, to view the VNIC we created above you could query NAPI with:
headnode# sdc-napi /nics/NIC-KEYThis will return the following:
headnode# sdc-napi /nics/22505634604c
HTTP/1.1 200 OK
Content-Type: application/json
Content-Length: 438
Date: Fri, 22 Aug 2014 20:16:10 GMT
Server: SmartDC Network API
x-request-id: 280bc540-2a39-11e4-b8da-11f0f3531862
x-response-time: 788
x-server-name: 526b0403-eb9f-4e93-a3ac-7bcb95ab41d8
Connection: keep-alive

{
  "belongs_to_type": "zone",
  "belongs_to_uuid": "420ee790-9d60-6dbe-a3c4-fc6f86e10f14",
  "mac": "22:50:56:34:60:4c",
  "owner_uuid": "76ce0bcd-d418-ce8c-bbee-90dd4d4ea48e",
  "primary": false,
  "state": "stopped",
  "ip": "192.168.212.138",
  "netmask": "255.255.255.0",
  "gateway": "192.168.212.1",
  "vlan_id": 0,
  "nic_tag": "external",
  "resolvers": [
    "192.168.212.19",
    "192.168.212.119",
    "8.8.8.8",
    "8.8.4.4"
  ],
  "routes": {},
  "network_uuid": "d534f307-da9b-4df5-86d6-0c3fc6905e46"
}
Assign to the instance
At this point, the VNIC has been created but even though NAPI has been updated with the instance ownership information for the VNIC, the instance has not been updated through VMAPI.
To do this, we run the following command on the head node, replacing VM-UUID and MAC-ADDRESS with your information from above, which will generate a workflow.
headnode# sdc-vmapi /vms/VM-UUID?action=add_nics -X POST -d '{"macs": ["MAC-ADDRESS"]}'You should see output that looks like this:
headnode# sdc-vmapi /vms/420ee790-9d60-6dbe-a3c4-fc6f86e10f14?action=add_nics  -X POST -d '{"macs": ["22:50:56:34:60:4c"]}'

HTTP/1.1 202 Accepted
Content-Type: application/json
Content-Length: 100
Content-MD5: NImGgwQ2CZDhAQIBB1+8RA==
Date: Fri, 22 Aug 2014 20:01:09 GMT
Server: VMAPI
x-request-id: 0d6813d0-2a37-11e4-ad83-adaf6342f20d
x-response-time: 3017
x-server-name: 1ea983c2-ebfe-4499-8dfe-fd0e65ed9d85
Connection: keep-alive

{
  "vm_uuid": "420ee790-9d60-6dbe-a3c4-fc6f86e10f14",
  "job_uuid": "3a73baf9-deed-44f7-b340-f3ba1f2334f8"
}
The job_uuid returned above is the identifier for the workflow that was created to attach your VNIC to your instance. This can be viewed in the Operations Portal under the Jobs page, or it can be viewed by running the following command:
headnode# sdc-workflow /jobs/JOB-UUIDWhere you replace JOB-UUID with the UUID returned from the POST to VMAPU above.
Reboot the instance
When the workflow runs, the the instance will reboot - this is required when adding a VNIC to an instance.
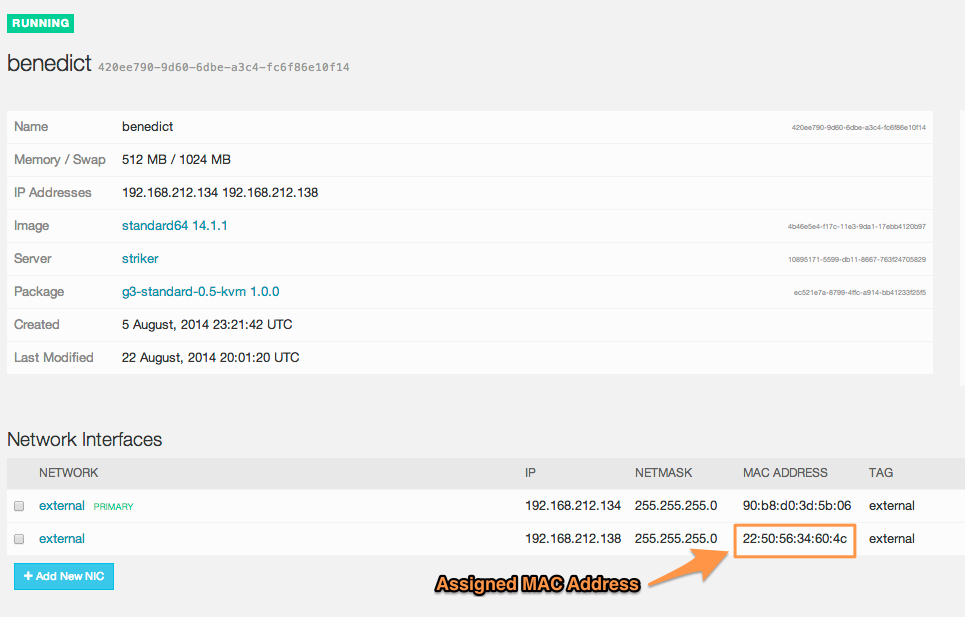
Verify the VNIC
Once the instance has been rebooted, you will be able to see the new VNIC in the list of adapters. For example, in SmartOS you can run ifconifg(1m) with the -a flag to see all the adapters
container# ifconfig -a
lo0: flags=2001000849<UP,LOOPBACK,RUNNING,MULTICAST,IPv4,VIRTUAL> mtu 8232 index 1
        inet 127.0.0.1 netmask ff000000
net0: flags=40001000843<UP,BROADCAST,RUNNING,MULTICAST,IPv4,L3PROTECT> mtu 1500 index 2
        inet 192.168.212.134 netmask ffffff00 broadcast 192.168.212.255
        ether 90:b8:d0:3d:5b:6
net1: flags=40001000843<UP,BROADCAST,RUNNING,MULTICAST,IPv4,L3PROTECT> mtu 1500 index 3
        inet 192.168.212.138 netmask ffffff00 broadcast 192.168.212.255
        ether 22:50:56:34:60:4c
lo0: flags=2002000849<UP,LOOPBACK,RUNNING,MULTICAST,IPv6,VIRTUAL> mtu 8252 index 1
        inet6 ::1/128
This can be verified in the Operations Portal
As well as through the VMAPI endpoint:
headnode# sdc-vmapi /vms/420ee790-9d60-6dbe-a3c4-fc6f86e10f14 | json -Hag nics
[
  {
    "interface": "net0",
    "mac": "90:b8:d0:3d:5b:06",
    "vlan_id": 0,
    "nic_tag": "external",
    "gateway": "192.168.212.1",
    "ip": "192.168.212.134",
    "netmask": "255.255.255.0",
    "network_uuid": "d534f307-da9b-4df5-86d6-0c3fc6905e46",
    "primary": true
  },
  {
    "interface": "net1",
    "mac": "22:50:56:34:60:4c",
    "vlan_id": 0,
    "nic_tag": "external",
    "gateway": "192.168.212.1",
    "ip": "192.168.212.138",
    "netmask": "255.255.255.0",
    "network_uuid": "d534f307-da9b-4df5-86d6-0c3fc6905e46"
  }
]
You can also verify that you can ping it (Note: you will need to do this from a host that has a route to the IP address you have just created.)
$ ping 192.168.212.138
PING 192.168.212.138 (192.168.212.138): 56 data bytes
64 bytes from 192.168.212.138: icmp_seq=0 ttl=255 time=0.606 ms
64 bytes from 192.168.212.138: icmp_seq=1 ttl=255 time=0.325 ms
64 bytes from 192.168.212.138: icmp_seq=2 ttl=255 time=0.329 ms
And see the newly created MAC in the arp table:
$ arp -a | grep 138
? (192.168.212.138) at 22:50:56:34:60:4c on en0 ifscope [ethernet]
Assigning an IP address
This procedure will create a VNIC with a custom IP address and allow you to assign it to an instance.
Create the VNIC
Run the following command, replacing the placeholders with your information
headnode# sdc-napi /nics -X POST -d '{ "vlan_id": "VLAN-ID", "nic_tag": "NIC-TAG", "ip" :"IP-ADDRESS", "primary": false, "owner_uuid": "OWNER-UUID", "belongs_to_uuid": "VM-UUID", "network_uuid": "NETWORK-UUID", "belongs_to_type": "zone" }'You should see output that looks like this:
headnode# sdc-napi /nics -X POST -d '{ "vlan_id": "0", "nic_tag": "external", "ip" :"192.168.212.193", "primary": false, "owner_uuid": "76ce0bcd-d418-ce8c-bbee-90dd4d4ea48e", "belongs_to_uuid": "420ee790-9d60-6dbe-a3c4-fc6f86e10f14", "network_uuid": "d534f307-da9b-4df5-86d6-0c3fc6905e46", "belongs_to_type": "zone"}'
HTTP/1.1 200 OK
Content-Type: application/json
Content-Length: 438
Date: Mon, 25 Aug 2014 21:22:25 GMT
Server: SmartDC Network API
x-request-id: e79bc2f0-2c9d-11e4-bdd6-772839feccb8
x-response-time: 1632
x-server-name: 526b0403-eb9f-4e93-a3ac-7bcb95ab41d8
Connection: keep-alive

{
  "belongs_to_type": "zone",
  "belongs_to_uuid": "420ee790-9d60-6dbe-a3c4-fc6f86e10f14",
  "mac": "90:b8:d0:29:cb:ff",
  "owner_uuid": "76ce0bcd-d418-ce8c-bbee-90dd4d4ea48e",
  "primary": false,
  "state": "running",
  "ip": "192.168.212.193",
  "netmask": "255.255.255.0",
  "gateway": "192.168.212.1",
  "vlan_id": 0,
  "nic_tag": "external",
  "resolvers": [
    "192.168.212.19",
    "192.168.212.119",
    "8.8.8.8",
    "8.8.4.4"
  ],
  "routes": {},
  "network_uuid": "d534f307-da9b-4df5-86d6-0c3fc6905e46"
}
At this point we have created the VNIC; this VNIC can be viewed in NAPI by using the MAC address with the colons stripped as a key. For example, to view the VNIC we created above you could query NAPI with:
headnode# sdc-napi /nics/NIC-KEYThis will return the following:
headnode# sdc-napi /nics/90b8d029cbff
HTTP/1.1 200 OK
Content-Type: application/json
Content-Length: 438
Date: Mon, 25 Aug 2014 21:23:38 GMT
Server: SmartDC Network API
x-request-id: 13f0ca80-2c9e-11e4-bdd6-772839feccb8
x-response-time: 789
x-server-name: 526b0403-eb9f-4e93-a3ac-7bcb95ab41d8
Connection: keep-alive

{
  "belongs_to_type": "zone",
  "belongs_to_uuid": "420ee790-9d60-6dbe-a3c4-fc6f86e10f14",
  "mac": "90:b8:d0:29:cb:ff",
  "owner_uuid": "76ce0bcd-d418-ce8c-bbee-90dd4d4ea48e",
  "primary": false,
  "state": "running",
  "ip": "192.168.212.193",
  "netmask": "255.255.255.0",
  "gateway": "192.168.212.1",
  "vlan_id": 0,
  "nic_tag": "external",
  "resolvers": [
    "192.168.212.19",
    "192.168.212.119",
    "8.8.8.8",
    "8.8.4.4"
  ],
  "routes": {},
  "network_uuid": "d534f307-da9b-4df5-86d6-0c3fc6905e46"
}
Assign to the instance
At this point, the VNIC has been created but even though NAPI has been updated with the instance ownership information for the VNIC, the instance has not been updated through VMAPI.
To do this, we run the following command on the head node, replacing VM-UUID and MAC-ADDRESS with your information from above, which will generate a workflow.
headnode# sdc-vmapi /vms/VM-UUID?action=add_nics -X POST -d '{"macs": ["MAC-ADDRESS"]}'You should see output that looks like this:
headnode# sdc-vmapi /vms/420ee790-9d60-6dbe-a3c4-fc6f86e10f14?action=add_nics  -X POST -d '{"macs": ["90:b8:d0:29:cb:ff"]}'
HTTP/1.1 202 Accepted
Content-Type: application/json
Content-Length: 100
Content-MD5: 9vDy2EFX5ZYujAAk3BDPhg==
Date: Mon, 25 Aug 2014 21:25:24 GMT
Server: VMAPI
x-request-id: 52af42b0-2c9e-11e4-91ad-731d320381f6
x-response-time: 1739
x-server-name: 1ea983c2-ebfe-4499-8dfe-fd0e65ed9d85
Connection: keep-alive

{
  "vm_uuid": "420ee790-9d60-6dbe-a3c4-fc6f86e10f14",
  "job_uuid": "f81d1358-24f2-4d4c-84c6-a196c44a754f"
}
The job_uuid returned above is the identifier for the workflow that was created to attach your VNIC to your instance. This can be viewed in the Operations Portal under the Jobs page, or it can be viewed by running the following command:
headnode# sdc-workflow /jobs/JOB-UUIDWhere you replace JOB-UUID with the UUID returned from the POST to VMAPI above.
Reboot the instance
When the workflow runs, the the instance will reboot - this is required when adding a VNIC to an instance.
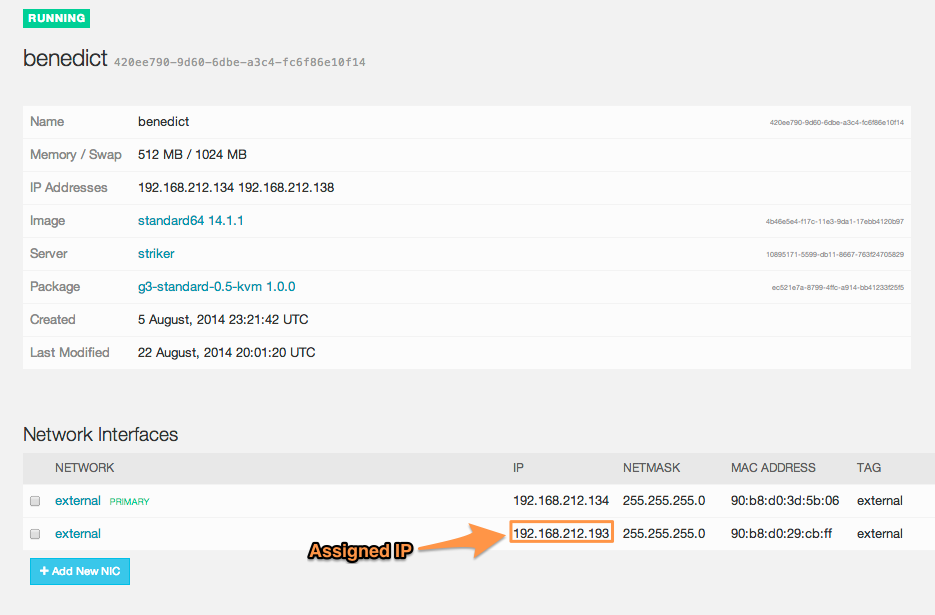
Verify the VNIC
Once the instance has been rebooted, you will be able to see the new VNIC in the list of adapters. For example, in SmartOS you can run ifconifg(1m) with the -a flag to see all the adapters
container# ifconfig -a
lo0: flags=2001000849<UP,LOOPBACK,RUNNING,MULTICAST,IPv4,VIRTUAL> mtu 8232 index 1
        inet 127.0.0.1 netmask ff000000
net0: flags=40001000843<UP,BROADCAST,RUNNING,MULTICAST,IPv4,L3PROTECT> mtu 1500 index 2
        inet 192.168.212.134 netmask ffffff00 broadcast 192.168.212.255
        ether 90:b8:d0:3d:5b:6
net1: flags=40001000843<UP,BROADCAST,RUNNING,MULTICAST,IPv4,L3PROTECT> mtu 1500 index 3
        inet 192.168.212.193 netmask ffffff00 broadcast 192.168.212.255
        ether 90:b8:d0:29:cb:ff
lo0: flags=2002000849<UP,LOOPBACK,RUNNING,MULTICAST,IPv6,VIRTUAL> mtu 8252 index 1
        inet6 ::1/128
This can be verified in the Operations Portal
As well as through the VMAPI endpoint:
headnode# sdc-vmapi /vms/420ee790-9d60-6dbe-a3c4-fc6f86e10f14 | json -Hag nics
[
  {
    "interface": "net0",
    "mac": "90:b8:d0:3d:5b:06",
    "vlan_id": 0,
    "nic_tag": "external",
    "gateway": "192.168.212.1",
    "ip": "192.168.212.134",
    "netmask": "255.255.255.0",
    "network_uuid": "d534f307-da9b-4df5-86d6-0c3fc6905e46",
    "primary": true
  },
  {
    "interface": "net1",
    "mac": "90:b8:d0:29:cb:ff",
    "vlan_id": 0,
    "nic_tag": "external",
    "gateway": "192.168.212.1",
    "ip": "192.168.212.193",
    "netmask": "255.255.255.0",
    "network_uuid": "d534f307-da9b-4df5-86d6-0c3fc6905e46"
  }
]
You can also verify that you can ping it (Note: you will need to do this from a host that has a route to the IP address you have just created.)
$ ping 192.168.212.193
PING 192.168.212.193 (192.168.212.193): 56 data bytes
64 bytes from 192.168.212.193: icmp_seq=0 ttl=255 time=0.606 ms
64 bytes from 192.168.212.193: icmp_seq=1 ttl=255 time=0.325 ms
64 bytes from 192.168.212.193: icmp_seq=2 ttl=255 time=0.329 ms
And see the newly created MAC in the arp table:
$ arp -a | grep 193
? (192.168.212.193) at 90:b8:d0:29:cb:ff on en0 ifscope [ethernet]
Assigning both a MAC and an IP address
This procedure will create a VNIC with a custom MAC and IP address and allow you to assign it to an instance.
Create the VNIC
Run the following command, replacing the placeholders with your information
headnode# sdc-napi /nics -X POST -d '{ "vlan_id": "VLAN-ID", "nic_tag": "NIC-TAG", "ip" :"IP-ADDRESS", "primary": false, "owner_uuid": "OWNER-UUID", "belongs_to_uuid": "VM-UUID", "network_uuid": "NETWORK-UUID", "belongs_to_type": "zone", "mac":"MAC-ADDRESS" }'You should see output that looks like this:
headnode# sdc-napi /nics -X POST -d '{ "vlan_id": "0", "nic_tag": "external", "ip" :"192.168.212.186", "primary": false, "owner_uuid": "76ce0bcd-d418-ce8c-bbee-90dd4d4ea48e", "belongs_to_uuid": "420ee790-9d60-6dbe-a3c4-fc6f86e10f14", "network_uuid": "d534f307-da9b-4df5-86d6-0c3fc6905e46", "belongs_to_type": "zone", "mac":"99:50:56:34:60:4d"}'
HTTP/1.1 200 OK
Content-Type: application/json
Content-Length: 438
Date: Mon, 25 Aug 2014 21:40:50 GMT
Server: SmartDC Network API
x-request-id: 7b26fe20-2ca0-11e4-bdd6-772839feccb8
x-response-time: 18
x-server-name: 526b0403-eb9f-4e93-a3ac-7bcb95ab41d8
Connection: keep-alive

{
  "belongs_to_type": "zone",
  "belongs_to_uuid": "420ee790-9d60-6dbe-a3c4-fc6f86e10f14",
  "mac": "99:50:56:34:60:4d",
  "owner_uuid": "76ce0bcd-d418-ce8c-bbee-90dd4d4ea48e",
  "primary": false,
  "state": "running",
  "ip": "192.168.212.186",
  "netmask": "255.255.255.0",
  "gateway": "192.168.212.1",
  "vlan_id": 0,
  "nic_tag": "external",
  "resolvers": [
    "192.168.212.19",
    "192.168.212.119",
    "8.8.8.8",
    "8.8.4.4"
  ],
  "routes": {},
  "network_uuid": "d534f307-da9b-4df5-86d6-0c3fc6905e46"
}
At this point we have created the VNIC; this VNIC can be viewed in NAPI by using the MAC address with the colons stripped as a key. For example, to view the VNIC we created above you could query NAPI with:
headnode# sdc-napi /nics/NIC-KEYThis will return the following:
headnode# sdc-napi /nics/99505634604d
HTTP/1.1 200 OK
Content-Type: application/json
Content-Length: 438
Date: Mon, 25 Aug 2014 21:42:40 GMT
Server: SmartDC Network API
x-request-id: bcc9f8a0-2ca0-11e4-bdd6-772839feccb8
x-response-time: 8
x-server-name: 526b0403-eb9f-4e93-a3ac-7bcb95ab41d8
Connection: keep-alive

{
  "belongs_to_type": "zone",
  "belongs_to_uuid": "420ee790-9d60-6dbe-a3c4-fc6f86e10f14",
  "mac": "99:50:56:34:60:4d",
  "owner_uuid": "76ce0bcd-d418-ce8c-bbee-90dd4d4ea48e",
  "primary": false,
  "state": "running",
  "ip": "192.168.212.186",
  "netmask": "255.255.255.0",
  "gateway": "192.168.212.1",
  "vlan_id": 0,
  "nic_tag": "external",
  "resolvers": [
    "192.168.212.19",
    "192.168.212.119",
    "8.8.8.8",
    "8.8.4.4"
  ],
  "routes": {},
  "network_uuid": "d534f307-da9b-4df5-86d6-0c3fc6905e46"
}
Assign to the instance
At this point, the VNIC has been created but even though NAPI has been updated with the instance ownership information for the VNIC, the instance has not been updated through VMAPI.
To do this, we run the following command on the head node, replacing VM-UUID and MAC-ADDRESS with your information from above, which will generate a workflow.
headnode# sdc-vmapi /vms/VM-UUID?action=add_nics -X POST -d '{"macs": ["MAC-ADDRESS"]}'You should see output that looks like this:
headnode# sdc-vmapi /vms/420ee790-9d60-6dbe-a3c4-fc6f86e10f14?action=add_nics -X POST -d '{"macs": ["99:50:56:34:60:4d"]}'
HTTP/1.1 202 Accepted
Content-Type: application/json
Content-Length: 100
Content-MD5: xqTU2S+p3kWCPNBHxHChTQ==
Date: Mon, 25 Aug 2014 22:44:40 GMT
Server: VMAPI
x-request-id: 63b61510-2ca9-11e4-91ad-731d320381f6
x-response-time: 4269
x-server-name: 1ea983c2-ebfe-4499-8dfe-fd0e65ed9d85
Connection: keep-alive

{
  "vm_uuid": "420ee790-9d60-6dbe-a3c4-fc6f86e10f14",
  "job_uuid": "db748b11-cbec-452c-9a67-e6f644373462"
}
The job_uuid returned above is the identifier for the workflow that was created to attach your VNIC to your instance. This can be viewed in the Operations Portal under the Jobs page, or it can be viewed by running the following command:
headnode# sdc-workflow /jobs/JOB-UUIDWhere you replace JOB-UUID with the UUID returned from the POST to VMAPI above.
Reboot the instance
When the workflow runs, the the instance will reboot - this is required when adding a VNIC to an instance.
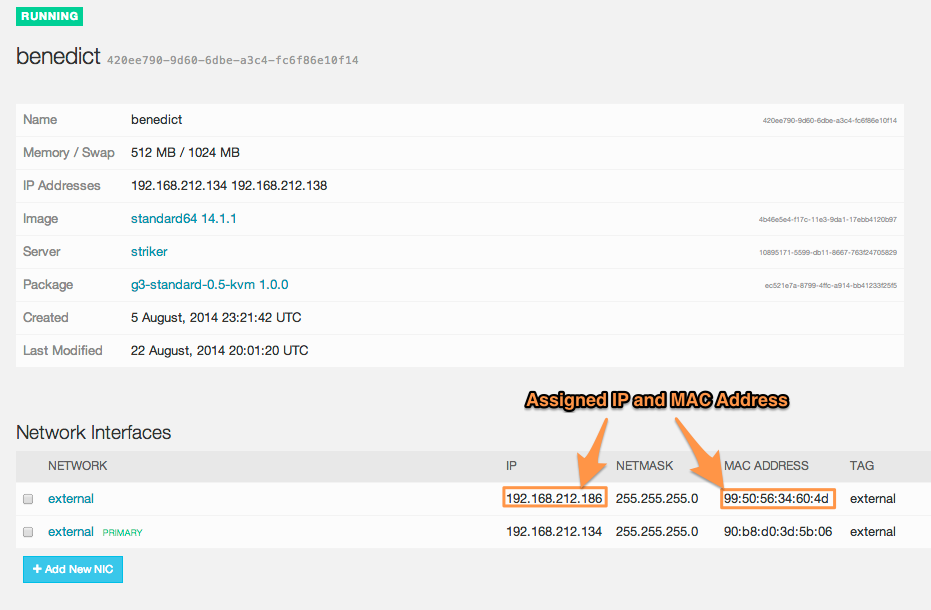
Verify the VNIC
Once the instance has been rebooted, you will be able to see the new VNIC in the list of adapters. For example, in SmartOS you can run ifconifg(1m) with the -a flag to see all the adapters
container# ifconfig -a
lo0: flags=2001000849<UP,LOOPBACK,RUNNING,MULTICAST,IPv4,VIRTUAL> mtu 8232 index 1
        inet 127.0.0.1 netmask ff000000
net0: flags=40001000843<UP,BROADCAST,RUNNING,MULTICAST,IPv4,L3PROTECT> mtu 1500 index 2
        inet 192.168.212.134 netmask ffffff00 broadcast 192.168.212.255
        ether 90:b8:d0:3d:5b:6
net1: flags=40001000843<UP,BROADCAST,RUNNING,MULTICAST,IPv4,L3PROTECT> mtu 1500 index 3
        inet 192.168.212.186 netmask ffffff00 broadcast 192.168.212.255
        ether 99:50:56:34:60:4d
lo0: flags=2002000849<UP,LOOPBACK,RUNNING,MULTICAST,IPv6,VIRTUAL> mtu 8252 index 1
        inet6 ::1/128
This can be verified in the Operations Portal
As well as through the VMAPI endpoint:
headnode# sdc-vmapi /vms/420ee790-9d60-6dbe-a3c4-fc6f86e10f14 | json -Hag nics
[
  {
    "interface": "net0",
    "mac": "90:b8:d0:3d:5b:06",
    "vlan_id": 0,
    "nic_tag": "external",
    "gateway": "192.168.212.1",
    "ip": "192.168.212.134",
    "netmask": "255.255.255.0",
    "network_uuid": "d534f307-da9b-4df5-86d6-0c3fc6905e46",
    "primary": true
  },
  {
    "interface": "net1",
    "mac": "99:50:56:34:60:4d",
    "vlan_id": 0,
    "nic_tag": "external",
    "gateway": "192.168.212.1",
    "ip": "192.168.212.186",
    "netmask": "255.255.255.0",
    "network_uuid": "d534f307-da9b-4df5-86d6-0c3fc6905e46"
  }
]
You can also verify that you can ping it (Note: you will need to do this from a host that has a route to the IP address you have just created.)
$ ping 192.168.212.186
PING 192.168.212.186 (192.168.212.193): 56 data bytes
64 bytes from 192.168.212.186: icmp_seq=0 ttl=255 time=0.606 ms
64 bytes from 192.168.212.186: icmp_seq=1 ttl=255 time=0.325 ms
64 bytes from 192.168.212.186: icmp_seq=2 ttl=255 time=0.329 ms
And see the newly created MAC in the arp table:
$ arp -a | grep 186
? (192.168.212.186) at 99:50:56:34:60:4d on en0 ifscope [ethernet]