Managing NICs on an instance
Instructions on how to manage the NICs for both container and hardware virtual machines in Triton.
Managing NICs on an instance
You can add or remove NICs, as well as manage anti-spoofing on instances in Triton from the Operations Portal or by using VMAPI .
Managing NICs using the Operations Portal
To add, modify, or remove a NIC using the Operations Portal, search for the instance and navigate to the instance page.
Note: Adding or removing a NIC will trigger a reboot of the instance in order for the changes to take effect.
Adding a NIC
On the Virtual Machines page in the Operations Portal, you'll see a Network Interfaces section, similar to the following:

Click the Add New NIC button. A window will pop open that looks like the following:

Select the network you want to add from the drop down.
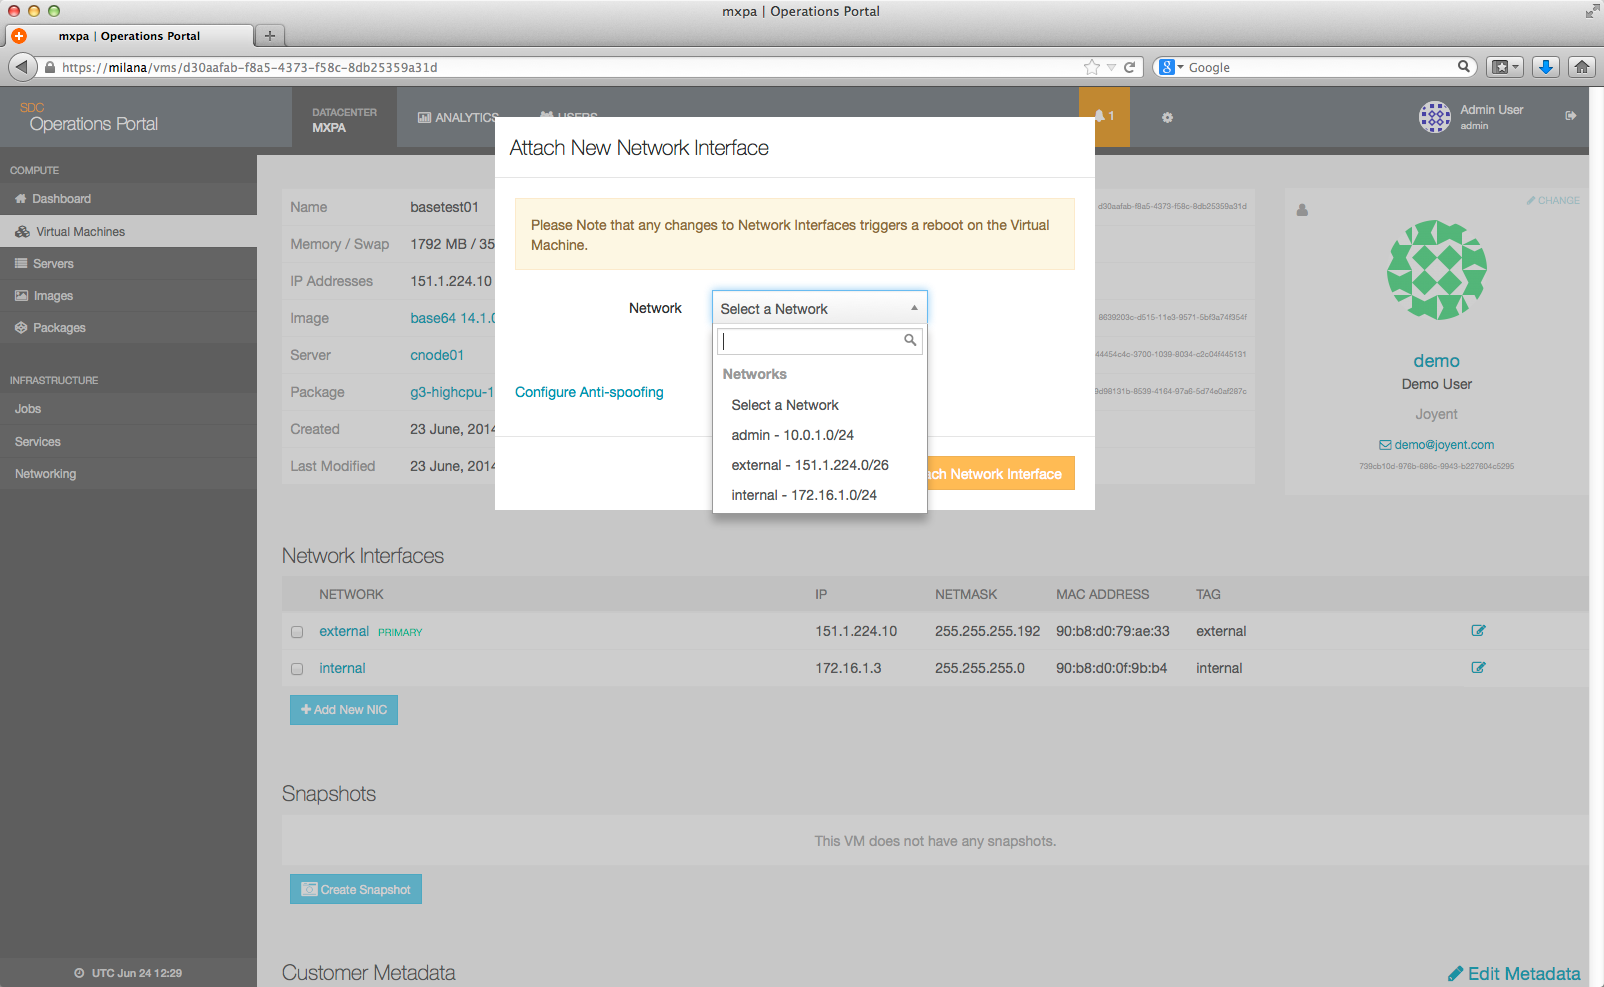
Once you've made your selection, attach the network interface by clicking the Attach Network Interface button.
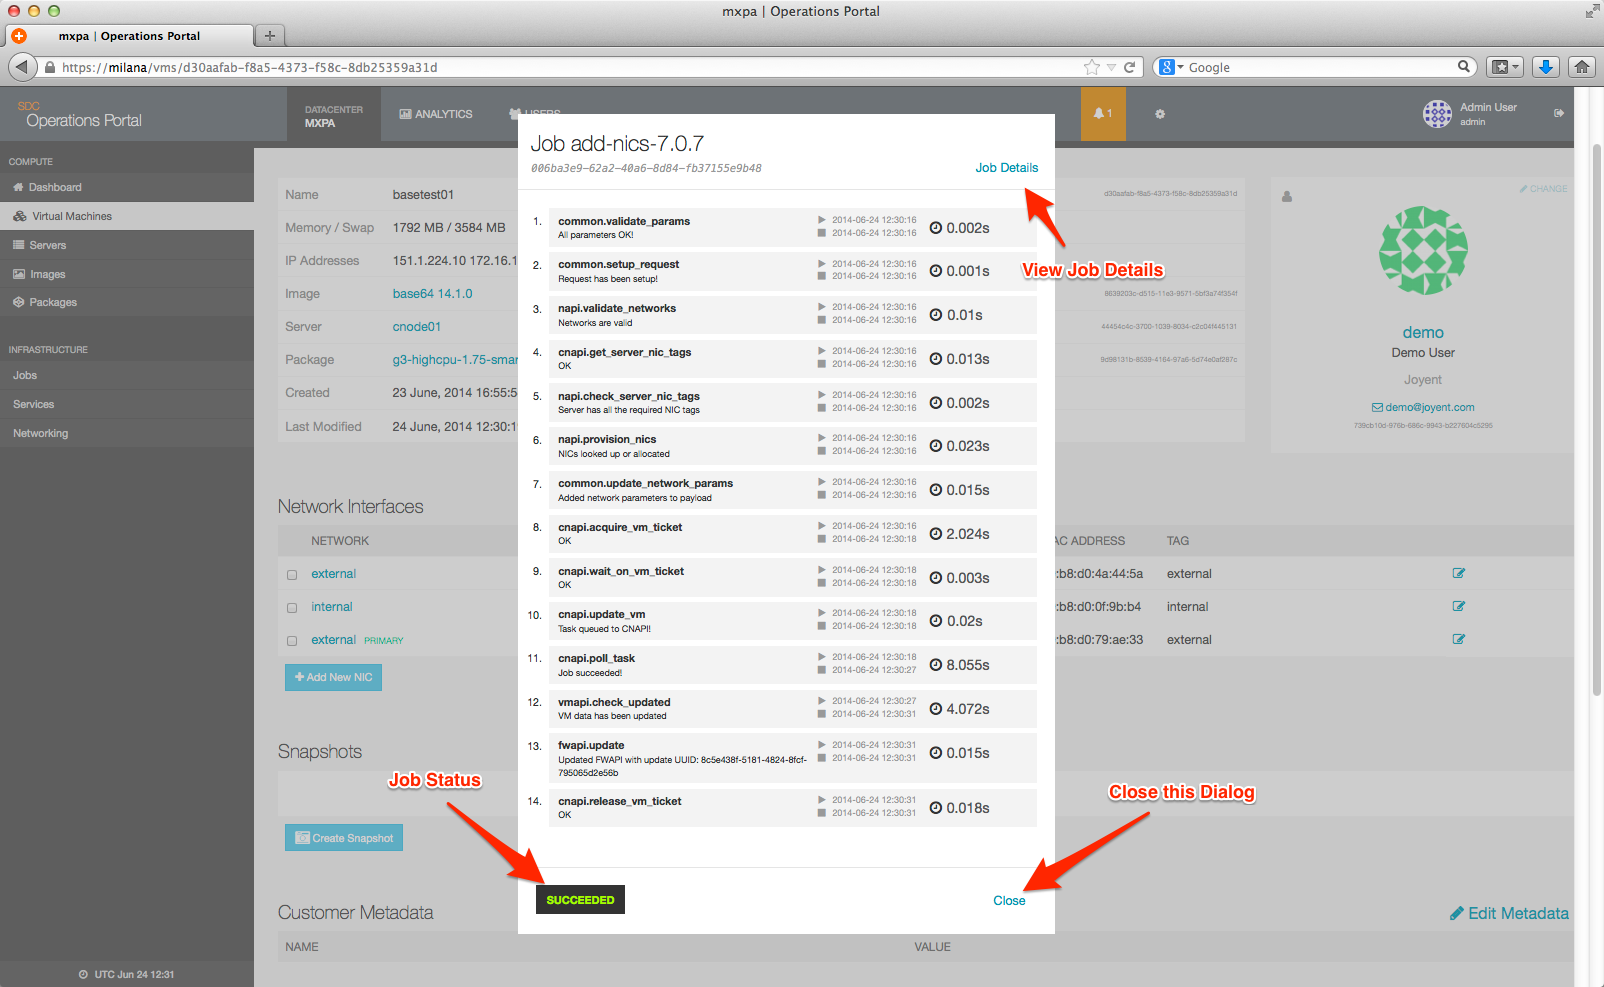
The job will be created on your behalf and run until it's complete. A status will be shown at the bottom of the job detail.
Once the job completes, the new NIC will be displayed on the instance page:

Removing a NIC
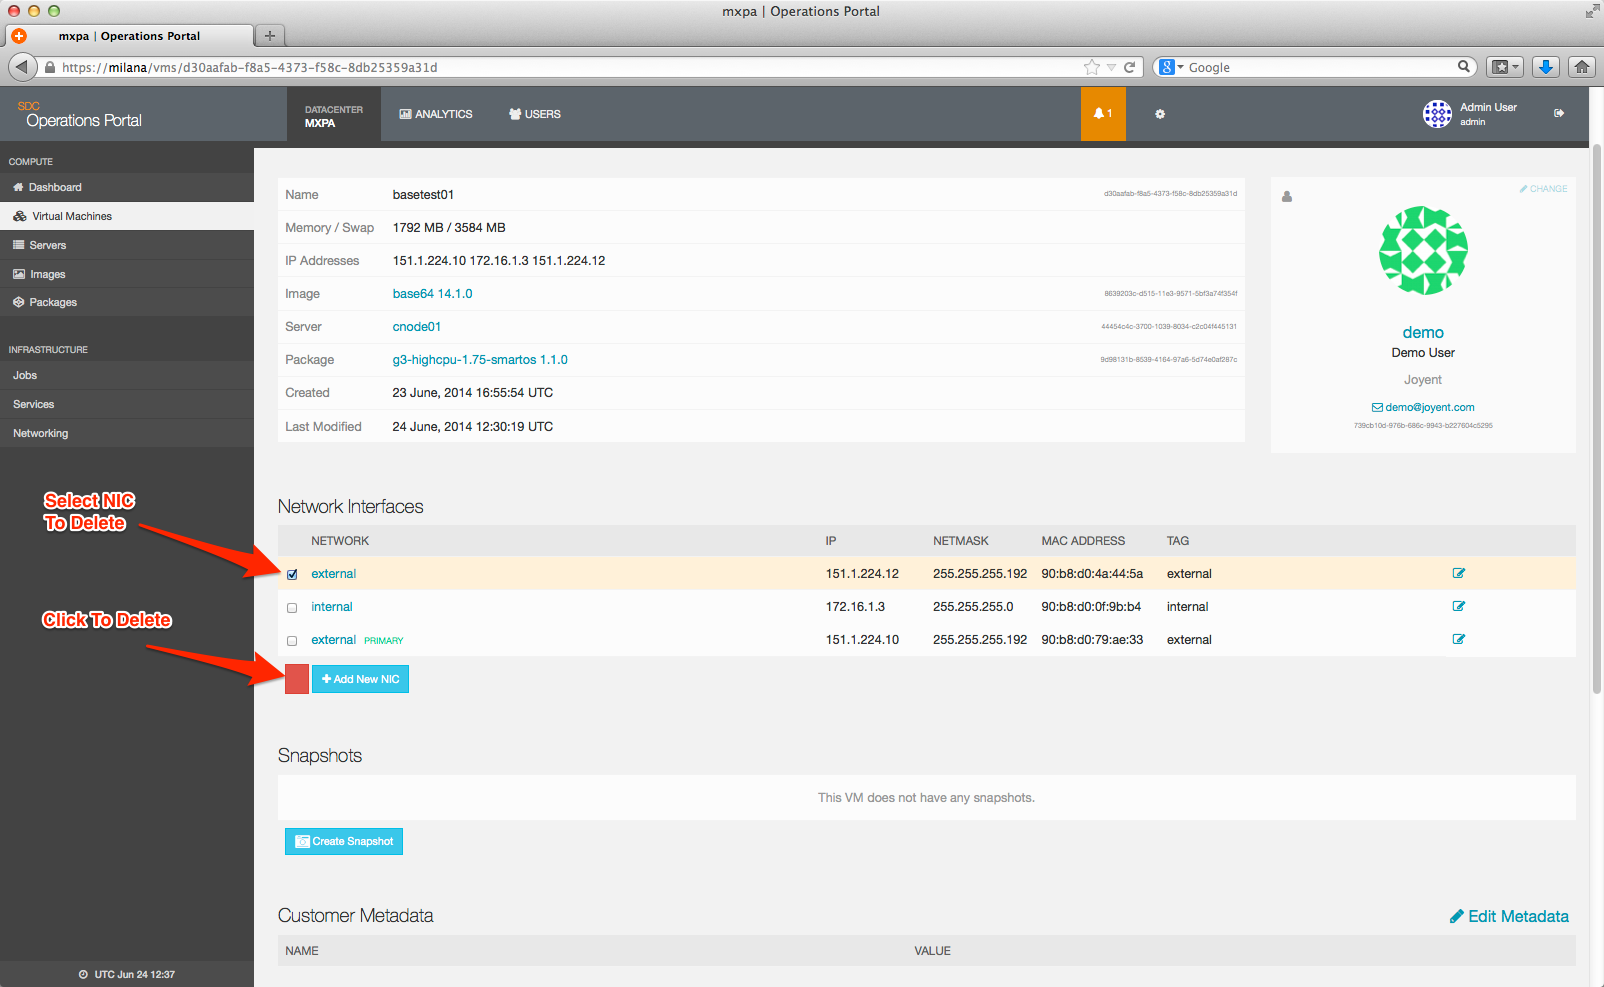
To remove a NIC from a instance, select the NIC you want to remove and then click the red trash can (note that this only appears once you select a NIC):
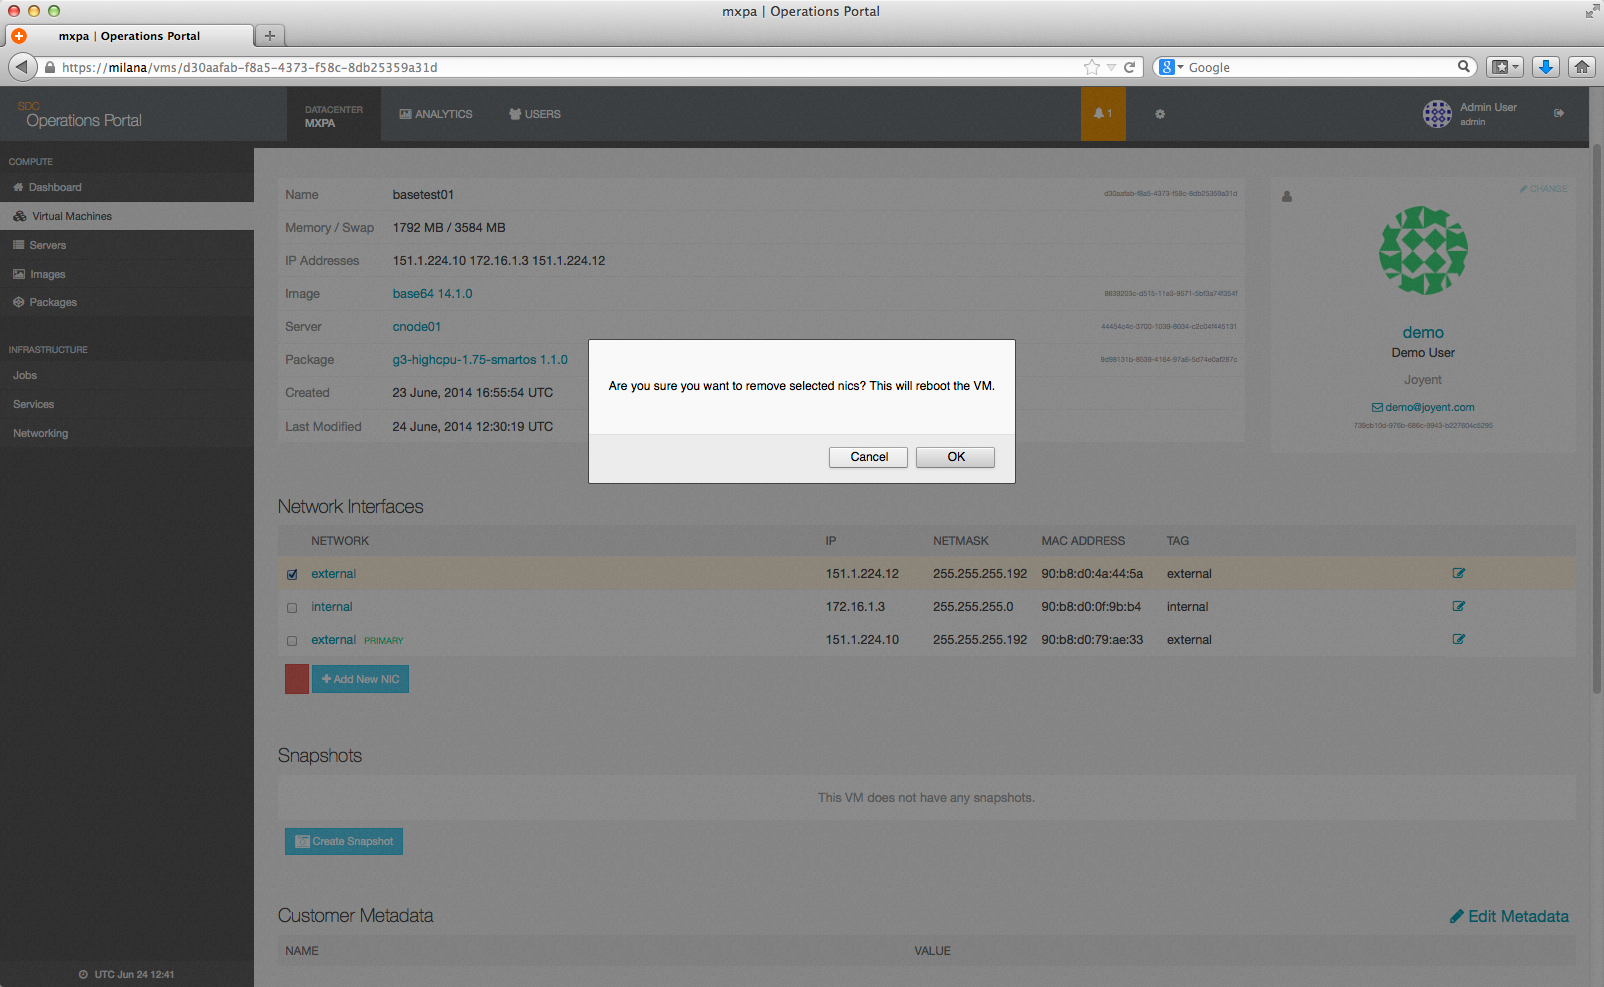
You will first be asked to confirm that you wish to remove the NIC, and be notified that this will cause the instance to be rebooted:
Once you answer affirmatively, this will cause a delete job to be started on your behalf:
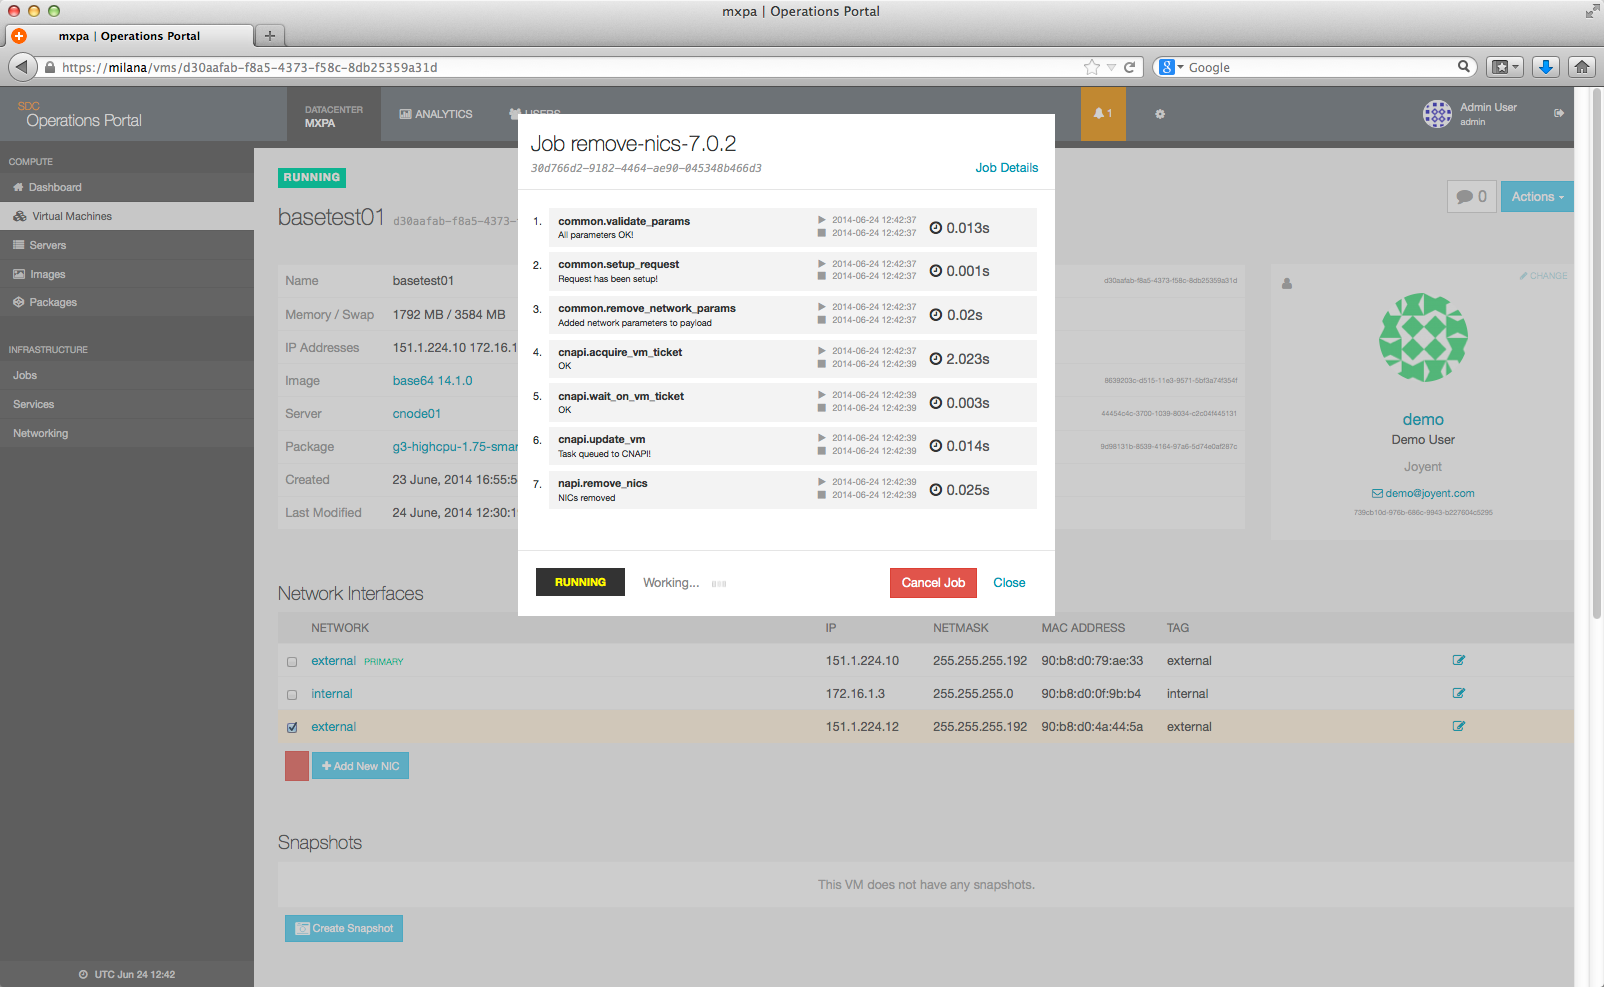
Once the job is complete, you may have to refresh the instance page to see the update in the Network Interfaces section.
Modifying a NIC
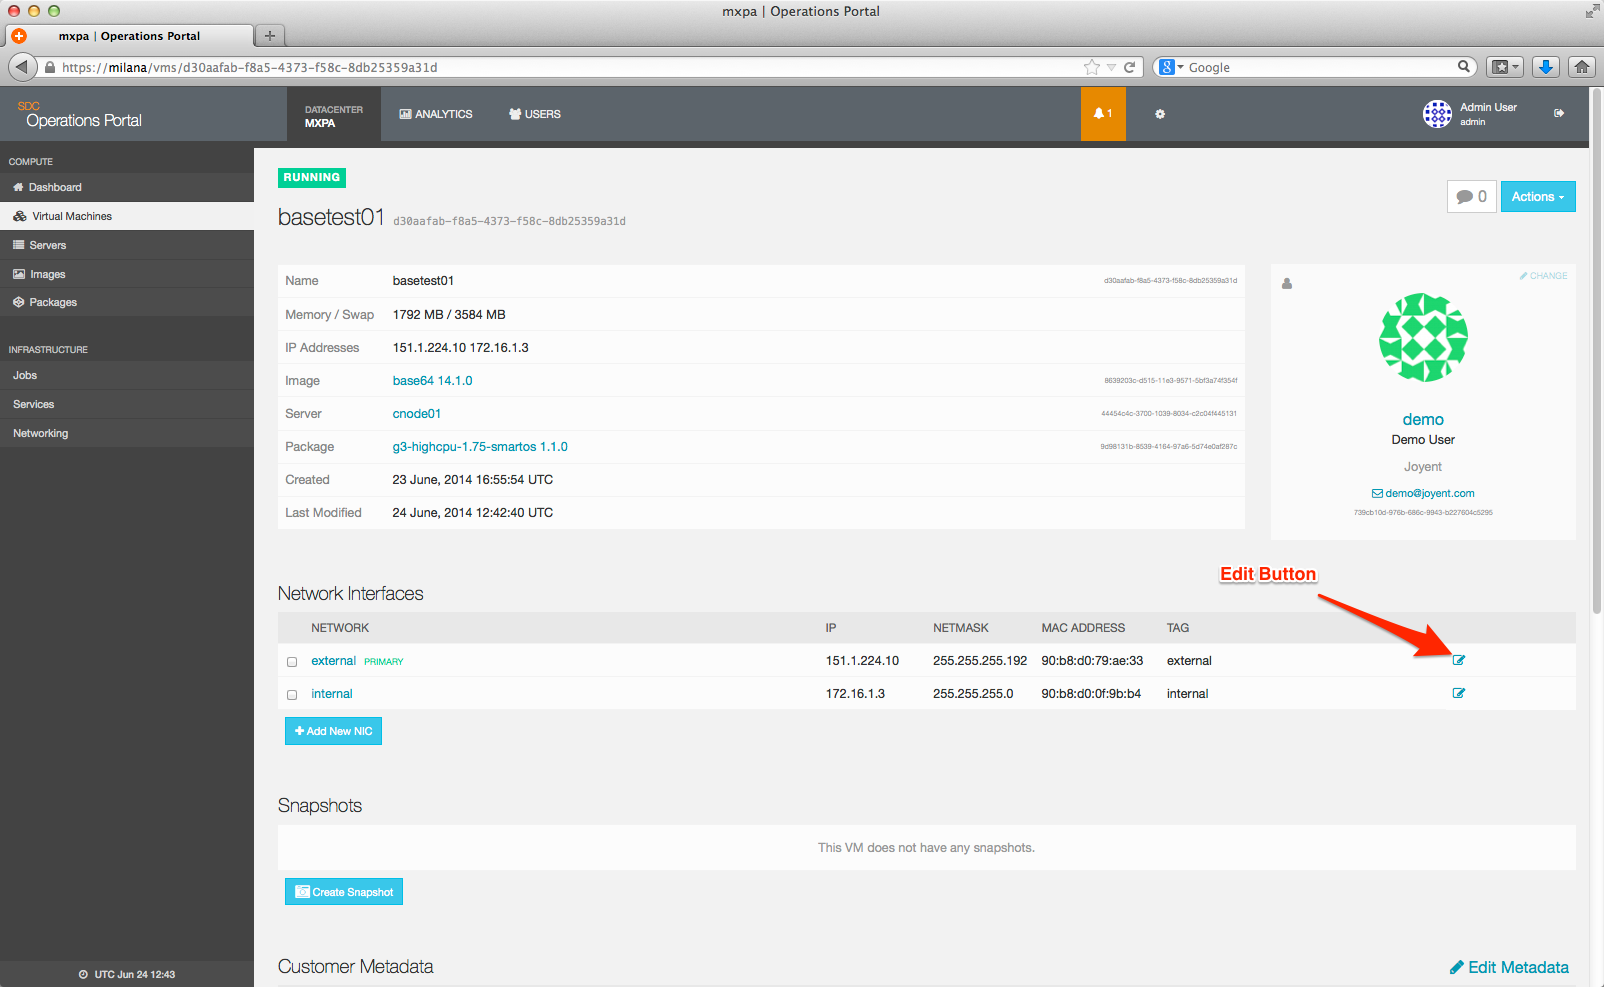
To modify a NIC, select the blue Pencil icon on the right hand side of the line corresponding to the NIC you wish to edit.
This brings up the following dialog.
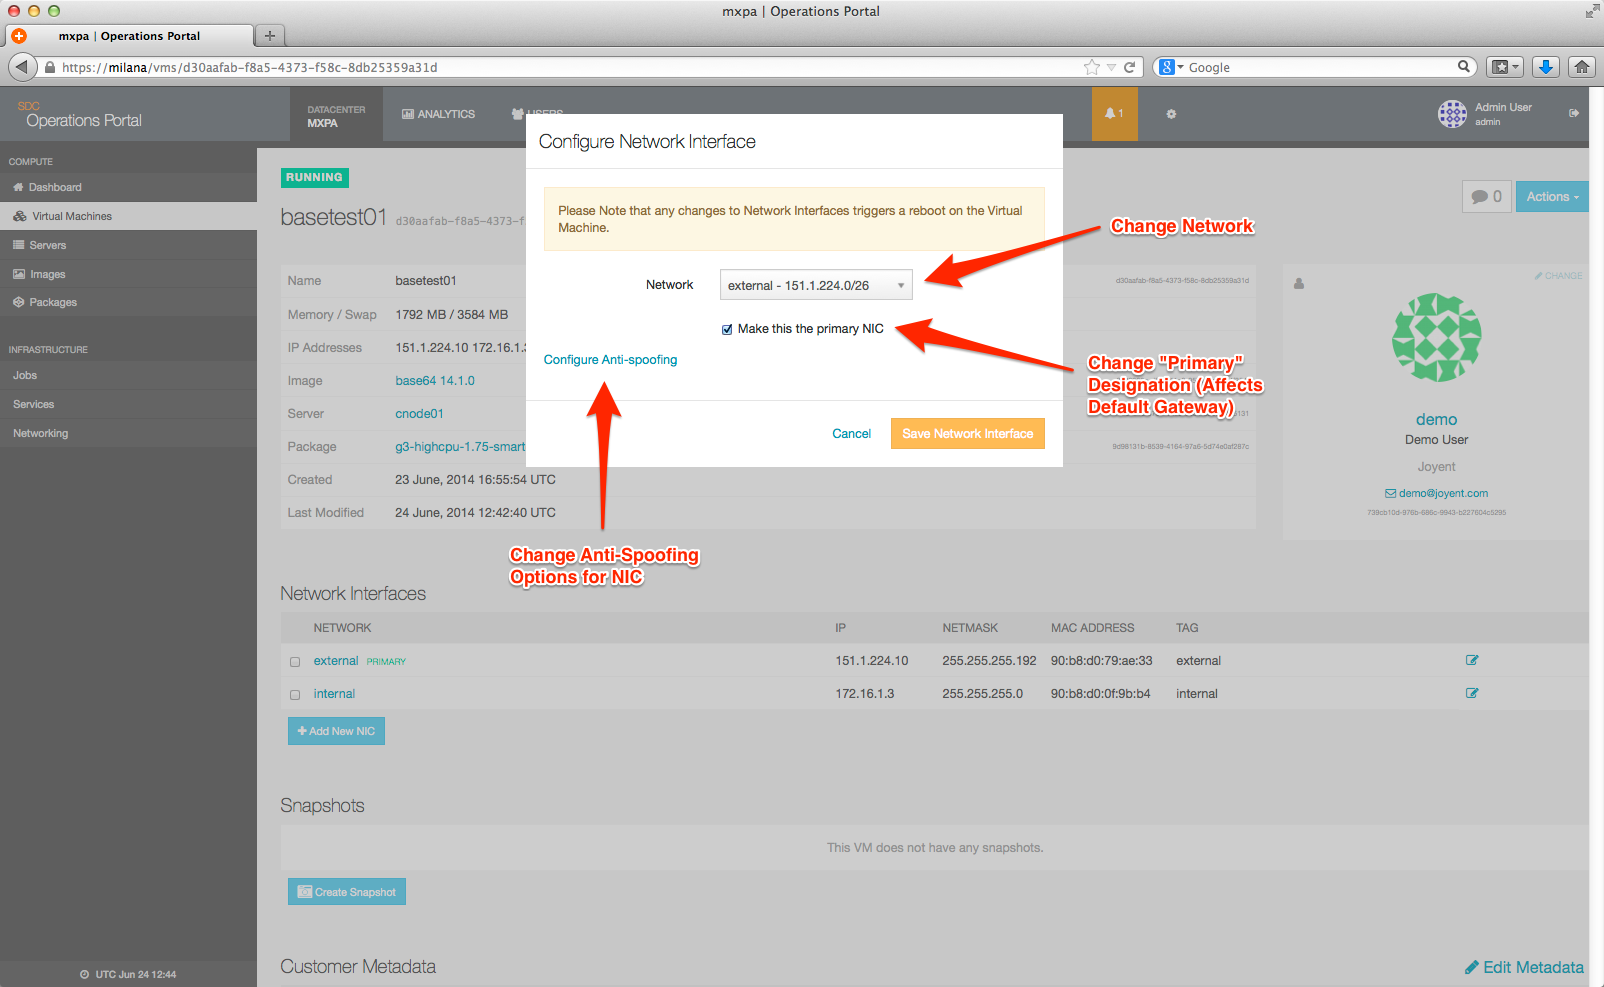
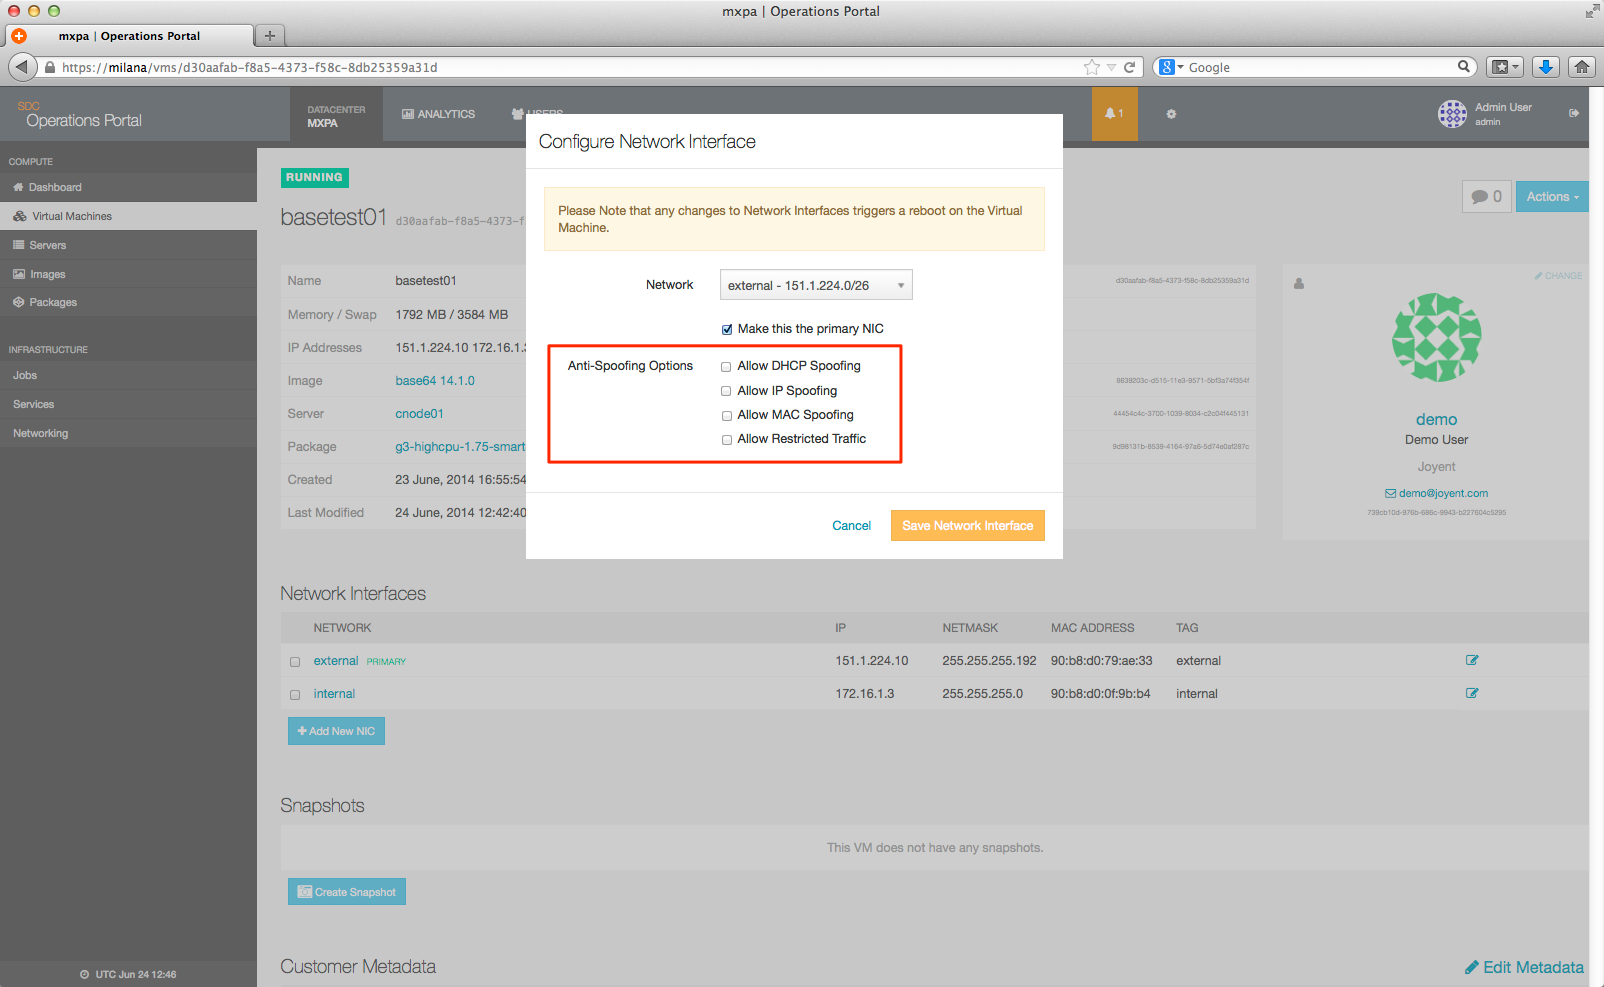
Clicking on the Configure anti-spoofing tag will expand the dialog to show additional options.
Any changes you make will trigger a job to be run on your behalf, and will also trigger a reboot of the instance.
Adding/Removing NICs using VMAPI from the head node
Note: Adding or removing a NIC using VMAPI will trigger a reboot of the instance in order for the changes to take effect.
Adding a NIC
To add a new NIC to an existing instance from the head node, use vmapi as shown below:
headnode# sdc-vmapi /vms/:uuid?action=add_nics -d '{"networks": [{"uuid":"network_uuid"}]}'Example usage and output:
headnode# sdc-vmapi /vms/4985f9fb-e674-e472-ac02-86e15242d6f7?action=add_nics -d '{"networks":[{"uuid":"27eac077-4589-4604-ae59-69e567a5e9f3"}]}'
HTTP/1.1 202 Accepted
Content-Type: application/json
Content-Length: 100
Content-MD5: XkIQRJuckCenM6OagiARug==
Date: Fri, 14 Mar 2014 05:50:53 GMT
Server: VMAPI
x-request-id: 9b006a50-ab3c-11e3-80c0-d1d28a191fe5
x-response-time: 37
x-server-name: 069caca7-94dc-4ebb-9579-cc223e44d3ab
Connection: keep-alive

{
  "vm_uuid": "4985f9fb-e674-e472-ac02-86e15242d6f7",
  "job_uuid": "61b9c279-a0e9-447a-953e-19f2864a7a86"
}
Removing a NIC
To remove a NIC from an instance, obtain the MAC address of the NIC you want to remove.
The MAC address of a NIC can be obtained by:
- running
ifconfig -afrom inside the instance - navigating to the instance page under the Network Interfaces section in the Operations Portal
- running vmadm(1m) on the compute node where the instance lives, such as:
headnode# vmadm get vm_uuid | json -aH nicsExample usage and output:
headnode# vmadm get 4985f9fb-e674-e472-ac02-86e15242d6f7 | json -aH nics
[
  {
    "interface": "net0",
    "mac": "90:b8:d0:6e:8c:86", <--------- mac address
    "vlan_id": 100,
    "nic_tag": "external",
    "gateway": "151.1.224.1",
    "ip": "151.1.224.13",
    "netmask": "255.255.255.192",
    "network_uuid": "ff1db258-4747-4bc2-8bfd-d8d69dbdec01",
    "primary": true
  },
  {
    "interface": "net1",
    "mac": "90:b8:d0:5e:1e:02",
    "vlan_id": 200,
    "nic_tag": "internal",
    "gateway": "172.16.1.1",
    "ip": "172.16.1.7",
    "netmask": "255.255.255.0",
    "network_uuid": "27eac077-4589-4604-ae59-69e567a5e9f3"
  }
]
To remove a NIC from an instance using vmapi, run:
headnode# sdc-vmapi /vms/:uuid?action=remove_nics -d '{"macs": ["mac_address"]}'Example usage and output:
headnode# sdc-vmapi /vms/4985f9fb-e674-e472-ac02-86e15242d6f7?action=remove_nics -d '{"macs": ["90:b8:d0:de:fe:bd"]}'
HTTP/1.1 202 Accepted
Content-Type: application/json
Content-Length: 100
Content-MD5: Mx3nZn/v8Kk9vmvbbGMryQ==
Date: Fri, 14 Mar 2014 05:52:58 GMT
Server: VMAPI
x-request-id: e57e8b70-ab3c-11e3-80c0-d1d28a191fe5
x-response-time: 27
x-server-name: 069caca7-94dc-4ebb-9579-cc223e44d3ab
Connection: keep-alive

{
  "vm_uuid": "4985f9fb-e674-e472-ac02-86e15242d6f7",
  "job_uuid": "a300fa96-a870-401f-91a8-8b2559113a7a"
}
Disable anti-spoofing in Triton
Disabling anti-spoof in Triton can be done in one of two ways:
- from the Operations Portal
vmapifrom the head node
Note: Updating anti-spoofing options will trigger a reboot of the instance in order for the changes to take effect.
Disable anti-spoofing in the Operations Portal
To disable (or enable) anti-spoof on a NIC, login to the Operations Portal dashboard, search for the instance, and navigate to the instance page. For help finding a instance, please see list and find instances using the Operations Portal
On the instance page, scroll down to the Network Interfaces section.
Click on the small edit icon for the NIC you want to update (noted in the image below):
A new window will pop open with the options to choose the network you want to update, and a link to Configure Anti-Spoofing:
When you click that link, you'll be given a set of spoofing options. To allow for IP spoofing, select the Allow IP Spoofing option:
Once you've made your selection, click the Save Network Interface to start the update job. During this time, the instance will be rebooted.
Disable anti-spoofing using VMAPI
To disable anti-spoofing from the head node, use the vmapi command as show below. You will need to obtain the mac address of the NIC to update. See Removing a NIC for details on how to locate the mac address of a NIC).
headnode# sdc-vmapi /vms/:vm_uuid?action=update_nics -d '{
"nics":[{
"mac":"mac_address",
"allow_ip_spoofing":true
}]
}'
Example usage and output:
headnode# sdc-vmapi /vms/4985f9fb-e674-e472-ac02-86e15242d6f7?action=update_nics -d '{
"nics":[{
"mac":"90:b8:d0:6e:8c:86",
"allow_ip_spoofing":true
}]
}'
HTTP/1.1 202 Accepted
Content-Type: application/json
Content-Length: 100
Content-MD5: gVoPpAZLWlEByv+MAnTjCw==
Date: Fri, 14 Mar 2014 20:36:09 GMT
Server: VMAPI
x-request-id: 4643fdc0-abb8-11e3-80c0-d1d28a191fe5
x-response-time: 33
x-server-name: 069caca7-94dc-4ebb-9579-cc223e44d3ab
Connection: keep-alive

{
  "vm_uuid": "4985f9fb-e674-e472-ac02-86e15242d6f7",
  "job_uuid": "1ab06a6e-2b35-4753-99e2-9827e543b6d1"
}
Confirm anti-spoofing changes
There are two ways to confirm that anti-spoofing has indeed been disabled:
ifconfig
The first way is to log in to the instance and run ifconfig.
You should see that the 3PROTECT property is no longer associated with the NIC (as exampled on net0 shown below):
container# ifconfig
lo0: flags=2001000849 mtu 8232 index 1
        inet 127.0.0.1 netmask ff000000
net0: flags=201000843 mtu 1500 index 2
        inet 151.1.224.13 netmask ffffffc0 broadcast 151.1.224.63
        ether 90:b8:d0:6e:8c:86
net1: flags=40201000843 mtu 1500 index 3
        inet 172.16.1.7 netmask ffffff00 broadcast 172.16.1.255
        ether 90:b8:d0:5e:1e:2
lo0: flags=2002000849 mtu 8252 index 1
        inet6 ::1/128
vampi
Alternatively, from the head node, you can use vmapi as shown below:
headnode# sdc-vmapi /vms/4985f9fb-e674-e472-ac02-86e15242d6f7 | json -aH nics
[
  {
    "interface": "net0",
    "mac": "90:b8:d0:6e:8c:86",
    "vlan_id": 100,
    "nic_tag": "external",
    "gateway": "151.1.224.1",
    "ip": "151.1.224.13",
    "netmask": "255.255.255.192",
    "network_uuid": "ff1db258-4747-4bc2-8bfd-d8d69dbdec01",
    "allow_ip_spoofing": true,        <---------- allow_ip_spoofing has been set to 'true'
    "primary": true
  },
  {
    "interface": "net1",
    "mac": "90:b8:d0:5e:1e:02",
    "vlan_id": 200,
    "nic_tag": "internal",
    "gateway": "172.16.1.1",
    "ip": "172.16.1.7",
    "netmask": "255.255.255.0",
    "network_uuid": "27eac077-4589-4604-ae59-69e567a5e9f3"
  }
]
Assigning a specific MAC address or IP address to an instance
In certain circumstances you may need to allocate a particular MAC address or IP address to an instance. Please see custom instance addresses for more information on how to accomplish this.
Obtaining VNC console access to a hardware virtual machine
If you have VNC enabled, and need to gain console access to a hardware virtual machine for access or to troubleshoot a problem that requires console access, you can do so by obtaining the necessary information needed using vmadm, and then utilizing your choice of any VNC client (depending on your OS, etc). In this example, we are using Chicken of the VNC, which is an open source VNC client for Mac OS X.
Each hardware virtual machine will come with VNC information, which can be obtained by running:
computenode# vmadm info 2c712fa0-2e2e-49d1-873c-c090ac7861bf vnc
{
  "vnc": {
    "host": "10.0.97.75",
    "port": 54348,
    "display": 48448
  }
}
To open a console window using Chicken of the VNC, input the host and display information provided by the above output.