Using delegated datasets
Instructions on how to enable an infrastructure container running SmartOS or Container Native Linux for delegated dataset support, as well as how to create, import, and export delegated datasets within the context of that infrastructure container.
Create the instance with delegated dataset support via VMAPI
First, create a json blob to define your container. At a minimum you need to provide
| Key | Value | Description |
|---|---|---|
| owner_uuid | UUID of the account to own the new instance | |
| brand | joyent or lx | containers running SmartOS are always joyent brand, containers running native linux are always lx brand |
| networks | Array of Network UUIDs | One must be set with primary equal to true |
| billing_id | Package UUID | |
| image_uuid | Image UUID | container based images only |
| alias | VM Name | Optional |
| delegate_dataset | true | Tells Triton to allow the dataset to be delegated |
Sample file:
{
  "owner_uuid": "2516f02a-2c72-ed1f-957a-890f37a014a4",
  "brand": "joyent",
  "networks":
     [
        { "uuid": "d34f3fd1-f69d-4613-a29f-9d08f399759e" , "primary": true }
     ],
  "billing_id": "8d205d81-3672-4297-b80f-7822eb6c998b",
  "image_uuid": "d34c301e-10c3-11e4-9b79-5f67ca448df0",
  "alias": "delgator02",
  "delegate_dataset": true
}
Once you've created your json blob, you can create your container using sdc-vmapi as shown below:
# sdc-vmapi /vms -X POST -d @delegator.json
HTTP/1.1 202 Accepted
Content-Type: application/json
Content-Length: 100
Content-MD5: 6vce+OJzggjZZOdmQJOReQ==
Date: Thu, 11 Sep 2014 20:44:16 GMT
Server: VMAPI
x-request-id: 6513aff0-39f4-11e4-b9de-2753486418db
x-response-time: 202
x-server-name: 1cb272df-66bc-41d3-a1d4-4cabc3f4a758
Connection: keep-alive

{
  "vm_uuid": "a879904a-8992-60da-83aa-e559022a656e",
  "job_uuid": "719673c6-4727-46c1-bb45-2d894d0f16c5"
}
Create the instance with delegated dataset support via AdminUI
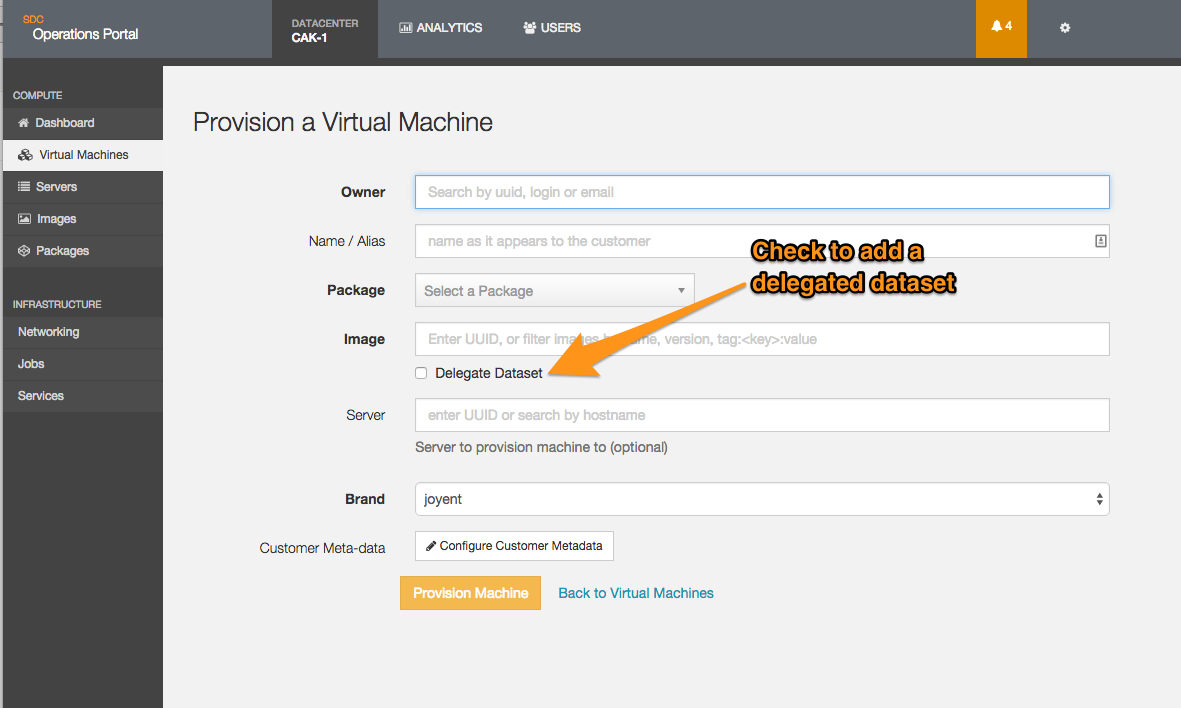
The Operations Portal permits you to add a delegated dataset to an instance by checking the appropriate box as shown below:

Creating a dataset within your instance
Once the instance is running, connect to it as root and list the datasets available:
# zfs list
NAME                                                     USED  AVAIL  REFER  MOUNTPOINT
zones                                                   42.3G  2.63T   594K  /zones
zones/a879904a-8992-60da-83aa-e559022a656e              11.6M  25.0G   421M  /zones/a879904a-8992-60da-83aa-e559022a656e
zones/a879904a-8992-60da-83aa-e559022a656e/data           38K  25.0G    19K  /zones/a879904a-8992-60da-83aa-e559022a656e/data
As you see, we have a 25GB dataset called zones/a879904a-8992-60da-83aa-e559022a656e/data for our instance. We are now going to create a 50MB dataset called logdir, mount it as /logdir, and enable file compression on it.
To accomplish this, we can use standard ZFS commands:
- Create our dataset:
# zfs create zones/a879904a-8992-60da-83aa-e559022a656e/data/logdir- Set the quota:
# zfs set quota=50M zones/a879904a-8992-60da-83aa-e559022a656e/data/logdir- Set the mount point:
# zfs set mountpoint=/logdir zones/a879904a-8992-60da-83aa-e559022a656e/data/logdir- Enable compression:
# zfs set compression=lz4 zones/a879904a-8992-60da-83aa-e559022a656e/data/logdirViewing the dataset
We can now view the dataset through both the zfs list command and the df command as shown:
# zfs list
NAME                                                     USED  AVAIL  REFER  MOUNTPOINT
zones                                                   42.3G  2.63T   594K  /zones
zones/a879904a-8992-60da-83aa-e559022a656e              11.6M  25.0G   421M  /zones/a879904a-8992-60da-83aa-e559022a656e
zones/a879904a-8992-60da-83aa-e559022a656e/data           38K  25.0G    19K  /zones/a879904a-8992-60da-83aa-e559022a656e/data
zones/a879904a-8992-60da-83aa-e559022a656e/data/logdir    19K  50.0M    19K  /logdir

# df -h /logdir
Filesystem                                              Size  Used Avail Use% Mounted on
zones/a879904a-8992-60da-83aa-e559022a656e/data/logdir   50M   19K   50M   1% /logdir
Using the dataset
At this point, the dataset can be used just like any other dataset. If the defined quota is exceeded, you will receive an error on the command that cause the dataset to hit the quota:
# tar cf /logdir/test.tar /big_directory
tar: /logdir/test.tar: Cannot write: Disc quota exceeded
tar: Error is not recoverable: exiting now
Importing a ZFS dataset into your instance
It is possible to import a ZFS dataset into a container that has a delegated dataset if the container has been granted the sys_fs_import privilege. This again requires access to the instance as root.
For this example, we will be using a file containing a ZFS snapshot, although you could also pipe the data into the receive command from a zfs send running remotely.
- Check the file:
# file zfs_test.snap
zfs_test.snap: ZFS snapshot stream- Import the data into your local dataset:
# zfs receive zones/a879904a-8992-60da-83aa-e559022a656e/data/zfs_test < zfs_test.snap- List the dataset:
# zfs list
NAME                                                       USED  AVAIL  REFER  MOUNTPOINT
zones                                                     42.4G  2.63T   594K  /zones
zones/a879904a-8992-60da-83aa-e559022a656e                82.1M  24.9G   432M  /zones/a879904a-8992-60da-83aa-e559022a656e
zones/a879904a-8992-60da-83aa-e559022a656e/data           59.7M  24.9G    19K  /zones/a879904a-8992-60da-83aa-e559022a656e/data
zones/a879904a-8992-60da-83aa-e559022a656e/data/logdir    50.0M      0  50.0M  /logdir
zones/a879904a-8992-60da-83aa-e559022a656e/data/zfs_test 9.66M 24.9G 9.66M /zones/a879904a-8992-60da-83aa-e559022a656e/data/zfs_test- Set the mount point:
# zfs set mountpoint=/zfs_test zones/a879904a-8992-60da-83aa-e559022a656e/data/zfs_test- Access the files:
# df -h /zfs_test/
Filesystem                                                Size  Used Avail Use% Mounted on
zones/a879904a-8992-60da-83aa-e559022a656e/data/zfs_test 25G 9.7M 25G 1% /zfs_test- Set any other ZFS options, such as compression or quota.
Exporting a ZFS dataset from your instance
It is possible to export a ZFS dataset from a container that has delegated dataset support enabled. This again requires access to the instance as root.
For this example, we will be writing our ZFS snapthot to a file, but you could also pipe to a zfs receive command running over ssh to export to another system.
- Check the dataset we want to export:
# zfs list zones/a879904a-8992-60da-83aa-e559022a656e/data/logdir
NAME                                                     USED  AVAIL  REFER  MOUNTPOINT
zones/a879904a-8992-60da-83aa-e559022a656e/data/logdir 50.0M 0 50.0M /logdir- Snapshot the dataset:
# zfs snapshot zones/a879904a-8992-60da-83aa-e559022a656e/data/logdir@snap- Send the snapshot to a file:
# zfs send zones/a879904a-8992-60da-83aa-e559022a656e/data/logdir@snap > zfs_logdir.snap- Check the snapshot:
# file zfs_logdir.snap
zfs_logdir.snap: ZFS snapshot stream- At this point you can compress the snapshot (if desired) and move it, or read it in via
zfs receiveas desired.
