Getting started with access control: portal
Role Based Access Control (RBAC) lets you provide limited access to your Triton account and Triton Object Storage (formerly known as Manta) to other members of your organization.
If you haven't already, be sure to read the RBAC overview, then come back here to continue. Note that the command line interface is more flexible that the portal interface, and there are RBAC actions that are not available in the portal.
In this walkthrough, we'll use the Triton Compute Service portal to:
- create a subuser
- create a role that allows the subuser to log in to the portal
- create a minimal policy
Since we're starting with a blank slate, no subusers, no roles, no policies, it's easier to build each of these components from the bottom up. So we'll start by creating a policy, creating a role that uses that policy, the finally creating a user who assumes that role.
Subusers do not currently work with Docker instances. This functionality will be available in a future version of RBAC.
It is also possible to create users with Triton CLI. You must use Triton CLI to modify permissions for users, as that feature is not availble in the portal.
Creating the login policy
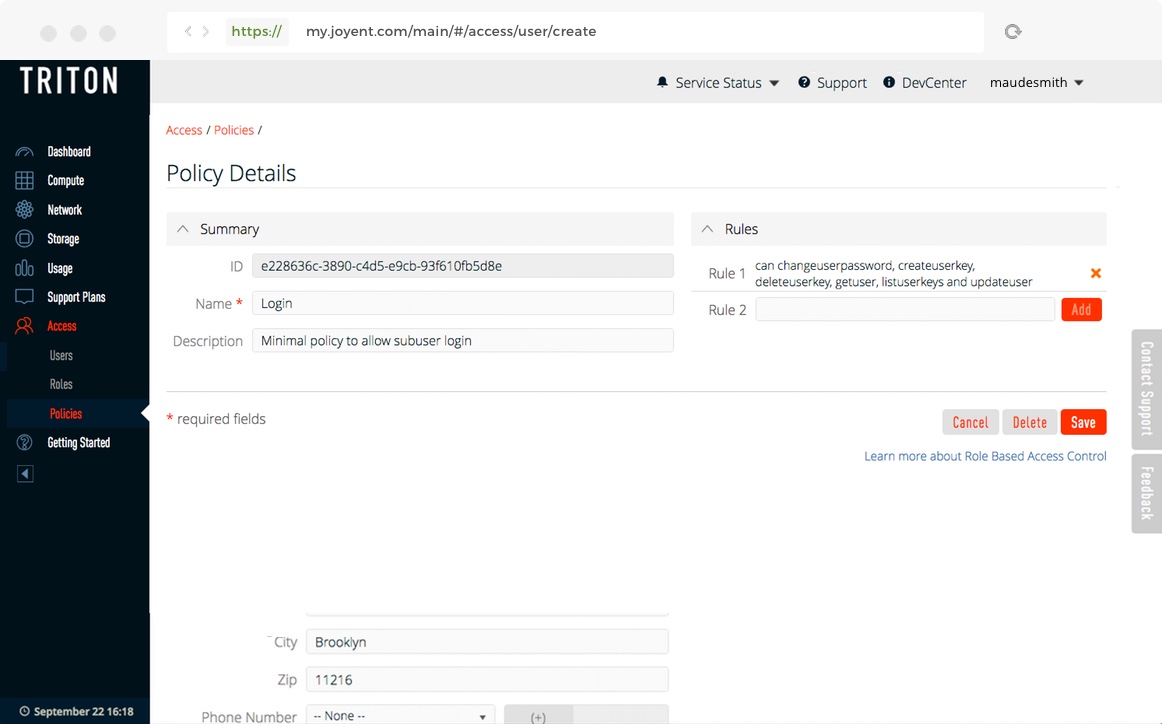
First, we'll create a policy that allows a subuser to log in to the portal and to update their user information and SSH keys
- Click Accounts in the left navigation pane.
- Click Policies.
- Click Create Policy in the upper right corner.
- Name the policy "Login".
-
Add the following rules. Make sure that you spell the actions like
getusercorrectly. Rules are case sensitive. The capitalizedCANis a convention. Important: The asterisk (*) at the end means "any resource" and is required for the rule to work.CAN changeuserpassword, createuserkey, deleteuserkey, getuser, listuserkeys, and updateuser *You can also enter the rules on separate lines, but each line must include the
*:CAN changeuserpassword *CAN createuserkey *CAN deleteuserkey *CAN getuser *CAN listuserkeys *CAN updateuser *
- Click Create Policy to create the policy.
- The policy "Login" will appear in the list of policies.
You can learn more about policies in Working with policies, and you can learn about the available rules in Working with rules.
Creating a basic user role
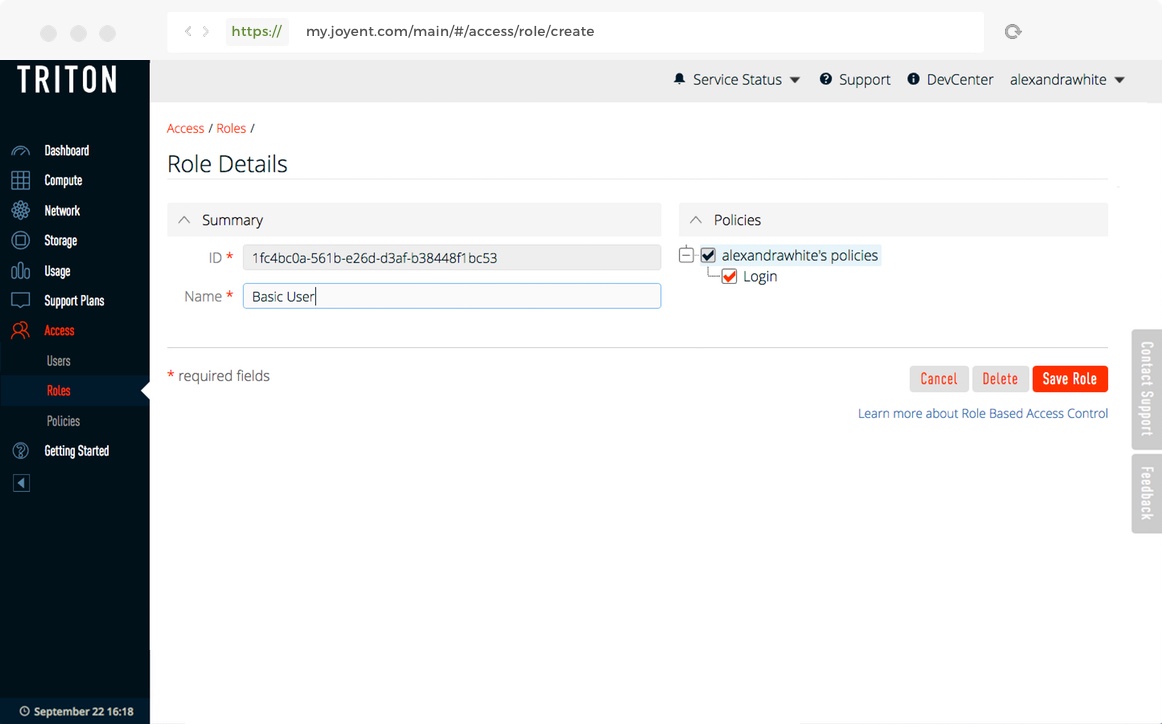
Next, we'll create a role named "Basic User" that uses the "Login" policy.
- Click Roles in the left navigation pane.
- Click Create Role in the upper right corner.
- Create a role named "Basic User".
- Expand the list of policies by clicking on the
+. You should see the "Login" policy you created earlier. - Check the "Login" policy to make it part of the role.
- Click Create Role to create the role.
- The role "Basic User" will appear in the list of roles.
A role must have a name. You can create a role without policies or users.
You can learn more about roles in Working with roles.
Creating a user
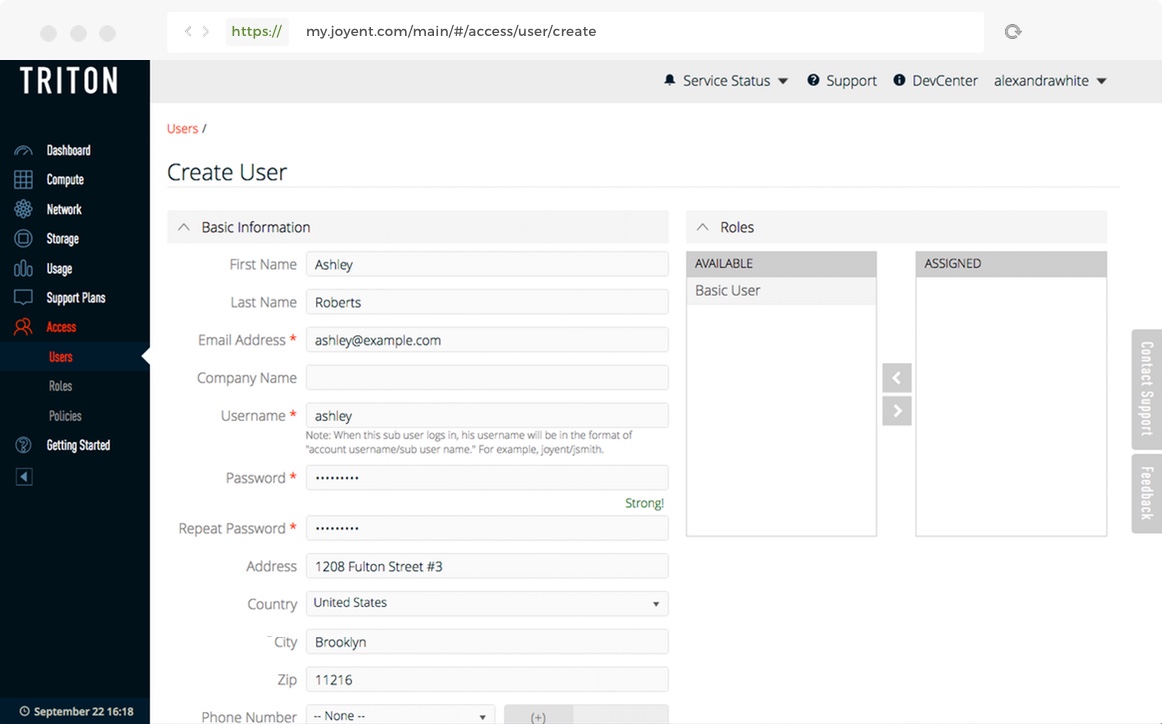
Now, we'll create a user and assign them the "Basic User" role.
- Click Users in the left navigation pane.
- Click Create User in the upper right.
-
Fill out the form. Some of the fields will be filled with data from the main account. You must provide at least the following fields:
- Username
- Email Address
- Password
- Country
- You'll see the "Basic Role" you created earlier in the list of available roles. Click it to move it to the list of assigned roles.
- Click Create User at the bottom of the form.
The subuser will appear in the list of users.
You can learn more about users in Working with users.
Logging in as a subuser
We suggest using a different browser than the one logged into your Triton account. Otherwise, log out of the arYou may want to do this part in a different browser than the one you used to create the user. Otherwise log out of your Triton account.
To log in as a subuser, append /subusername to the account owner's accountname, and use the subuser's password. For example, if your Triton account name is thejungle and the subuser's username is george, you would log in as thejungle/george.
If you followed the steps above, you should be able to log in as the subuser. In this walkthrough we created a role that uses a policy that provides the minimum permissions for a subuser to log in. The subuser can view and modify their own information, such as changing the password, but nothing else. The subuser will not be able to list or create instances, work with Triton Object Storage, or create other users.
If a subuser doesn't have any roles that allow them to log in, they'll be redirected to an "Access Denied" page.
If a subuser forgets their password, they can use the reset password link, and use <account>/<subuser> in the user name field.
In the next section we'll add policies that allow more actions and create roles that use those policies.
Adding more roles and policies
The "Basic User" role is very limited. It doesn't allow the subuser to do anything useful. In this section we'll create some new roles and the policies to go with them.
Adding a support role
Suppose we want people in our support department to be able to see all instances in the account, start and stop them, but not be able to create new instances. We already have the "Login" policy that allows subusers to log in to the portal. Now let's add policies that allow starting and stopping instances, and listing them.
The first policy is "Listing". It allows listing of anything in the datacenter.
CAN getaccount, getnetwork, listdatacenters, listmachines, listpackages, listnetworks, listimages, and listfirewallrules *Or as separate rules (each must include the *):
CAN getaccount *CAN getnetwork *CAN listdatacenters *CAN listmachines *CAN listpackages *CAN listnetworks *CAN listimages *CAN listfirewallrules *
Note: The getaccount and getnetwork actions are needed in order to allow listing in the portal.
The next policy is "Reboot". It allows starting, stopping, and rebooting instances.
CAN startmachine, stopmachine, rebootmachine, and getmachine *Or as separate rules:
CAN startmachine *CAN stopmachine *CAN rebootmachine *CAN getmachine *
Note: The getmachine action is needed in order to allow the portal to get the current state of an instance.
Adding an operator role
We want some of our subusers to be able to create instances. We'll create a new policy called "Creating" and a new role called "Operator".
The "Creating" policy looks like this.
CAN createmachine, deletemachine, getmachine, and listkeys *Or as separate rules:
CAN createmachine *CAN deletemachine *CAN getmachine *CAN listkeys *
Note: The listkeys action is needed by the portal.
The "Operator" role uses all of the policies we've defined.
Differences between using the portal and CLI
There are some things that you can do with the RBAC command line interface that you cannot do in the portal.
- When a user is assigned a role, the user is added to both the default members list and the members list.
- Users cannot assume roles if they are not in the default members list.
- The portal interface automatically associates roles with every resource in the account.
- The portal does not give the ability to assign permissions to users.