Firewall
Triton's firewall rules enable you to secure instances by defining network traffic rules to control inbound and outbound connections. By default, firewall rules are not automatically enabled on new instances provisioned with CloudAPI. You can enable, define, and edit firewall rules in the Triton Compute Service portal or by using Triton CLI. If you could like watch and learn how to configure a cloud firewall using the portal.
This page covers firewall rule basics. Read the firewall rules reference document for details on how to create rules and read the firewall rule examples for sample use cases.
NOTE: Firewall rules are automatically created and enabled for Docker containers based on the exposed port specifications in the Dockerfile. For more information, see the Optimizing Docker operations for Triton blog post, Docker API documentation, and networking FAQs.
Default firewall policy
Without a firewall enabled, each instance allows all inbound and all outbound traffic. When firewall rules are enabled, three default rules apply:
- Block all inbound traffic. This rule blocks traffic from any source to all instances.
- Allow all outbound traffic. This rule allows traffic from any instance through to any destination.
- Allow ICMP type 8 code 0. This rule enables you to ping an instance.
Rule syntax
Getting familiar with the rule syntax ensures that you create rules that apply as you expect. Triton firewall rules have the following syntax:
FROM <target a> TO <target b> <action> <protocol> <port>You can associate rules with instances (or instances with rules) using target criteria such as tags, instance IDs, or the ALL VMS keyword. Target criteria include:
- Instances
- IP addresses
- TCP, UDP, or ICMP, ESP, and AH ports
- Tags
- Subnets
- All VMs in a data center
The Firewall Rules Reference document describes firewall rule syntax in more detail.
The words FROM, TO, and the action name (such as ALLOW or BLOCK) do not have to be capitalized when creating a new rule. Triton will automatically normalize and update the syntax once created.
Creating and managing firewall rules in the Triton Compute Service portal
You can enable and manage firewall rules for a data center, an instance, or a group of instances in the Triton Compute Service portal.
Before you get started creating and managing rules, read the firewall rules reference document to learn how to define a rule.
Enabling or disabling the firewall feature
Before you create firewall rules, you must enable the feature for the data center and for each instance to which the rules apply.
To enable the firewall rules feature for an instance:
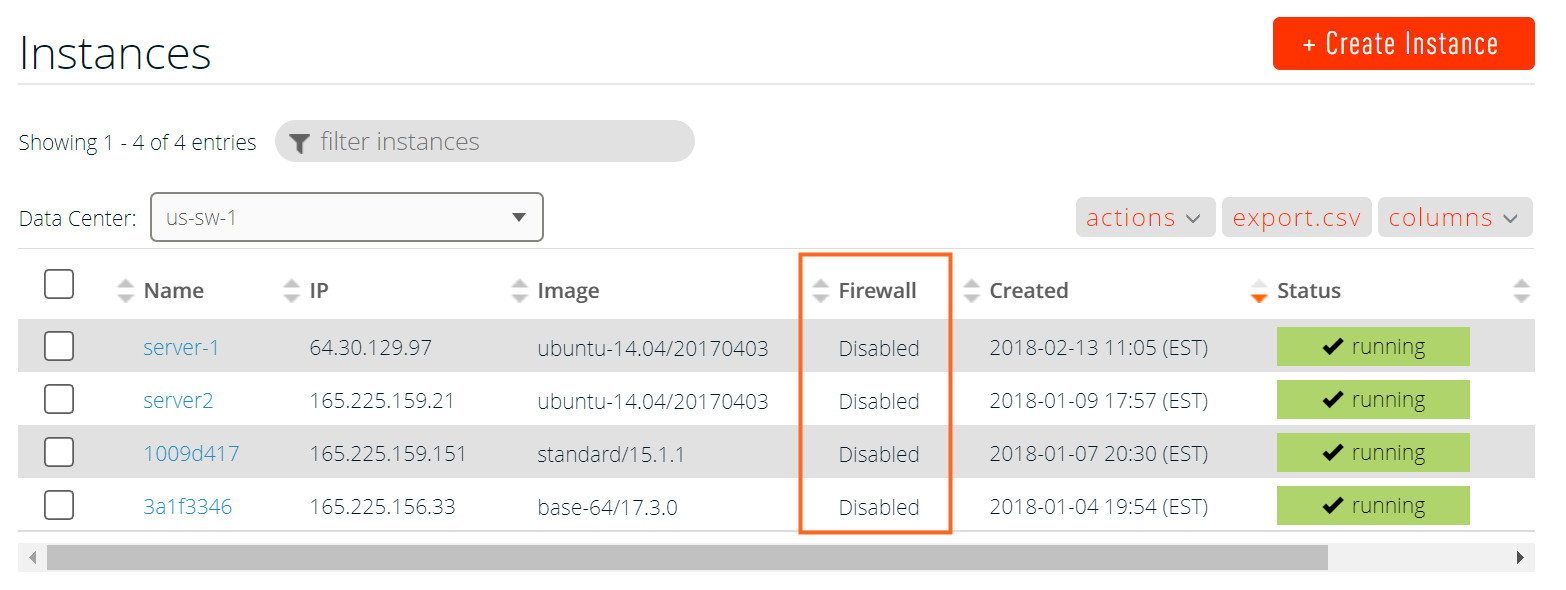
- Navigate to the Instances page of the Triton Compute Service portal. The Firewall column of the Instances list displays the firewall rule status for every instance.
- Click the Name of the instance.
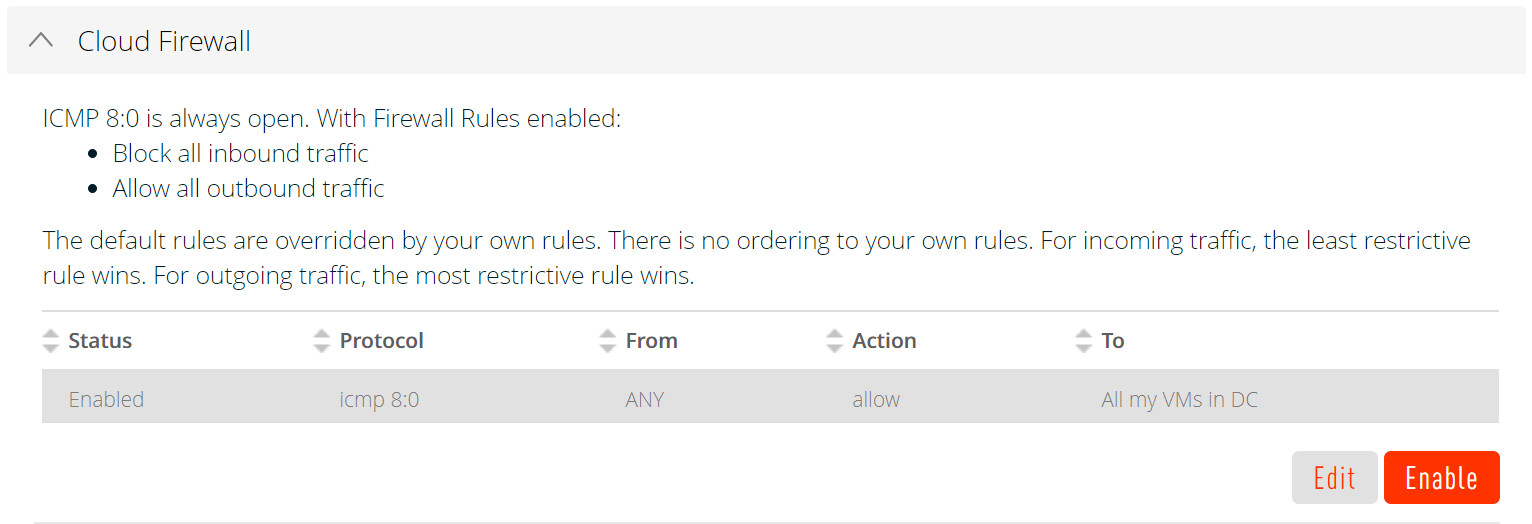
- Select the Cloud Firewall section.
- Click Enable.
To disable the firewall rules for an instance in the Triton Compute Service portal, navigate to the Firewall Rules section for the appropriate instance and disable the firewall.
Create firewall rules
Triton firewall rules are similar to other firewall rules such as Packet Filer (PF) or IPFilter. Remember that once enabled, the default behavior for inbound connections is to block everything. The default behavior for outbound connections is to allow everything. You must add rules to define inbound connections and outbound connections.
To create firewall rules in the portal:
- From the left-navigation menu, click Network and then select Firewall. The Cloud Firewall page enables you to filter firewall rules by data center. You can view the rules you assigned to instances by data center or within all data centers.
- Select a data center, and then click Add New Rule.
- Select a rule Status.
- Choose the Data Center that the rule will apply to.
- Select the Protocol. Click Add.
- Select the From to specify the traffic source. Click Add From.
- Choose the Action. Click Add.
- Select the To to specify the traffic destination. Click Add To.
- Enter the Port number(s). Click Add.
- Click Create Rule.
- If you created the rules as Disabled, click Enable to enable it.
Enable and disable rules
In the portal, you can choose the rule status. Select Enabled to put a rule into effect immediately. If you want to create a rule but enable it later, select Disabled.
To enable or disable a firewall rule in the portal:
- Choose Firewall from the Triton Compute Service portal menu.
- Locate the rule you want to enable or disable in the list of rules.
- Click the Enable or Disable button.
List rules
To see all firewall rules that apply to a machine, navigate to the Instance Details page of an instance:
- From your list of instances, click on the name of an instance.
- Expand the Cloud Firewall section.
All of the rules that apply to the machine are listed in the Firewall Rules section.
Edit firewall rules
To update firewall rules:
- Choose Firewall from the Triton Compute Service portal menu.
- Locate the rule you want to edit in the list of rules.
- Click Edit.
- Follow the prompts to edit the rule.
Delete firewall rules
To delete firewall rules:
- Choose Firewall from the Triton Compute Service portal menu.
- Locate the rule you want to delete in the list of rules.
- Click Delete.
Firewall rule commands require a unique identifier, such as the instance id or UUID, SHORTID, or NAME. This information is available for each instance.
List instances command
To see a list of triton instances, run triton instance list. The output lists the instances for your account and enables you to obtain the SHORTID and NAME.
$ triton instance list
SHORTID   NAME      IMG                    STATE    FLAGS  AGE
3a1f3346  3a1f3346  base-64@17.3.0         running  F      11w
1009d417  1009d417  standard@15.1.1        running  -      11w
c85da785  server2   ubuntu-14.04@20170403  running  -      11w
4f3a2681  server-1  ubuntu-14.04@20170403  running  -      6w
The FLAGS column indicates the firewall rule status. F indicates an enabled status. If there are no flags, the firewall rules for the instance are disabled.
Instance details command
To find the full UUID for an instance, run the command triton instance get <instance> where <instance> is the SHORTID or NAME of the instance. This example shows the JSON payload (output) for server-1, which contains the UUID as "id" and other details.
$ triton instance get server-1
{
    "id": "4f3a2681-a9e9-c2bc-e64f-da5c57950a8e",
    "name": "server-1",
    "type": "smartmachine",
    "brand": "lx",
    "state": "running",
    "image": "04179d8e-188a-11e7-af4a-1349e98cbd17",
    "ips": [
        "64.30.129.97",
        "192.168.27.167"
    ],
    [...]
}
Create firewall rules command
To create a firewall rule, run triton fwrule create with the appropriate rule syntax. For example:
$ triton fwrule create "FROM any TO tag www ALLOW tcp (port 80 and port 443)"
Created firewall rule f5653bef-2e91-4c07-a1a5-2f5fc81aeaf3
When you create a rule using triton, it is automatically granted an enabled status. You have the option to create rules in a disabled status and enable them at another time to better control when rules are put into effect.
To create rules in a disabled status, run triton fwrule create with the -d flag:
$ triton fwrule create -d "FROM any TO all vms ALLOW tcp PORT 22"
Created firewall rule 93cbb439-b539-4b4e-b809-966394630ff6 (disabled)
Enable firewall rules command
The command to enable firewall rules for an instance is triton instance enable-firewall <instance> where <instance> is the UUID, SHORTID, or NAME.
For example:
$ triton instance enable-firewall server-1
Enabling firewall for instance "server-1"
If you run triton instance list, the output shows the F flag indicating that firewall rules are enabled for server-1.
$ triton instance list
SHORTID   NAME      IMG                    STATE    FLAGS  AGE
3a1f3346  3a1f3346  base-64@17.3.0         running  F      11w
1009d417  1009d417  standard@15.1.1        running  -      11w
c85da785  server2   ubuntu-14.04@20170403  running  -      11w
4f3a2681  server-1  ubuntu-14.04@20170403  running  F      6w
To create a rule that allows you to log into your machines using SSH, run:
$ triton fwrule create "FROM any TO all vms ALLOW tcp PORT 22"
Created firewall rule 3a1f3346-b700-4032-f86c-ea3173eedf8a
Disable firewall command
The command to disable firewall rules for an instance is triton instance disable-firewall <instance> where <instance> is the UUID, SHORTID, or NAME.
You can define a rule, disable it, and then enable it when you are ready to implement it. You can also disable active firewall rules.
To disable firewall rules using the instance name:
$ triton instance disable-firewall server-1
Disabling firewall for instance "server-1"
You can disable a specific rule using the firewall rule ID, which you can obtain with triton fwrules -l.
To disable a currently active rule, run triton fwrule disable <FWRULE-ID>.
$ triton fwrule disable 037740ed-fe54-4ff6-8507-a1896571415c
Created firewall rule 037740ed-fe54-4ff6-8507-a1896571415c (disabled)
List all rules commands
You can list firewall rules to help manage what rules you have and how they apply. Firewall rules are assigned a unique ID on creation, FWRULE-ID, which you reference in the commands run to manage your firewall rules.
To list rules to obtain the FWRULE-ID, run:
$ triton fwrules -l
ID                                    ENABLED  GLOBAL  RULE
680a5224-fde8-4e08-b251-95d696dbc0f5  true     -       FROM any TO all vms ALLOW tcp PORT 22
b9c25d17-ecef-4ee1-8931-09c26e847606  true     -       FROM subnet 172.16.0.0/24 TO all vms ALLOW tcp PORT all
47e8a50b-1fb7-4147-a42a-3aa8768086a3  true     -       FROM tag "sdc_docker" TO tag "sdc_docker" ALLOW tcp PORT all
3535e168-5a34-406f-bce3-d39c59d9736c  true     -       FROM tag "sdc_docker" TO tag "sdc_docker" ALLOW udp PORT all
8197c46e-f731-4090-8543-c1584b64fd4b  false    -       FROM vm c85da785-6310-44a8-e95b-f0a97afa57be TO all vms ALLOW tcp PORT all
The triton fwrule list command lists also displays all of the rules associated with your account, organized by SHORTID.
List all rules for an instance command
The triton instance fwrules <instance> command lists all rules that have been defined for a specific instance.
To list the firewall rules that apply to an instance:
$ triton instance fwrules 98338d48-d2a7-4e17-bbc7-b44054b04503
SHORTID                               ENABLED  GLOBAL  RULE
3473327e-6d0c-4747-97c5-ced1260a7e42  true     true    FROM any TO all vms ALLOW icmp TYPE 8 CODE 0
58dfcdf6-0a39-494a-8856-ff3169806954  true     -       FROM all vms TO all vms ALLOW tcp PORT all
4ecbc8ee-6621-4b68-b659-e9e631129480  true     -       FROM any TO vm 98338d48-d2a7-4e17-bbc7-b44054b04503 ALLOW tcp PORT 22
Refer to the Firewall Rules Reference document for the complete list of firewall rule commands.
Update rules command
To edit a firewall rule, use the triton fwrule update command. Note that you must specify the entire rule, not just the part that you're changing.
$ triton fwrule update 037740ed-fe54-4ff6-8507-a1896571415c rule="FROM all vms TO tag db ALLOW tcp port 5432"
Updated firewall rule 037740ed-fe54-4ff6-8507-a1896571415c (fields: rule)
Delete rules command
To delete a firewall rule, use the triton fwrule delete command. Note that this command does not produce any output if it is successful.
$ triton fwrule delete 037740ed-fe54-4ff6-8507-a1896571415c
Delete firewall rule "037740ed-fe54-4ff6-8507-a1896571415c"? [y/n] y
Deleted rule 037740ed-fe54-4ff6-8507-a1896571415c
$ triton fwrule delete 037740ed-fe54-4ff6-8507-a1896571415c
Delete firewall rule "037740ed-fe54-4ff6-8507-a1896571415c"? [y/n] y
triton fwrule delete: error: first of 1 error: Rule not found
Rule precedence
The default firewall rules have a priority level of 0, which means that the firewall rules you define always take precedence over the default rules. In general, rules are not evaluated in order but by how restrictive they are.
-
Inbound: For incoming traffic, the least restrictive rule wins. The default rules for incoming traffic block everything, so any rule that allows incoming traffic is less restrictive.
- Outbound: For outgoing traffic, the most restrictive rule takes precedence. The default rules for outgoing traffic allow everything, so any rule that blocks outgoing traffic is more restrictive.
You can prioritize firewall rules to define the order in which rules should apply. The Firewall Rules Reference document describes how to set priority levels.
Frequently asked questions
This section answers some questions you may have about Triton firewall rules.
What is the relationship between Triton's firewall rules and IPFilter?
Triton's firewall rules apply to all the instances in the same data center that have the firewall feature enabled. IPFilter rules apply only to the instance in which they are defined.
For incoming traffic, the firewall rules set with Triton are applied first. If an instance has IPFilter rules, they are applied next.
                  +----------+         +----------+
                  | Cloud    |         | instance |
  Internet ------>| Firewall +-------->| IPFilter +------> instance
                  | Rules    |         | rules    |
                  +----------+         +----------+
For outgoing traffic, any IPFilter rules defined for the instance apply first and then the Triton firewall rules are applied.
                  +----------+         +----------+
                  | Cloud    |         | instance |
  Internet <------+ Firewall |<--------+ IPFilter |<------ instance
                  | Rules    |         | rules    |
                  +----------+         +----------+