NFS shared storage
Tasks:
- Review for correctness in the current context
- Reformat as markdown
Old content
If you plan to run your SmartMachine or VM in a production environment, you should consider a storage solution that utilizes Network File System storage (NFS). MNX hosts NFS storage that you can use as part of your backup strategy.
To setup NFS space, you must contact MNX support to setup a mount and whitelist your IPs. You can request a subnet Virtual LAN (VLAN) of private IP's that MNX will whitelist. This allows customers to provision a dataset that is on the VLAN and have access to the NFS mount.
| MNX recommends that you only use NFS space for archiving data. Avoid hosting your production files off of an NFS store. |
|---|
The way you add systems to an NFS mount varies depending on the environment.
SmartOS
To add SmartMachines to an NFS mount:
- Ensure NFS is enabled through SMF:
svcadm enable rpc/bind nfs/client nfs/status nfs/nlockmgr - Create a mount point:
mkdir /shared - Create an entry in
/etc/vfstab: <``` 10.10.10.10:/vol/- /shared nfs - yes - - Mount the share:
mount /shared - Verify filesystem is mounted:
gdf -h - Test the mount by accessing a file in the share.
Debian flavored Linux (Ubuntu)
To add Debian flavored Linux VMs to an NFS mount:
- Ensure the NFS package is installed:
apt-get update apt-get install nfs-common - Create a mount point:
mkdir /shared - Create an entry in
/etc/fstab:10.10.10.10:/vol/<UUID> /shared nfs rw,users - Mount the share:
mount /shared - Verify the filesystem is mounted:
df -h - Test the mount by accessing a file in the share.
RedHat flavored Linux (CentOS, Fedora)
To add RedHat flavored Linux VMs to an NFS mount:
- Ensure the NFS package is installed:
yum install nfs-utils nfs-utils-lib - Create a mount point:
mkdir /shared - Create an entry in
/etc/fstab:10.10.10.10:/vol/<UUID> /shared nfs rw,users,nolock - Mount the share:
mount /shared - Verify filesystem is mounted:
df -h - Test the mount by accessing a file in the share.
| 
chkconfig --level 345 netfs on
chkconfig --level 345 nfs on
|
Microsoft Windows
Microsoft Windows includes a service for NFS but you will need to enable it first. The following TechNet article provides more information on enabling the NFS service in Windows.
http://technet.microsoft.com/en-us/library/cc753302(v=ws.10).aspx
| You will need to contact MNX support for the NFS server IP and volume. |
|---|
To use NFS from a Windows machine, you will need to modify the registry so that Windows has rewrite access to the NFS share. The reason for this is the anonymous UID and GID for the Windows client to access an NFS share is set to -2 by default. You will need to set this to a value of 0.
- Click Start > Command Prompt
- In the Command Prompt, run regedit.
C:\Users\Administrator\>regeditThis will open the Registry Editor.
- In the registry editor, navigate to HKEY_LOCAL_MACHINE > SOFTWARE > Microsoft > ClientForNFS > CurrentVersion > Default

- In the default directory, click Edit > New > DWORD (32bit) value.

- Add two DWORDs:
AnonymousUidandAnonymousGid - For each new DWORD, click Edit > Modify...
- In the Value Data field, set the value to 0.

- Restart the NFS service client or restart your Windows machine.
You can mount the NFS share by running this command from the Command Prompt:
mount <NFS_Server_IP>:<Share_Path> <Mount_Point>For example:
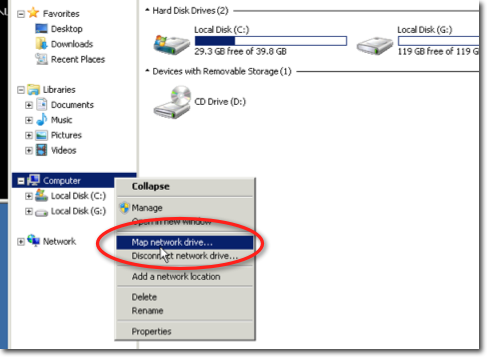
mount 192.168.31.254:/vol/joyfb7fff88_ae36_4c25_9d4b_df6e3c64efc2 z:You can also map to an NFS share through Explorer using

| To setup your mounts so that they persist after a reboot, you need to set up a script that mounts shares on boot. You can find more information about setting up a script here. |
|---|
Windows 2012 GUI mapping of network drive:
1.) Right click on My Computer Icon, and Map Network Drive 2.) Choose a drive letter and insert

